AI Visual Check
|
|
NOTE: AI Visual Check is currently in beta. All beta requests must be directed through your OpenEye Sales Representative.
NOTE: An existing license for AI Visual Check as an add-on service is required. See Manage Products for more information.
Try Visual Check
AI Visual Check is available to test. To test prompts and scenarios, go to Alerts > Alert Rules, and click Try AI Visual Check.

Select Camera from the dropdown and enter a prompt to search video from that camera. See How to Write Better Prompts for AI Visual Check for more information.
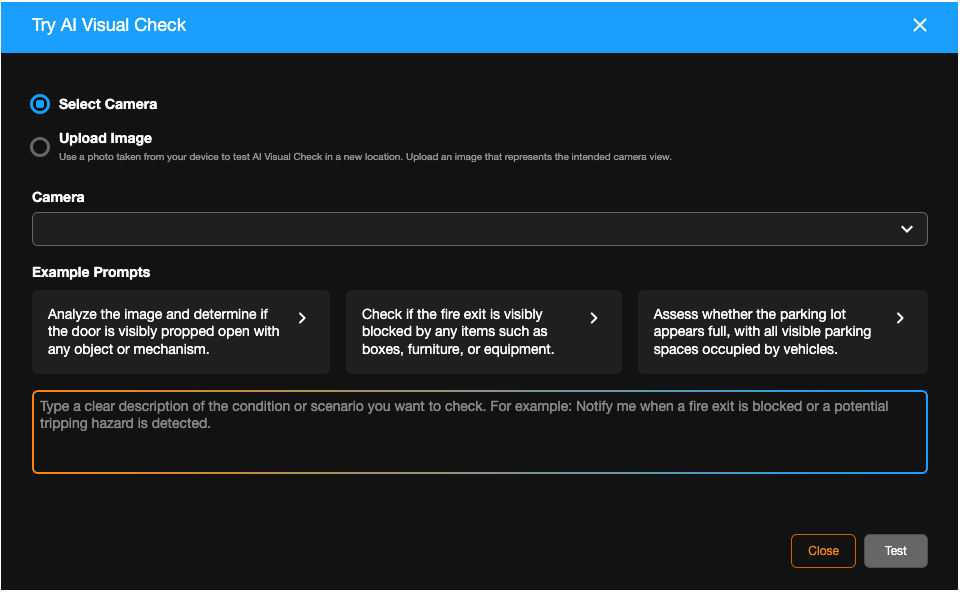
Upload Image to search images with a prompt. Use a photo taken from your device to test AI Visual Check in a new location. Upload an image that represents the intended camera view.

After entering a prompt for either a camera or an image, click Test.
Enabling AI Visual Check
Go to Management > Location Management > Locations > Analytic Options.
This analytic option enables AI Visual Check for the location and allows users to create visual check rules at that location to perform automated visual analysis.

Select AI Visual Check to enable.
NOTE: AI Visual Check requires the address for the location to be set.
Creating an AI Visual Check Alert Rule
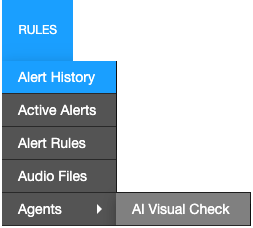
- Under Rules, select Agents > AI Visual Check from the dropdown menu.
- Create a Custom Prompt or select from a Template Prompt, and click Next.

- Name the alert and give it a Description.
NOTE: A Prompt Template will automatically have a Name and Description, but can be customized as needed.

- Click Create.

Defining an Alert Rule: AI Visual Check
Cameras

- Click Cameras on the navigation sidebar.
NOTE: The Rule Usage Estimate and Estimated Credits Remaining displays above the camera list. Totals reflect the overall monthly credits, the credits per check, and the credits remaining. Credit usage is based on the number of cameras, check frequency, and the complexity of the alert rule's context (sample image / image size).
- Select a location from the dropdown.

- Click Add Camera.
NOTE: Click Select All to include all cameras in the Rule.
- Click Select when finished.

NOTE: Click Manage  after adding a camera to go directly to the corresponding device.
Rule Definition

- Click Rule Definition on the navigation sidebar.
- Enter a text description of the conditions that should trigger the alert. See How to Write Better Prompts for AI Visual Check for more information.
- Optional: Add a Reference Image.
NOTE: Add a reference image to show what should or should not trigger the alert. This can improve results, but uses additional credits.
- Optional: Click Test this rule to test cameras or images selected for the alert.

- For Analyzed Image Quality, select Standard (Recommended), High or Ultra.
NOTE: Standard is recommended for most checks. High and Ultra increase costs and generally work best when paired with a reference image.
- For Schedule, select Custom Hours, Location Hours, or Point in time.
- For Custom Hours, set Frequency by minutes, hours, or daily, and customize the schedule.
- For Location Hours, select Only when location is closed or Only when location is open, and set Frequency by minutes, hours, or daily.
- For Point in time, customize the schedule.
- Active Alert (Optional): Check the Active Alert box to add the alert to the Active Alert Dashboard and tag it as an Active Alert in email notifications.
- Activate Relay on originating device (Optional): Check the Activate Relay on originating device box to activate a relay when an alert is generated. See Activating a Relay for an Alert Rule for more information.
- Send To Third-Party Integration (Optional): Check the Send To boxes to send the alert to the associated third-party integration.
- Activate LEDs on originating device and Enable audio deterrent playback on originating device (Optional): Check to enable active deterrence on compatible cameras.
- Click Save.
Add Users to an Alert Rule
NOTE: Adding Users to a rule automatically grants them permission to view alerts for cameras and locations they have access to based on their User Group permissions.
- Click Users/Notifications on the left-hand menu.

- Click Add User or Add Group.

- Click + next to each User or Group to send emails and push notifications when the alert is triggered.

- Click Add when finished.
NOTE: To receive email, push or client alert notifications, the Email Alert, Push Alert or Client Alert box must be checked. Simply adding a user only gives them access to see this alert’s history. See Alert Notifications for details.
General Info
- Click General Info on the navigation sidebar.

- Edit the Name and Description as desired.

- Click Disable Rule to turn the Alert Rule off without deleting it.
- Click Delete Rule to permanently remove the Alert Rule and delete all history associated with it.
- Click Clear All Active Alerts to permanently remove only the Active Alerts from the history associated with the Alert Rule.
- Click Save when finished.
NOTE: The Name given to an alert will appear as the subject line of email notifications sent by that alert.