Alarm.com Integration Instructions
Requirements
Alarm.com customer accounts need a Service Package of either Commercial or Commercial Plus and have OpenEye Cloud Connect added to the service package in order to link Alarm.com accounts to OWS.


Adding OpenEye Cloud Connect to the Alarm.com Partner Portal
- Log in to the Alarm.com Partner Portal.
- In Customer Management > Search Customer/Device, search for a customer by entering customer information in Find Customer.

- Click Search.
- Click on the customer information row in Results.

- Go to Customer Support > Service Package > Change Service Package.

- Use the dropdown to choose Commercial or Commercial Plus from an available Base Package.

- Scroll down on the same Service Package page and check OpenEye Cloud Connect.

- Click Save Changes.
OWS Integration Configuration
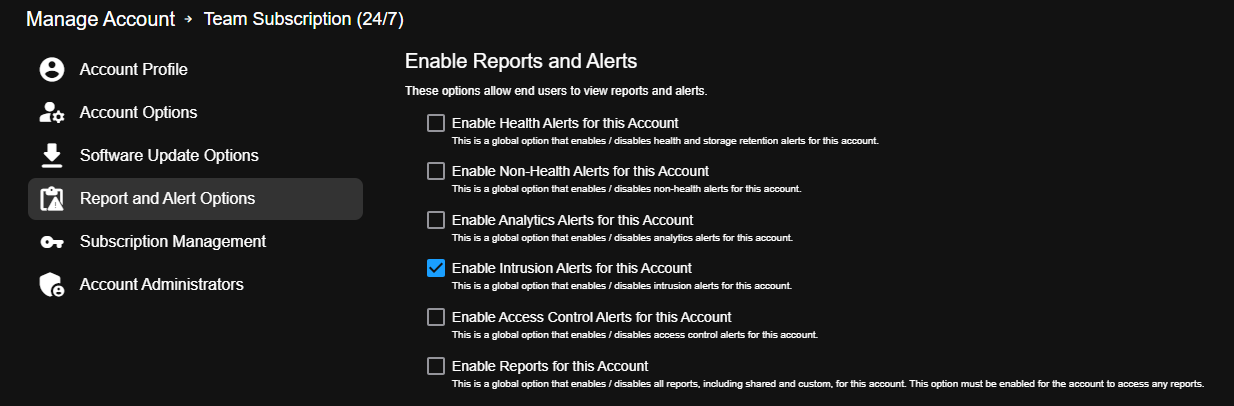
NOTE: Intrusion Alerts will need to be enabled for the account before the Alarm.com integration can be configured. See Managing Customer Accounts for more information.
Enable Alarm.com in OWS
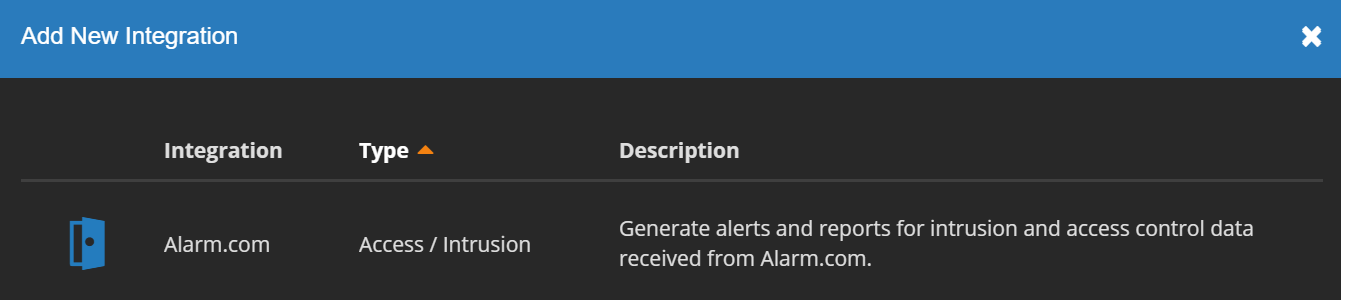
Go to Integrations in the End User Portal.
- Select Alarm.com and then click Next.
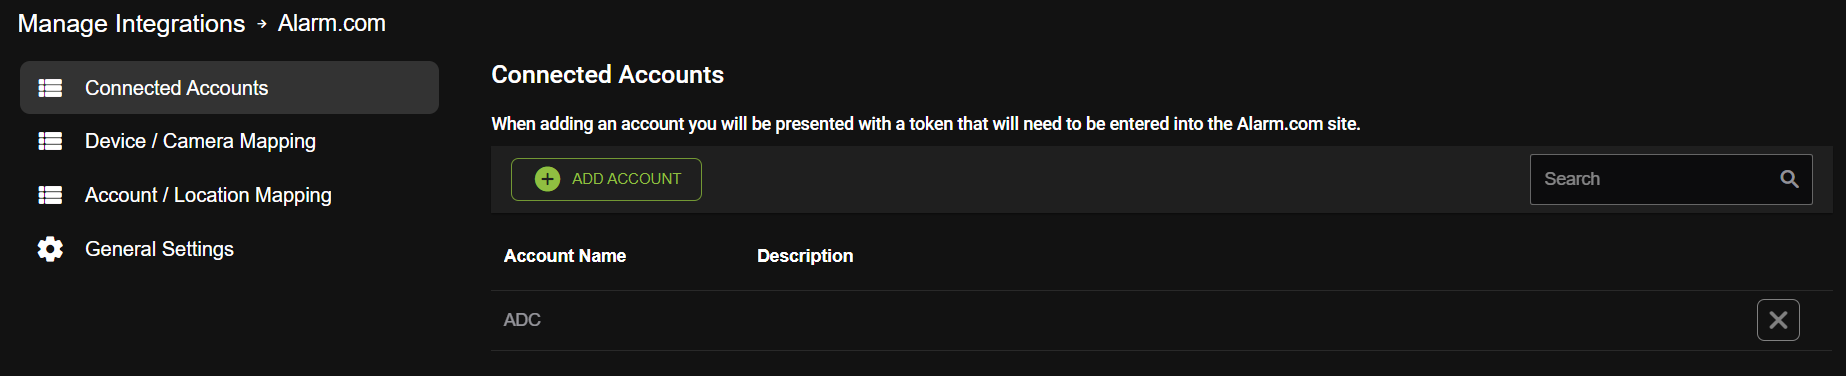
- To make changes to the Integration, click Edit from Manage Integration.

- In Connected Accounts, click Add Account to receive a token to enter in your Alarm.com account.
NOTE: Access Tokens are good for 24 hours. New tokens can be created at any time, including before a previous token has expired. Each new token will be usable for 24 hours upon creation.
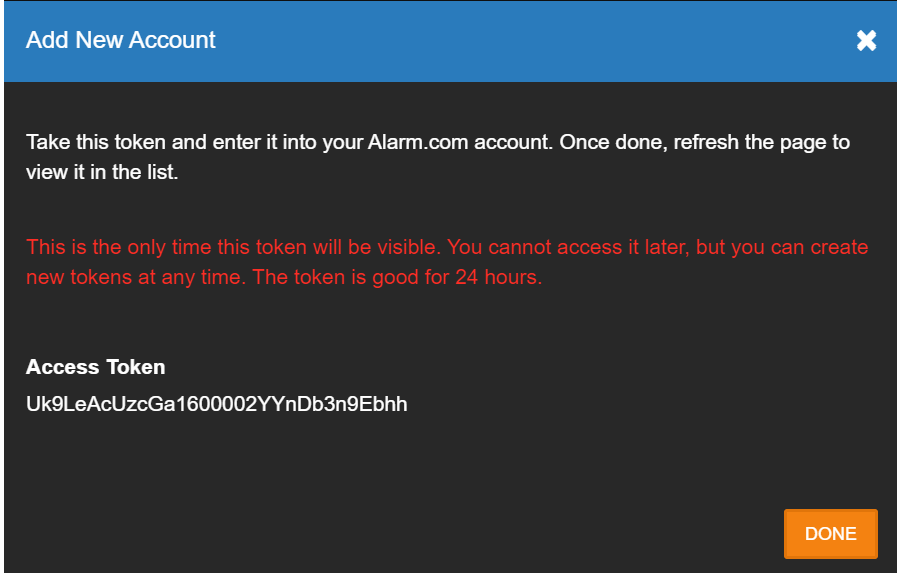
- Enter the Access token in the Alarm.com Partner Portal.

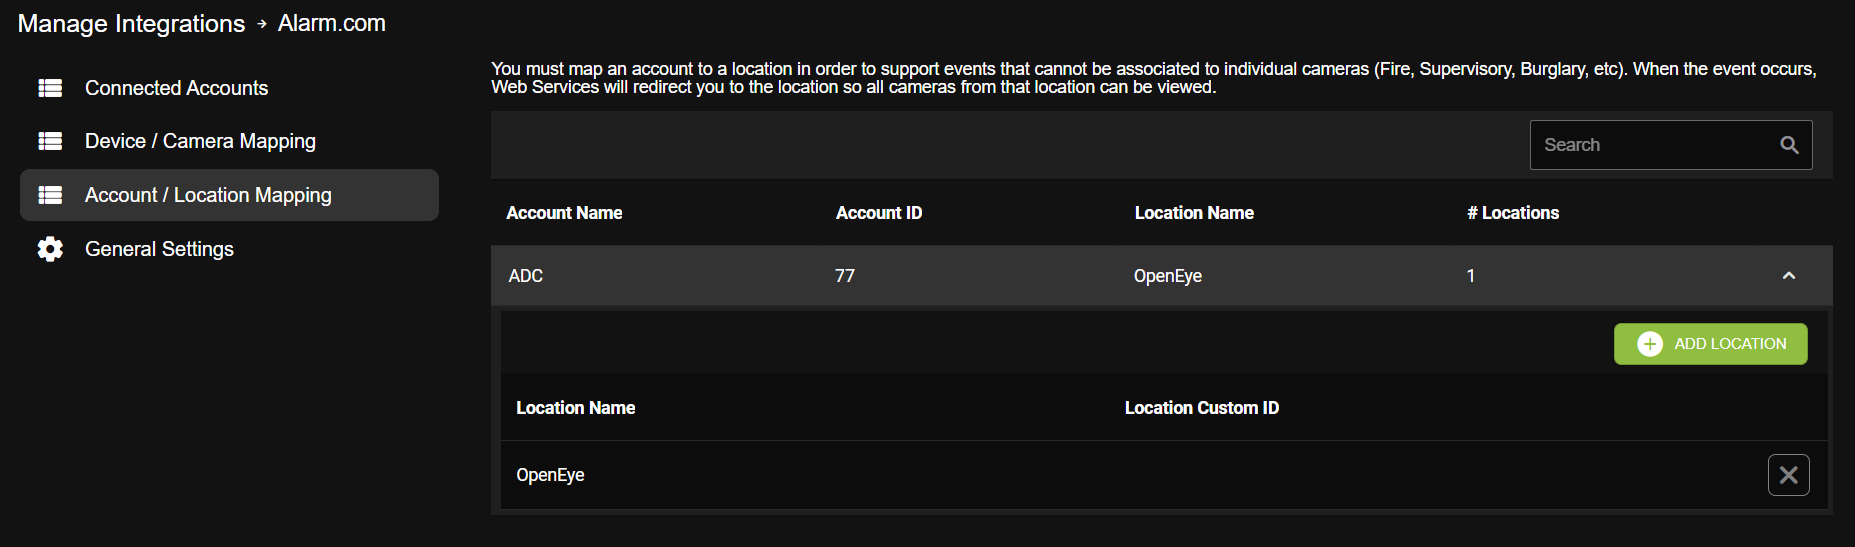
- Once the accounts are linked, Account / Location Mapping allows user to map locations to the 3rd party account. Select the dropdown on the Account Name and select Add Location.
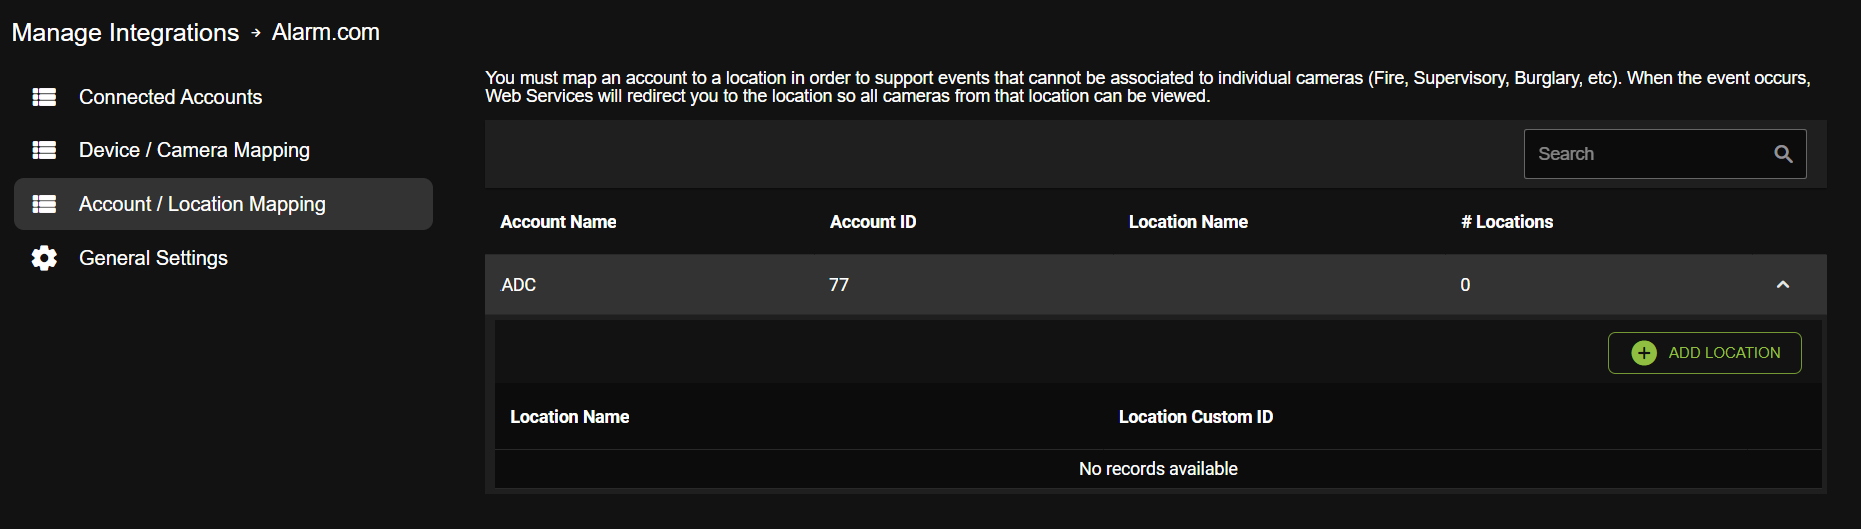
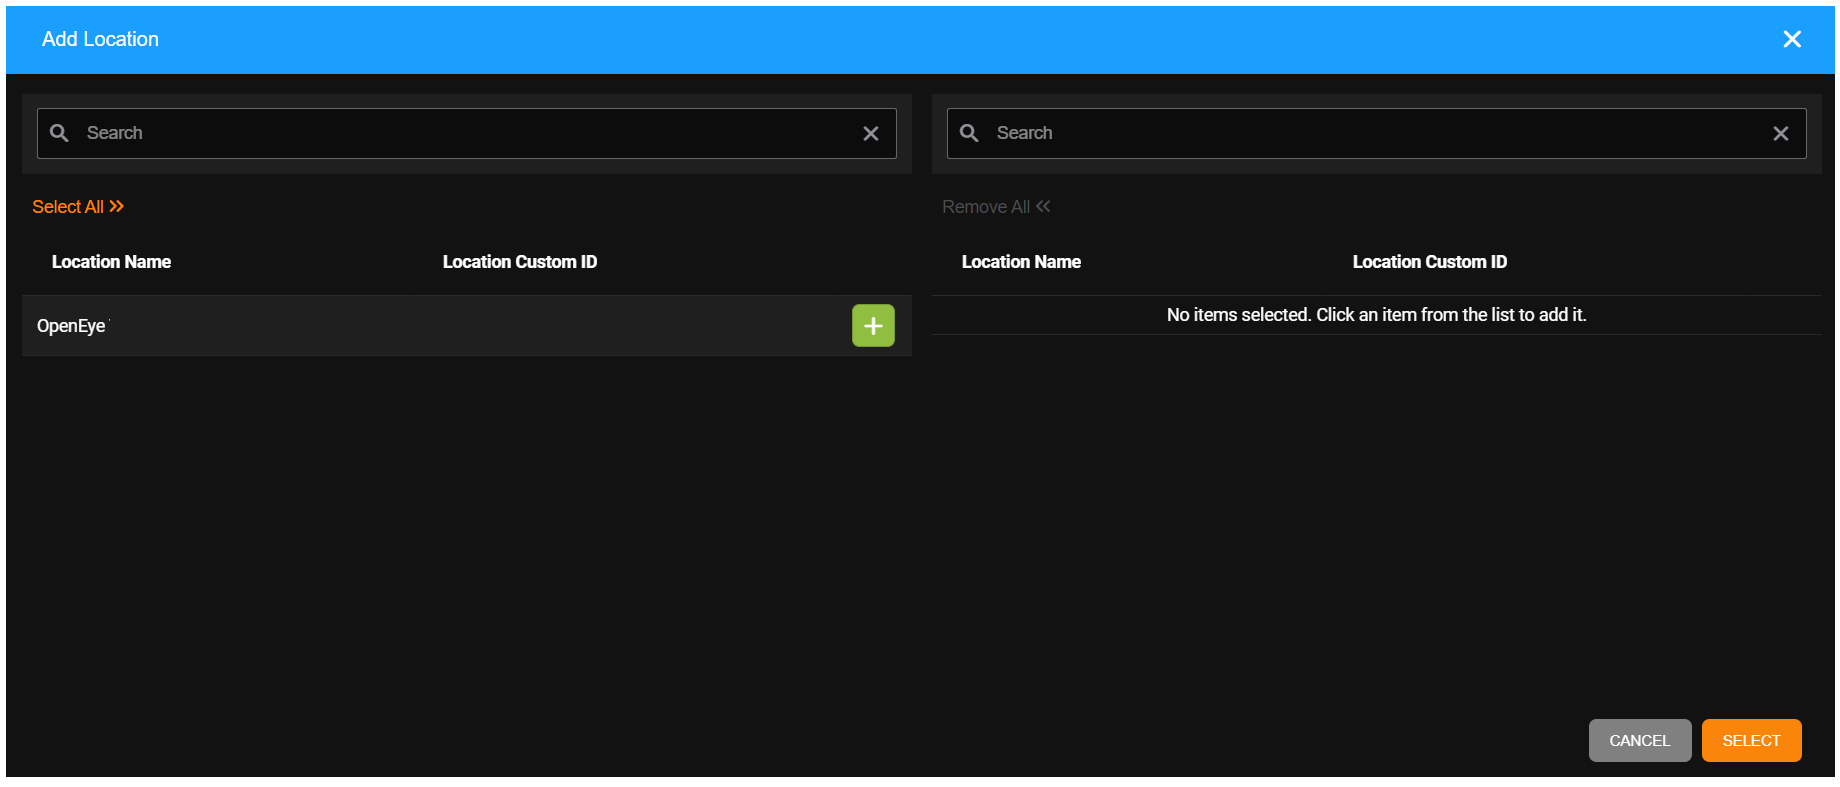
- Select the add icon next to the location name in the Add Location popup, then Select. Added locations will be listed under Location Name.
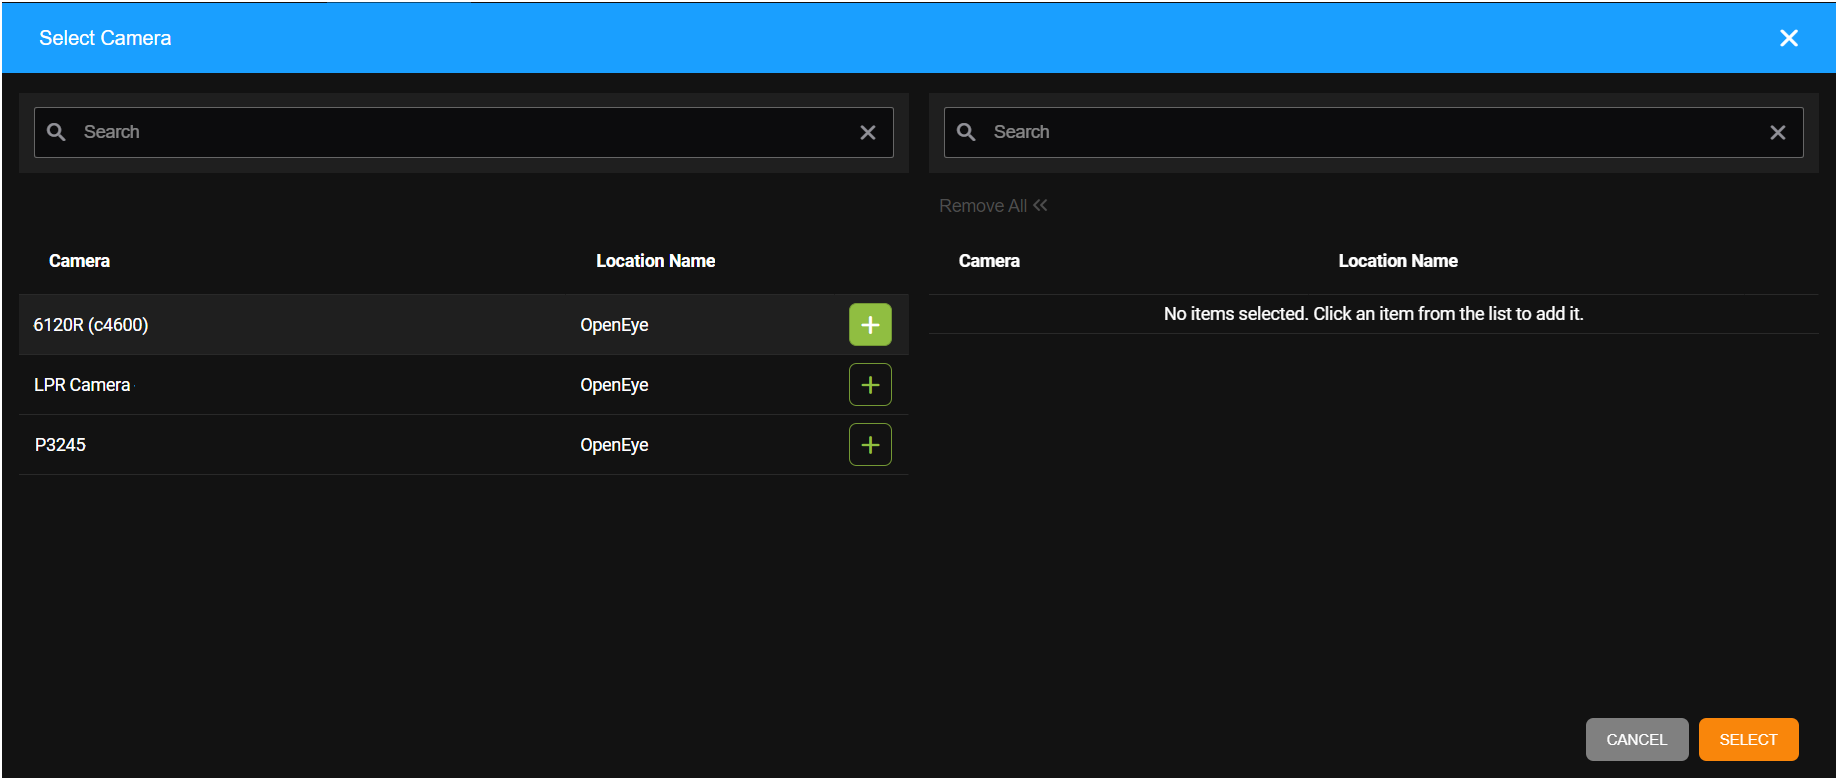
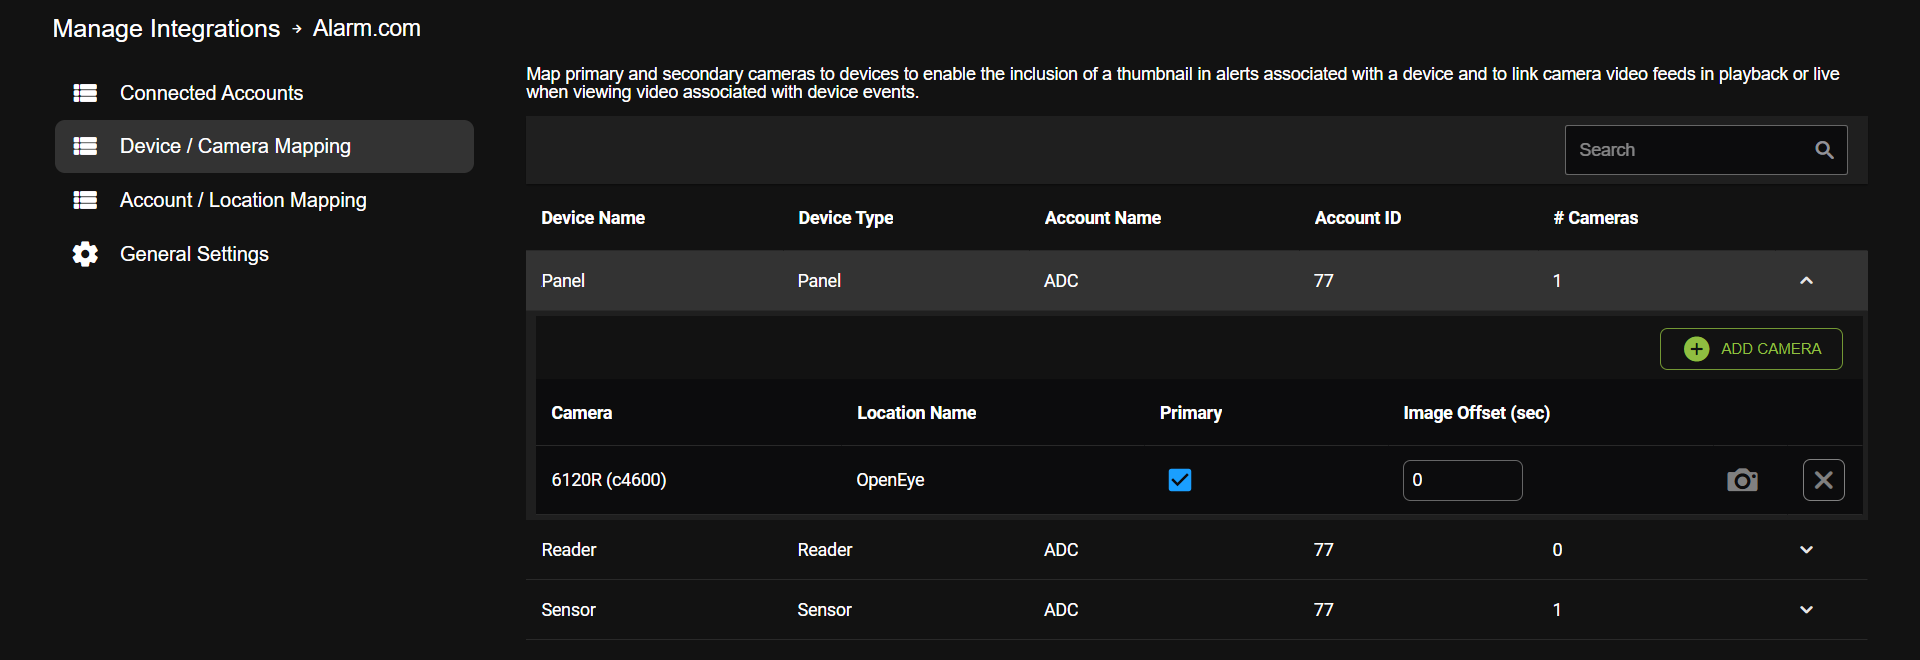
- Device / Camera Mapping allows user to map cameras to the 3rd party devices available. Select the dropdown on a Device Name and Add Camera.
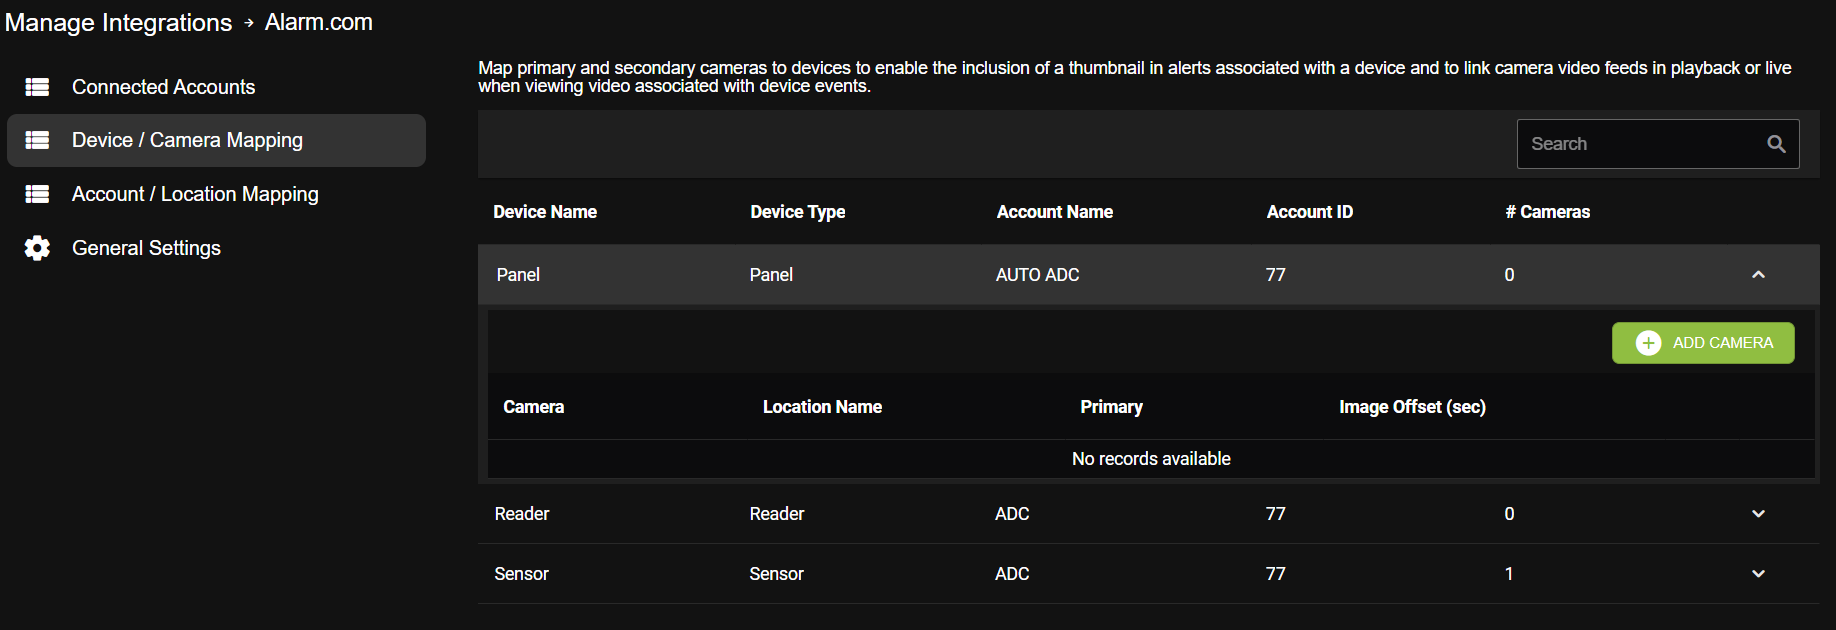
- Select the add icon next to the camera name in the Select Camera popup, then Select. Added cameras will be listed under Camera Name.
-
Click Enable Alarm.com Integration in General Settings to enable, disable or remove the integration.
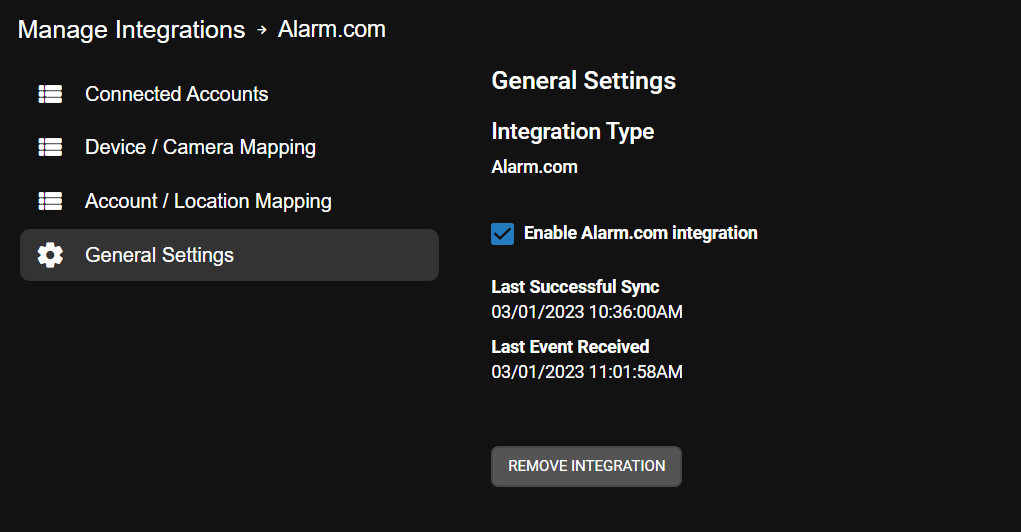
NOTE: Last Successful Sync shows the last time and date OWS successfully synced with the linked account.
NOTE: Last Event Received shows the last time and date OWS received an event from the account.
OWS Alert Configuration
Create a New Intrusion Alert Rule
Select one of the Access or Intrusion Alert Types when Creating a New Alert Rule:
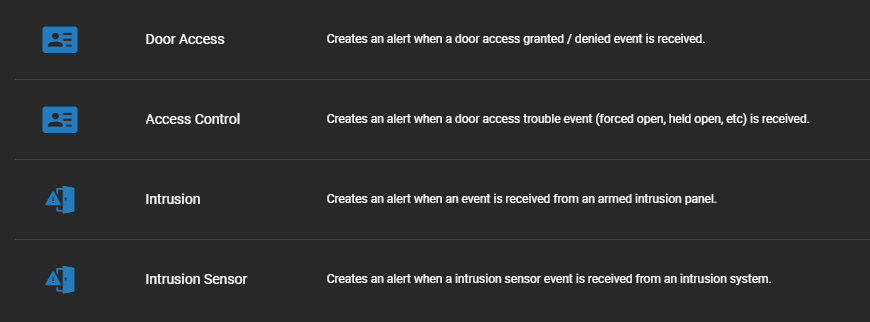
- Access Alerts are alerts based on access control readers or trouble events. You can generate alerts based on access being granted to an area, access being denied to an area and door status. Access Alerts include Door Access and Access Control.
- Intrusion Alerts are alerts based on panel status. You can generate alerts based on areas being armed, disarmed or late to arm, intrusion alarms and the panel/device connection state.
- Intrusion Sensor are alerts based on sensor events. You can generate alerts based on areas being armed, disarmed, or both armed and disarmed.
When creating an Alert Rule, Event Types further define when an event notification will be sent. More than one type can be added when creating a rule.
| Door Access Event Types | |
| Event Group | Event Type |
| Access Denied | All Event Types |
| Invalid Code | |
| To Area Not Exited | |
| To Area Outside Schedule | |
| To Armed Area | |
| To Door | |
| To Unauthorized Area | |
| Unspecified | |
| Access Granted | Granted |
| Door Status | Door Opened |
| Access Control Event Types | |
| Event Group | Event Type |
| Door Status | Door Forced Open |
| Door Held Open | |
| Panel / Device | Device Tampering |
| Intrusion Event Types | |
| Event Group | Event Type |
| Area | Armed |
| Disarmed | |
| Late to Arm | |
| Panel / Device | Device Timeout |
| Intrusion Alarm | All Event Types |
| Intrusion - Day | |
| Intrusion - Exit | |
| Intrusion - Night | |
| Emergency Alarm | |
| Fire Alarm | |
| Panic Alarm | |
| Supervisory Alarm | |
| Intrusion Alarm |
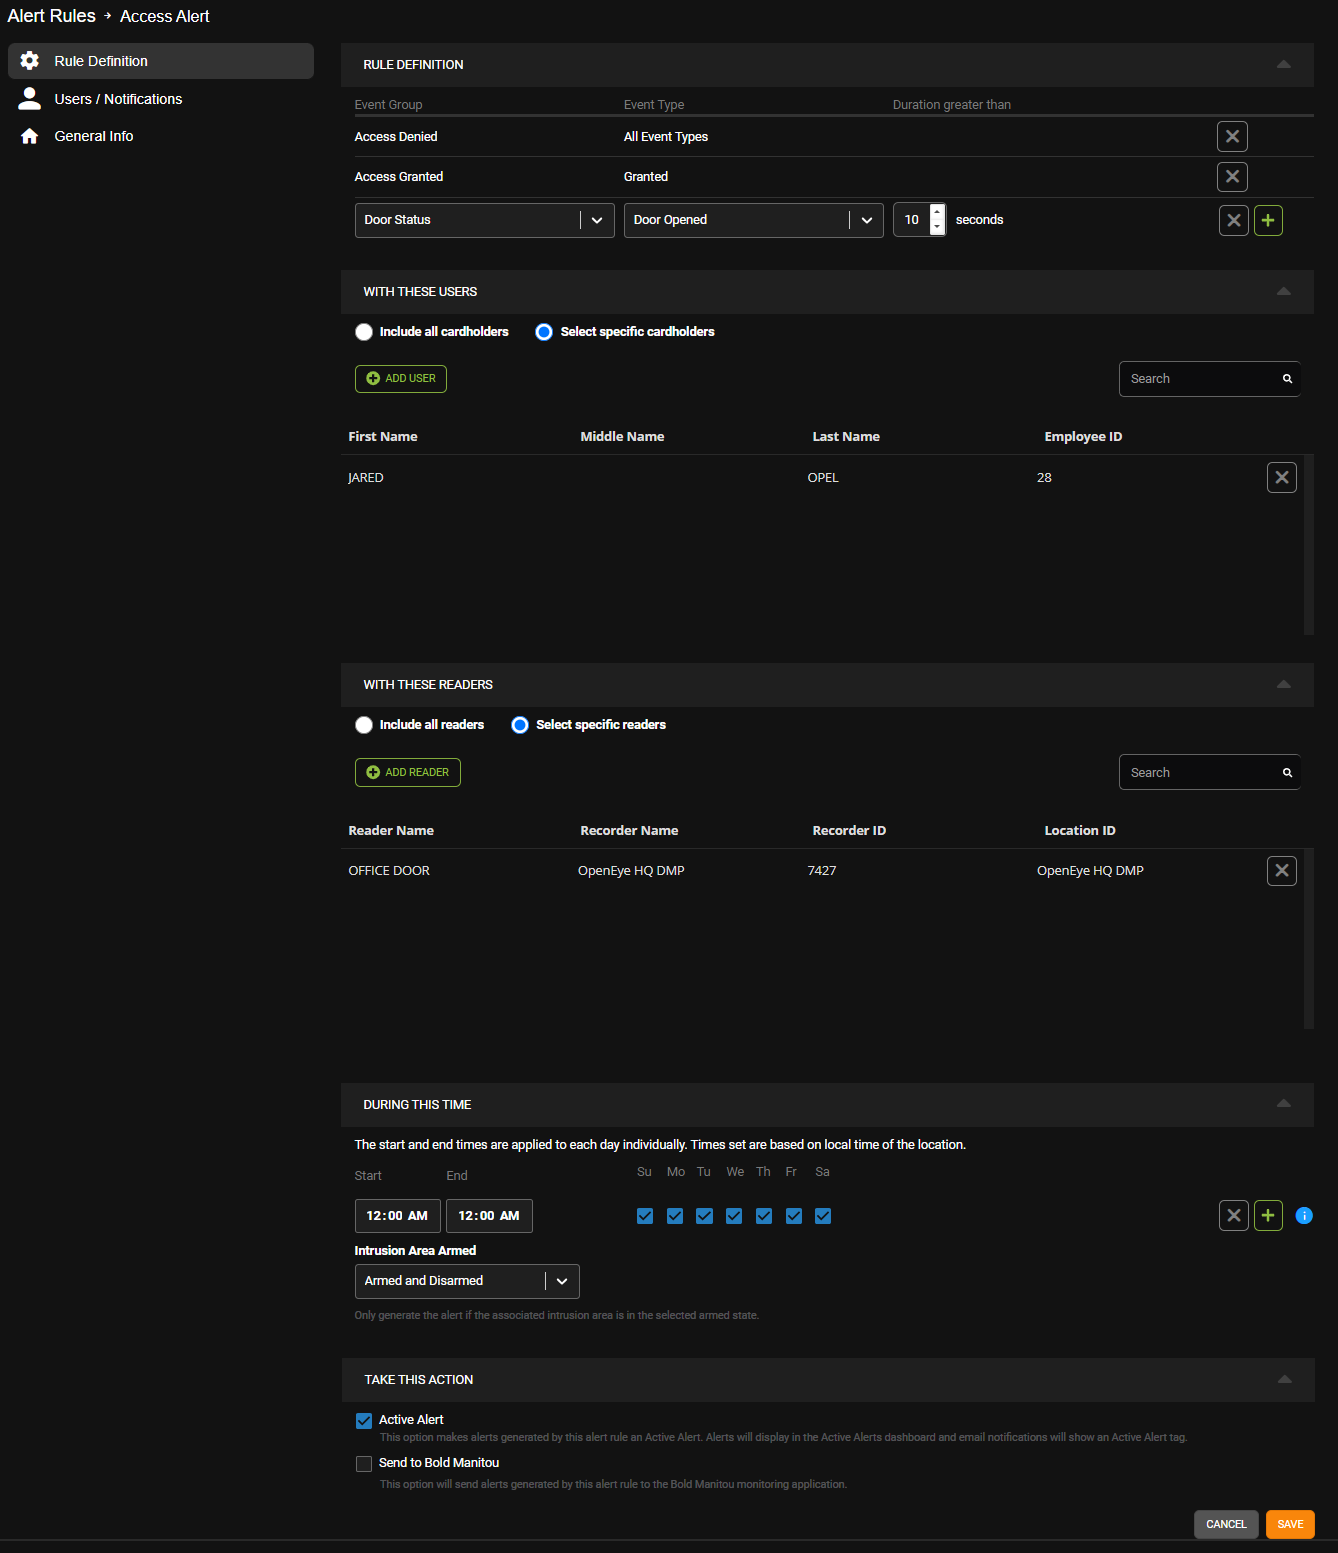
Defining an Alert Rule: Door Access
- Choose Access Denied, Access Granted or Door Status from the Event Group and then an Event Type from the dropdown menu.
- Choose Include all cardholders -or- Select specific cardholders and Add Users to limit the rule to specific cardholders.
- Choose Include all readers -or- Select specific readers and Add Reader to limit the rule to specific readers.
- Enter the Time of Day ranges that this rule should be active for.
- Check the boxes beneath the Days of the Week on which the rule should be active.
- Select Armed and Disarmed, Armed, or Disarmed from the Intrusion Area Armed dropdown. See Location Arming for more information.
- Active Alert (Optional) - Check the Active Alert box to add the alert to the Active Alert Dashboard and tag it as an Active Alert in email notifications.
- Send To 3rd Party Integration (Optional) - Check the Send To boxes to send the alert to the associated 3rd party integration.
- Click Save.
NOTE: Go to How to Add Cardholders to an Alert Rule for more information.
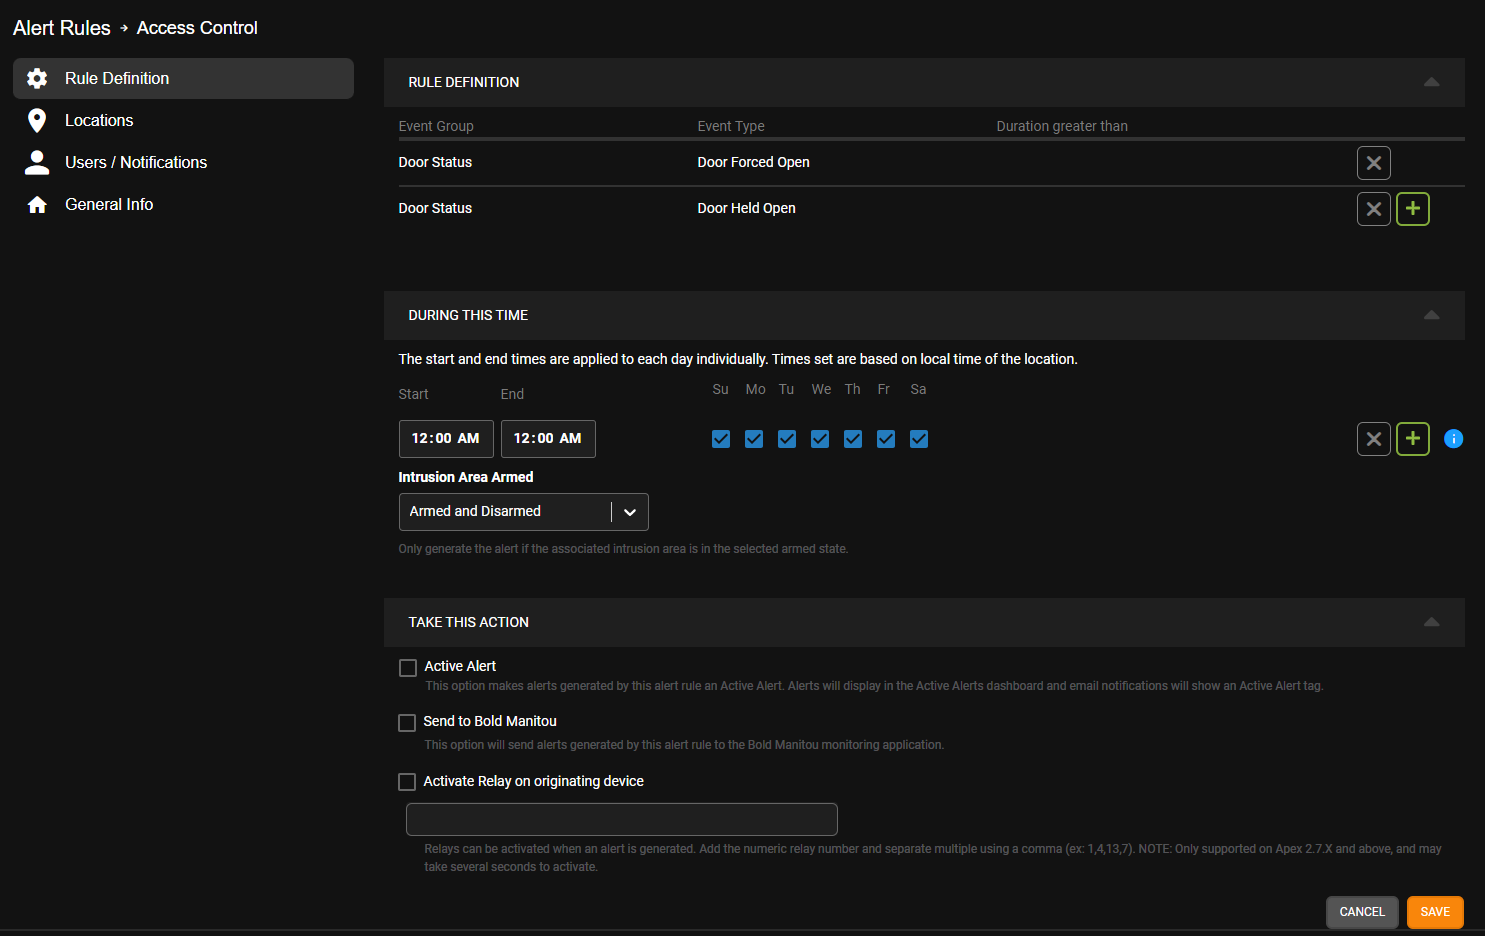
Defining an Alert Rule: Access Control (Trouble)
- Under the Door Status Event Group, choose Door Forced Open or Door Held Open as the Event Type. For Panel/Device, Device Tamper is the Event Type. Any combination of the three events can be added to the rule. The rule is always enabled.
- Enter the Time of Day ranges that this rule should be active for.
- Check the boxes beneath the Days of the Week on which the rule should be active.
- Select Armed and Disarmed, Armed, or Disarmed from the Intrusion Area Armed dropdown. See Location Arming for more information.
- Active Alert (Optional) - Check the Active Alert box to add the alert to the Active Alert Dashboard and tag it as an Active Alert in email notifications.
- Send To 3rd Party Integration (Optional) - Check the Send To boxes to send the alert to the associated 3rd party integration.
- Active Relay on originating device (Optional) - Check to enable and add the numeric relay numbers.
- Click Save.
Defining an Alert Rule: Intrusion
- Choose Area, Panel/Device or Zone Alarm from the Event Group and then an Event Type from the dropdown menu.
- Enter the Time of Day ranges that this rule should be active for.
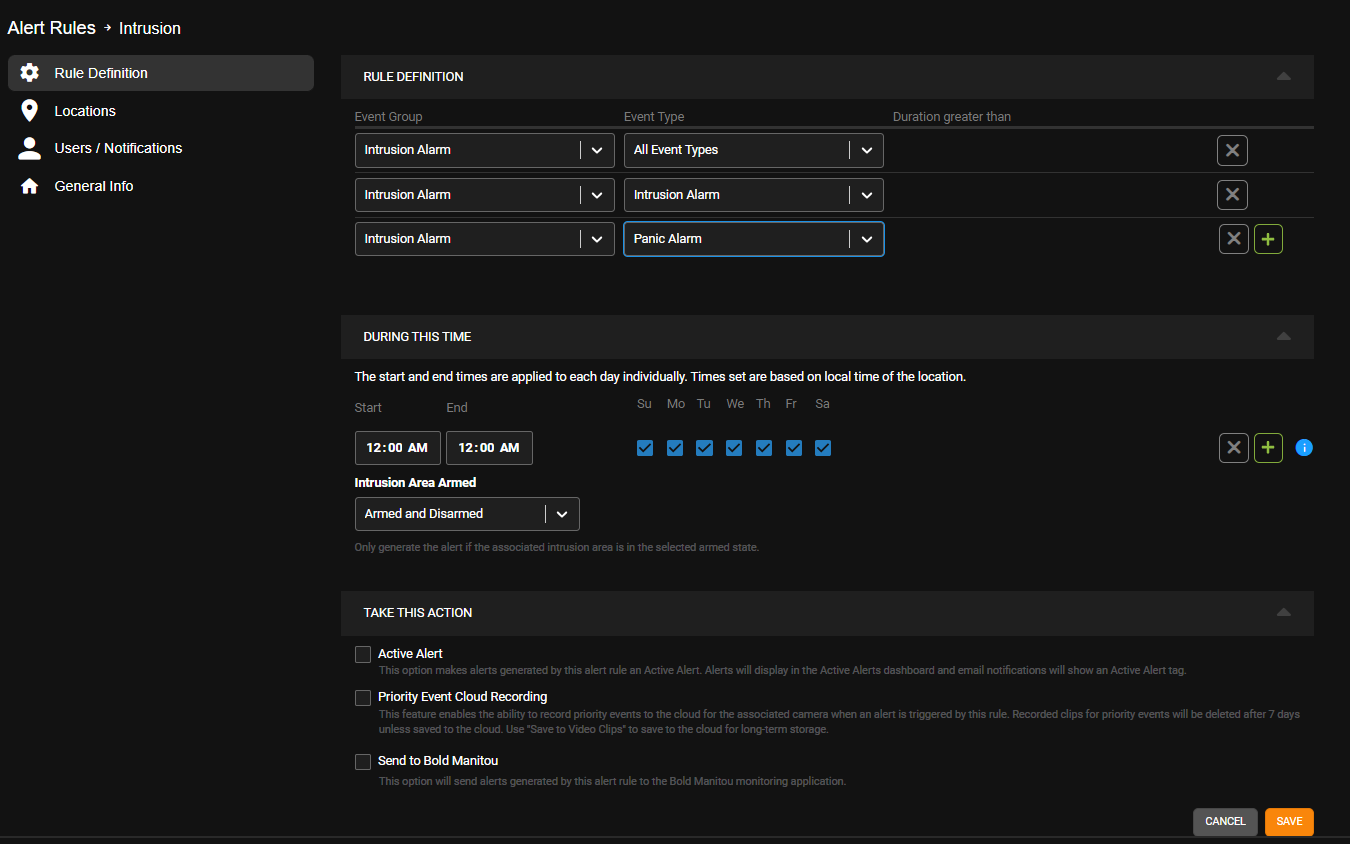
- Check the boxes beneath the Days of the Week on which the rule should be active.
- Select Armed and Disarmed, Armed, or Disarmed from the Intrusion Area Armed dropdown. See Location Arming for more information.
- Active Alert (Optional) - Check the Active Alert box to add the alert to the Active Alert Dashboard and tag it as an Active Alert in email notifications.
- Send To 3rd Party Integration (Optional) - Check the Send To boxes to send the alert to the associated 3rd party integration.
- Click Save.
NOTE: All Area Event Group types can be added to the same rule or as separate rules. An alert will be generated when the panel becomes Armed, Disarmed, or Late to Arm during the applied times.
Adding Locations to an Intrusion Alert Rule
- Click Locations on the navigation sidebar.
- Click Add Location.
- Click the Add icon next to each Location to be included in the Alert.

NOTE: To apply the rule to every Location, click Select All.
- Click Select when finished.
Defining an Alert Rule: Intrusion Sensor
- For Duration, manually enter a threshold in seconds that the armed state must exceed to generate an alarm.
- Enter the Time of Day ranges that this rule should be active for.
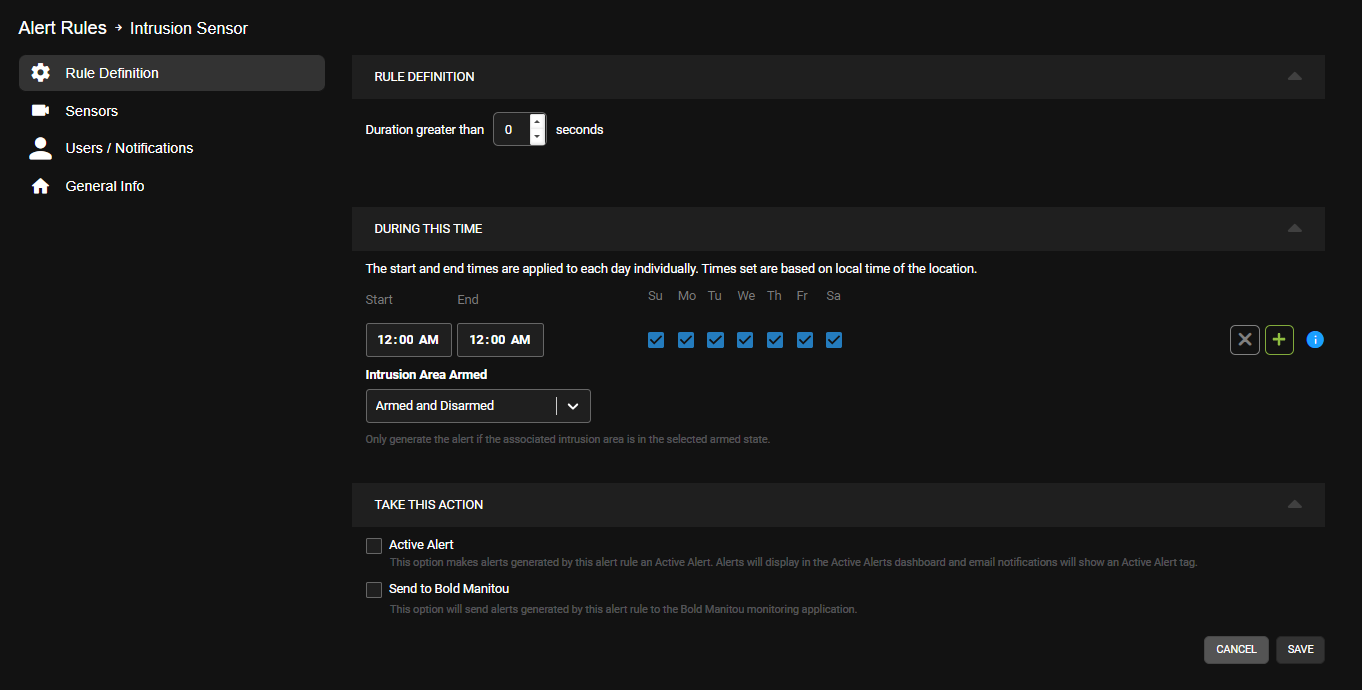
- Check the boxes beneath the Days of the Week on which the rule should be active.
- Select Armed and Disarmed, Armed or Disarmed from the Intrusion Area Armed dropdown for the state that generates the alert.
- Active Alert (Optional) - Check the Active Alert box to add the alert to the Active Alert Dashboard and tag it as an Active Alert in email notifications.
- Click Save.
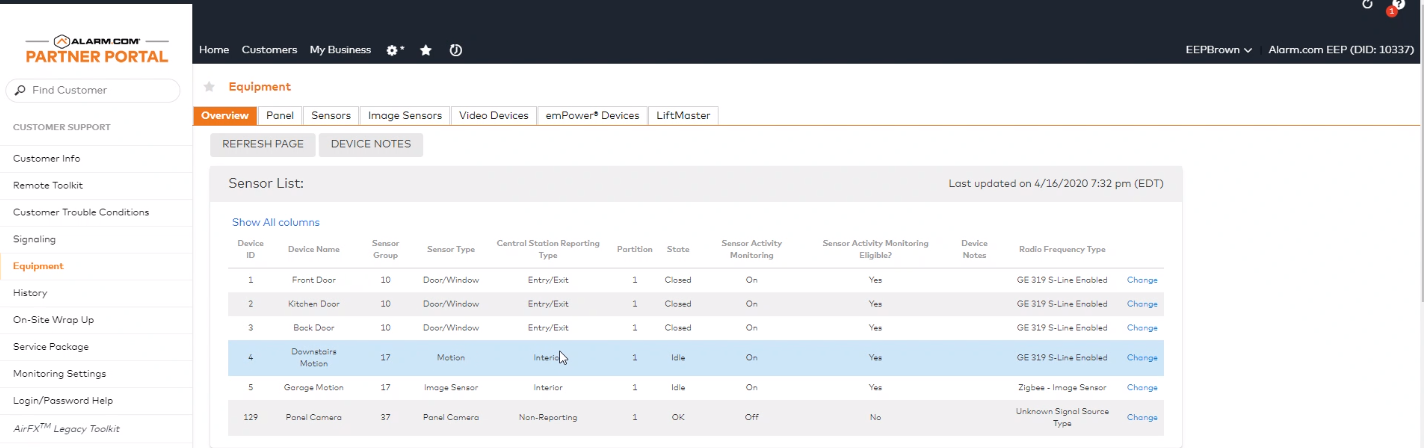
Adding Sensors to an Intrusion Sensor Alert Rule
- Click Sensors on the navigation sidebar.
- Click Add Sensor.
- Click the add icon next to each Sensor to be included in the Alert.
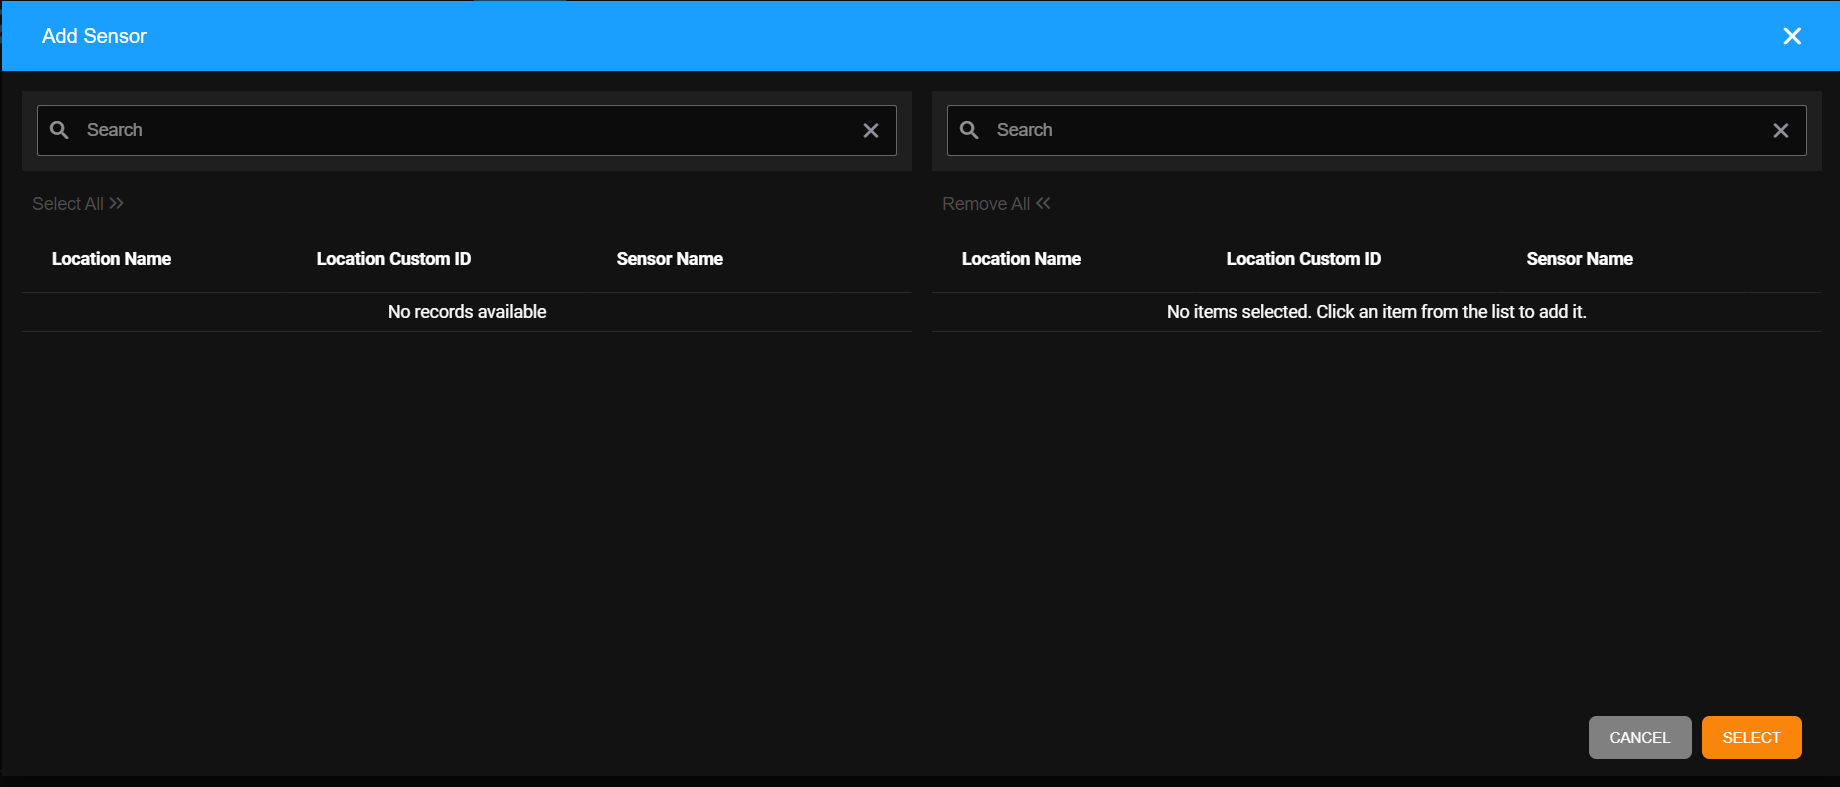
NOTE: To apply the rule to every Sensor, click Select All.
- Click Select when finished.
Add Users to an Alert Rule
Adding Users to an Alert Rule will enable those users to receive notifications.
Updating, Disabling, or Deleting an Alert Rule
Updating, Disabling, or Deleting an Alert Rule can be done at any time after creating an Alert Rule.
Alarm.com Intrusion Panel Arming in Locations
After configuring a compatible Bosch, DMP, or Alarm.com intrusion panel, you can set the associated location arm/disarm state.
Location Arming
- Choose the Location associated with the Integration from the Locations list.

- Click on the Location Arming tab.

- Choose the integration from the Arm State Owner dropdown. This option determines what integration sets the armed state for this location.
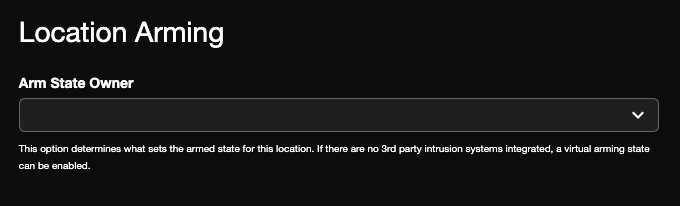
- Click Save.

NOTE: Once you have configured the arm/disarm state for an intrusion panel, your alert notifications can be driven by the panel arm state; however, no icon will appear in the device list for the intrusion panel arm/disarm state.
NOTE: Changing the Armed/Disarmed state in locations will not change the Armed/Disarmed state configured on the Alarm.com panel.
Alert History
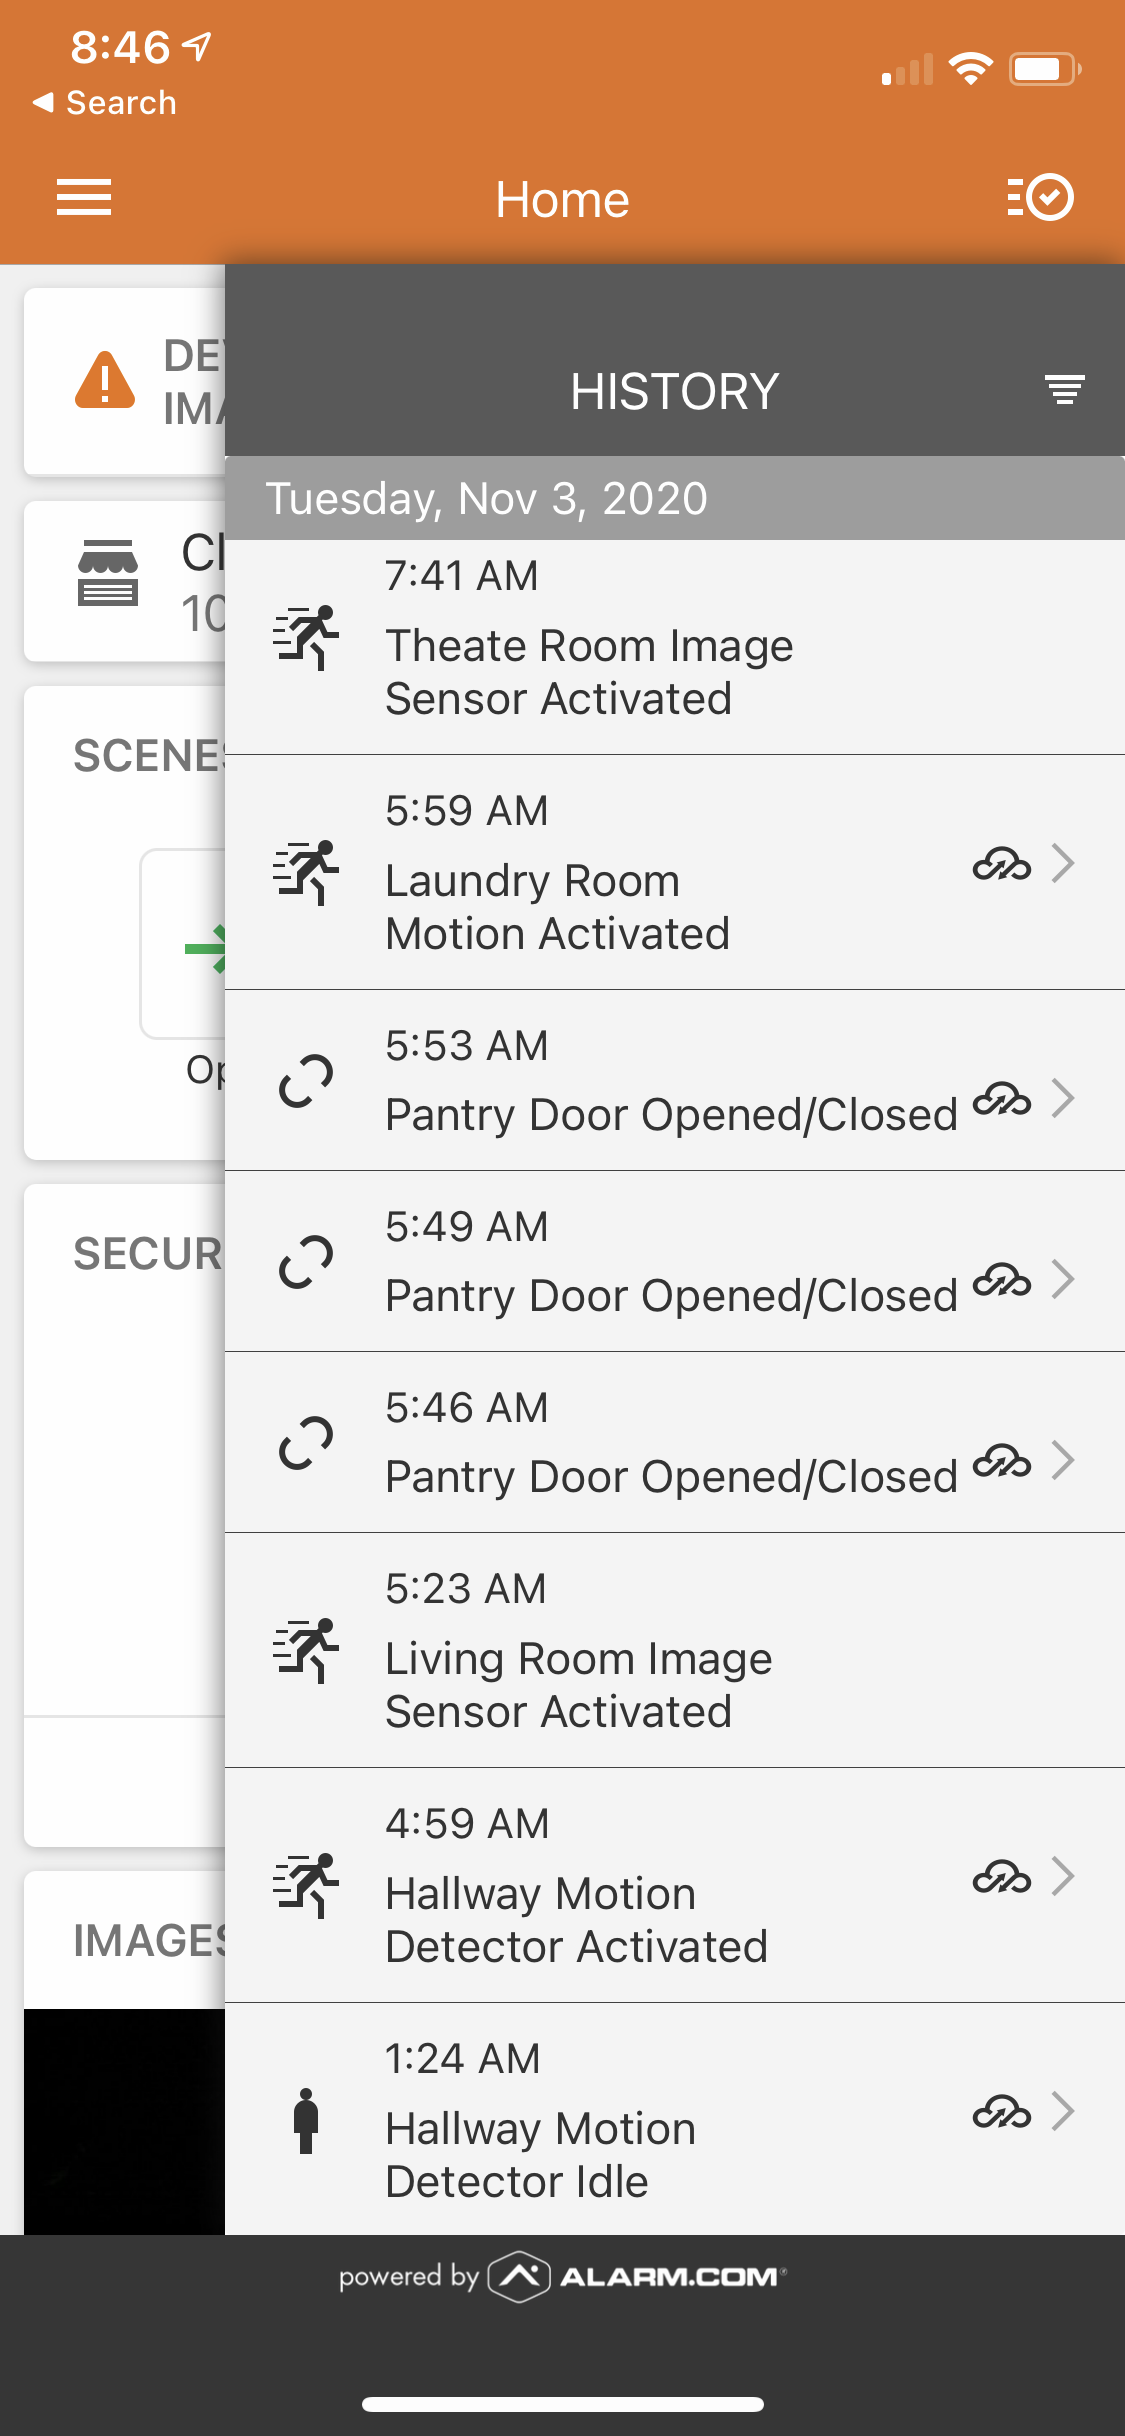
In OWS, select Alerts → Alert History. Here you will find all Alert events created by associated locations that have rules assigned.

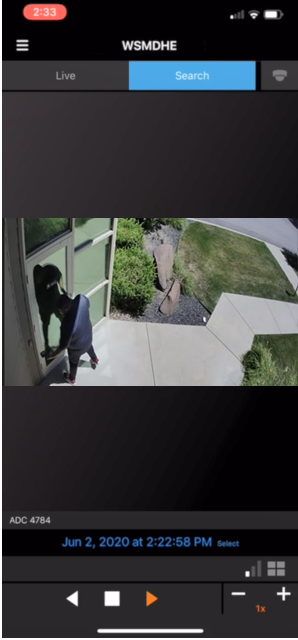
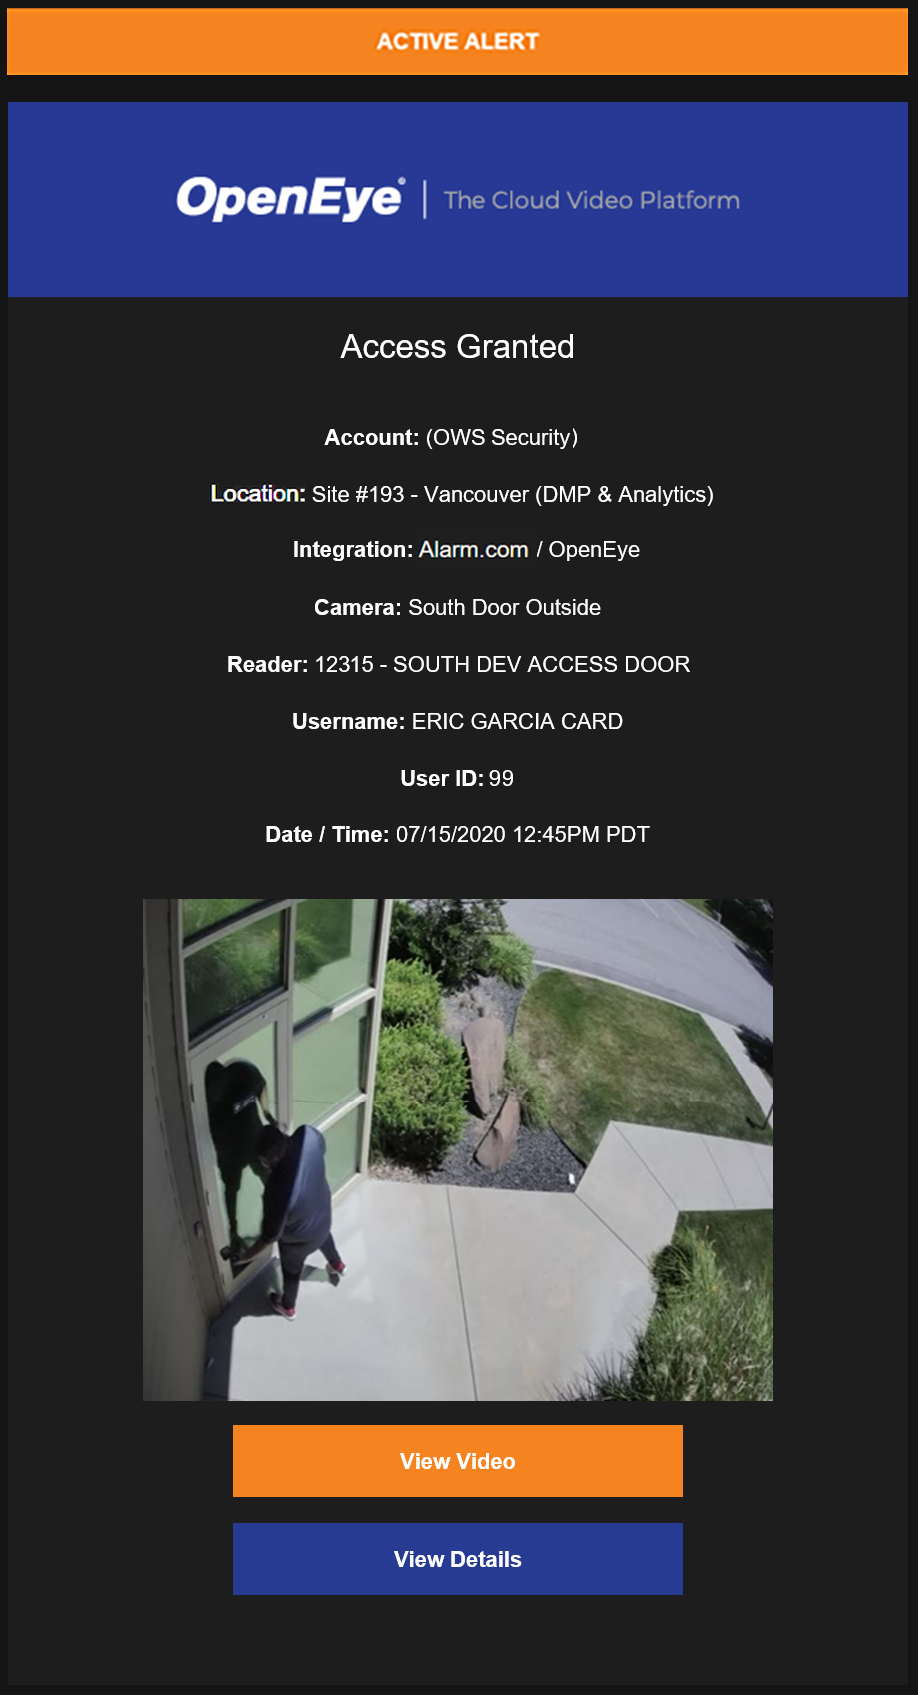
Hovering over the camera icon will show a snapshot of the video clip before viewing it. By selecting view, you will be taken to the video created by the camera associated with that event.
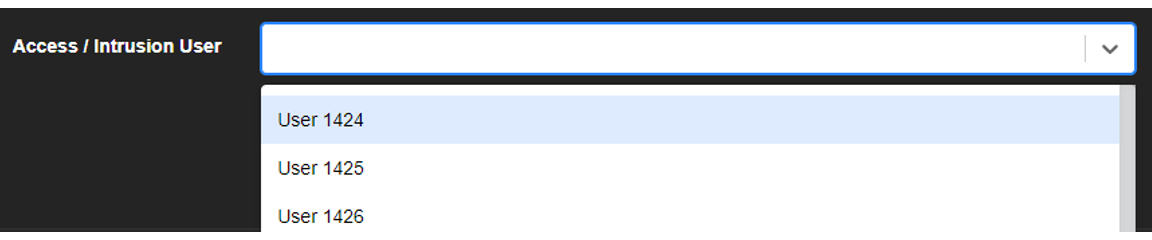
Show Filters → Access / Intrusion User allows users to filter by the users/cardholders for Alarm.com integrated events.
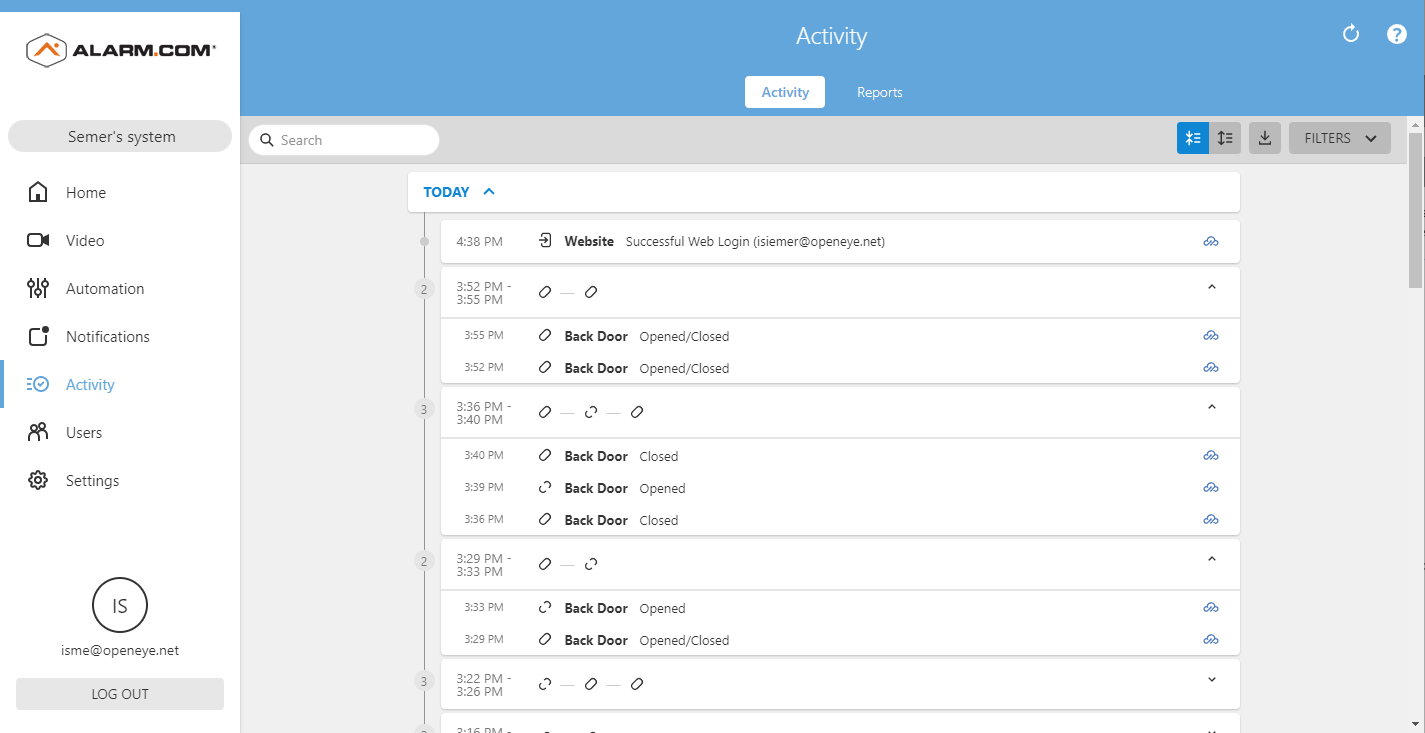
Events are also viewable on the Alarm.com Activity page with a link to the associated video. Click on the OWS cloud icon to view the video.
If you are not already logged into OWS, you will be prompted to log in.
Link Alarm.com Account with OWS
Users will be able to view video from the Alarm.com Activity page without being prompted to log in if their accounts are linked.
Link accounts from Alarm.com:
If you are already in the Alarm.com Activity page, but not yet logged into OWS, you will be prompted to log in.
- After logging in to OWS, click Link Accounts.

- The accounts can then be linked in the user profile page. See the next steps below in Link accounts in OWS.
Link accounts in OWS:
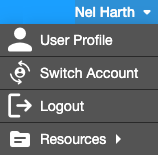
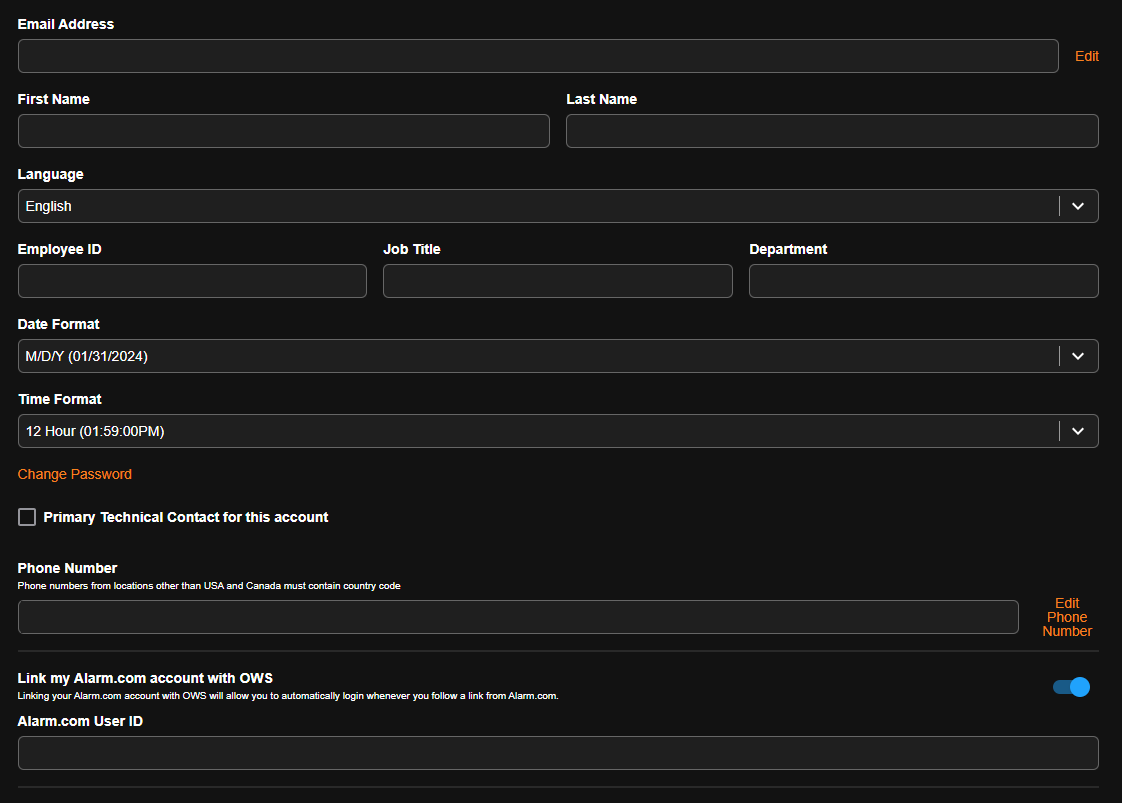
- Click on your username in the upper right-hand corner, and then click User Profile.
- Enter the same Alarm.com User ID used to log in to the Alarm.com account.
The user will now automatically log in whenever they follow a link from Alarm.com to OWS.
Alarm.com Mobile App
Events are also viewable on the Alarm.com Mobile App. To view an OWS event, tap the cloud icon to open the associated video in the OpenEye App.
Email Alerts
Email alerts will be sent based on any intrusion, or access control event. Any User or User Group checked to receive email alerts for an event, are notified with Account, Location, Camera, Date and Time information as well as a thumbnail image and links that allow additional Event monitoring.
Supported Event Types / OWS Alert Mapping
The same events in OWS are also viewable in the Alarm.com app. The name of some of the events may appear different between OWS and Alarm.com.
| Access Control Event Types | ||
| OWS Alert Rule | OWS Alert Type | Alarm.com Event Type |
| Door Access | Access Granted | Door Accessed |
| Door Access | Access Granted | Door Accessed Double Swipe |
| Door Access | Access Granted | Access Control Exit Button Pressed |
| Door Access | Access Denied | Unknown Card Format Read |
| Door Access | Access Denied | Access Attempt Failed |
| Door Access | Access Invalid PIN | Reason Invalid PIN |
| Door Access | Access Invalid Time | Reason Invalid Time |
| Door Access | Access Invalid Level | Reason Never Allowed |
| Door Access | Access Invalid Level | Reason Unknown Card Format |
| Door Access | Access Invalid Level | Reason Deactivated Card |
| Door Access | Access Invalid Level | Reason Before Activation Date |
| Door Access | Access Invalid Level | Reason After Expiration Date |
| Door Access | Access Invalid Level | Reason Credential Not Saved |
| Door Access | Access Invalid Location | Reason Invalid Facility Code |
| Door Access | Door Opened | Opened |
| - | Door Closed | Closed |
| Access Control | Door Forced Open | Door Forced Open |
| Access Control | Door Held Open | Door Held Open |
| Intrusion Event Types | ||
| OWS Alert Rule | OWS Alert Type | Alarm.com Event Type |
| Intrusion | Area Armed | Armed Stay |
| Intrusion | Area Armed | Armed Away |
| Intrusion | Area Armed | Armed Night |
| Intrusion | Area Late to Arm | Arming Failed |
| Intrusion | Area Late to Arm | Arming Supervision Fault |
| Intrusion | Area Disarmed | Disarmed |
| Intrusion | Timeout Device | Power Failure |
| Intrusion | Timeout Device | Panel Not Responding |
| Intrusion | Timeout Device | Panel Comm Failure |
| Intrusion | Panic Alarm | Duress |
| Intrusion | Panic Alarm | Aux Panic |
| Intrusion | Panic Alarm | Aux Panic in App |
| Intrusion | Panic Alarm | Police Panic |
| Intrusion | Panic Alarm | Police Panic in App |
| Intrusion | Panic Alarm | Police Panic Silent in App |
| Intrusion | Panic Alarm | Police Panic Suspected Alarm |
| Intrusion | Panic Alarm | Aux Panic Suspected Alarm |
| Intrusion | Fire Alarm | Fire Panic Pending Alarm |
| Intrusion | Fire Alarm | Fire Panic Suspected Alarm |
| Intrusion | Fire Alarm | Fire Panic |
| Intrusion | Fire Alarm | Fire Panic in App |
| Intrusion | Fire Alarm | Fire Alarm |
| Intrusion | Intrusion Alarm | Pending Alarm |
| Intrusion | Intrusion Alarm | Suspected Entry Delay Alarm |
| Intrusion | Intrusion Alarm | Suspected Alarm |
| Intrusion | Intrusion Alarm | Zone Alarm |
| Intrusion Sensor | Door Opened | Sensor Opened |