Online RMA QSG
To begin with processing an RMA, If you are the recipient and/or approver of RMA paperwork, you should have received an automatically generated email from the RMA portal. It should look much the same as the below:
Please note: all information shown in these screenshots is for example purposes only and may not exactly reflect what you will see
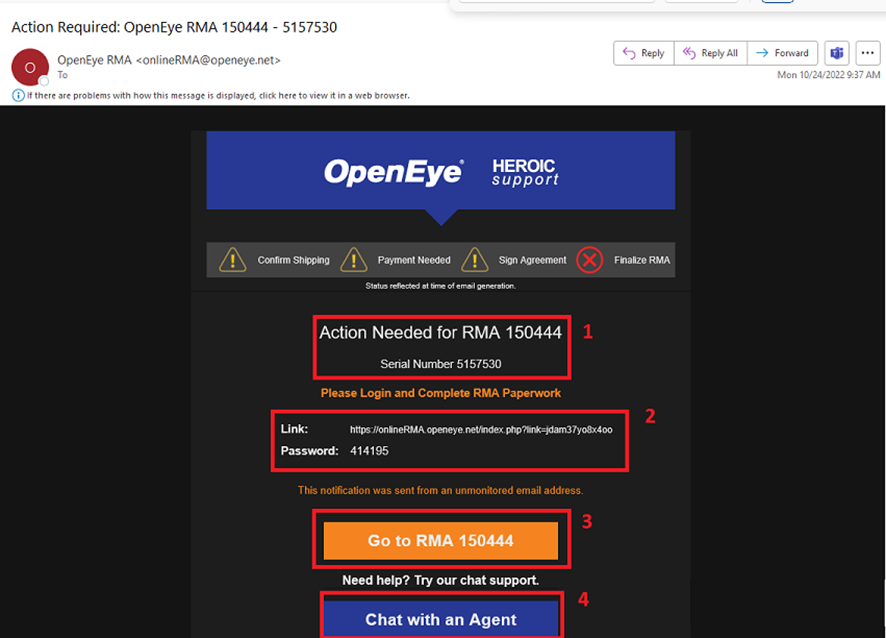
- This section shows you the RMA number as well as the related serial number of the unit for your recorders and verification purposes
- This is the link provided that will take you to the RMA portal webpage. The subsequent password provided is how you will log in when prompted.
- You may also click this button to take you straight to the RMA portal link, instead of copying and pasting the above link.
- If you have further questions about the RMA or see something that is incorrect, you can click this button. This will take you to our webpage https://help.openeye.net/ which is used to begin chat support. Simply enter your information when prompted and one of our support agents will be with you shortly.
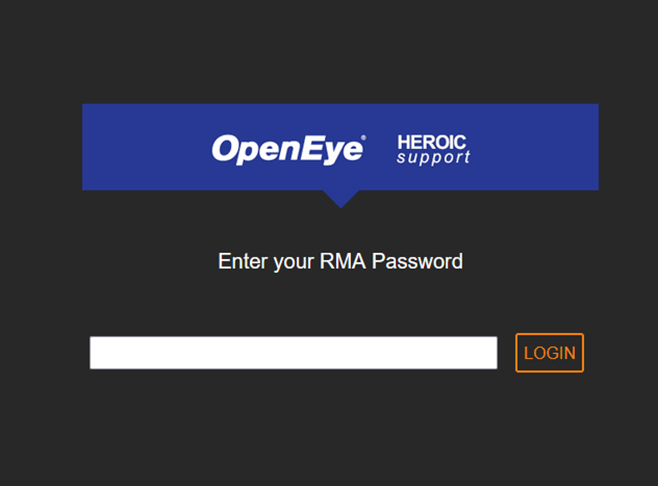
Once you click on the orange button or paste the RMA portal link into your address bar you should see a page like the one below. This is where you will require the password from box 1 in the above screenshot to log in:
After logging in to this page you will be brought to the RMA instructions page:

- This is an outline of the stage you may see when filling out the RMA. The ones marked “if required” may not apply to every RMA type.
- An explanation of the ‘light bar’ you will see at the very top of the page. The green check mark signifies that the step has been completed. The yellow caution sign signifies that the step has not been submitted. Lastly, the red X signifies that the paperwork is not complete and has not been submitted to the RMA department
- Much the same as with the email, this button will take you to our webpage https://help.openeye.net/ which is used to begin chat support. Simply enter your information when prompted and one of our support agents will be with you shortly.
- The next button will move you forward into the RMA portal to complete your RMA.
Completing the RMA stages:
As explained on the previous page before you clicked ‘Next’, the first thing you should see at the top is the ‘light bar’ as shown below:
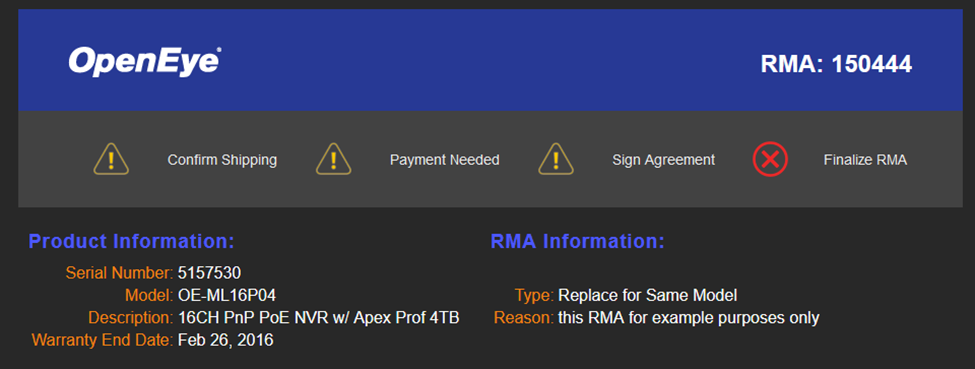
The symbols next to each step of the light bar will update as you move through them using the symbols explained above. Directly beneath the light bar are your product information and your RMA information. This will show you info such as the serial number, model number, part description, and warranty end date. If anything you see here seems incorrect you can always reach out for clarification to our support team.
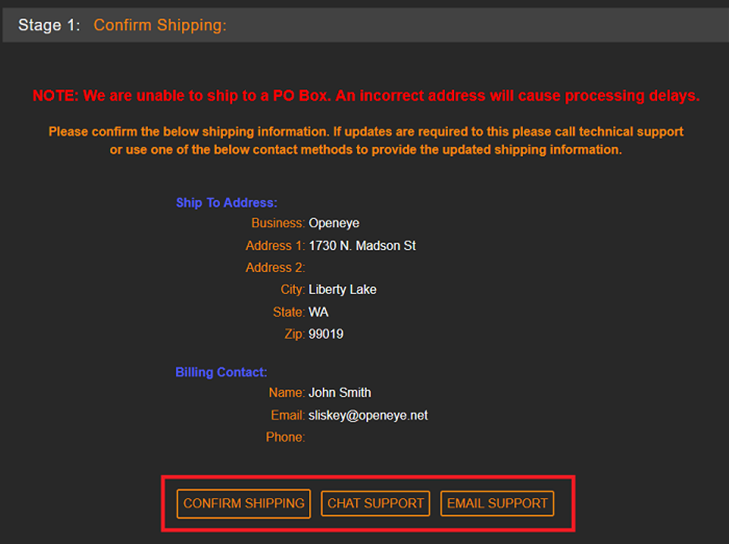
Stage 1: Confirm Shipping
Right below the product information should be your first step, confirming the shipping address. This section will show you the address that was entered when the RMA was created. If the address looks correct, you will need to hit the confirm shipping* button as shown in the below example. If the address does not look correct you can use either the chat support* button or the email support* button to reach out to our technical support team for any corrections. For further information on those two options, you can reference the following knowledge base article:
https://answers.openeye.net/Partner_Tools/RMA_Billing_Portal/Shipping_Address_Change_for_RMA
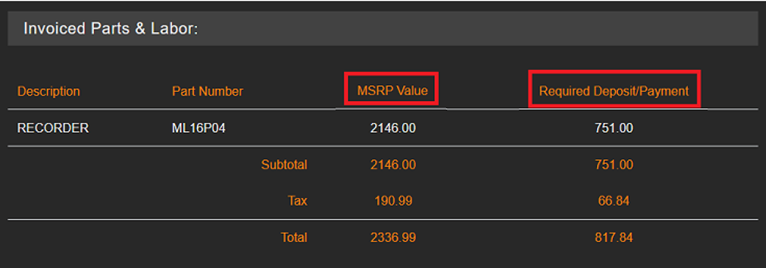
Invoiced Parts & Labor
Directly below where the confirm shipping button you will see the Invoiced Parts & Labor section. In this section, you will be given an overview of the pricing of the items entered in on your RMA. This pricing may differ depending on the type of RMA you are handling. In this example, this RMA is an Advanced Replacement. With advanced replacements, you will see the MSRP Value* of the item and the Required Deposit* in different amounts. The reason for this is that a deposit is required on all advanced replacement RMA’s but we do not take the full MSRP value as a deposit. For more information on our RMA security deposits you can reference the following knowledge base article:
https://answers.openeye.net/Partner_Tools/RMA_Billing_Portal/RMA_Security_Deposits
And for more information on the different types of RMA’s that we offer, you can reference the following knowledge base article: https://answers.openeye.net/Partner_Tools/RMA_Billing_Portal/What_types_of_RMAs_does_OpenEye_offer
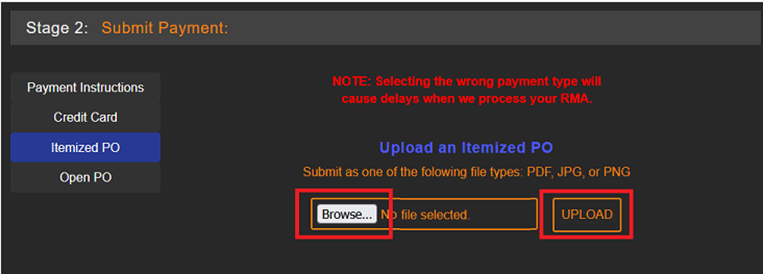
Stage 2: Submit Payment Method
Next up will be submitting a payment method for your RMA. You will find a couple of different options for payment types. As shown below in the screenshot, each payment method option is also a button you can use to select which method you will use.
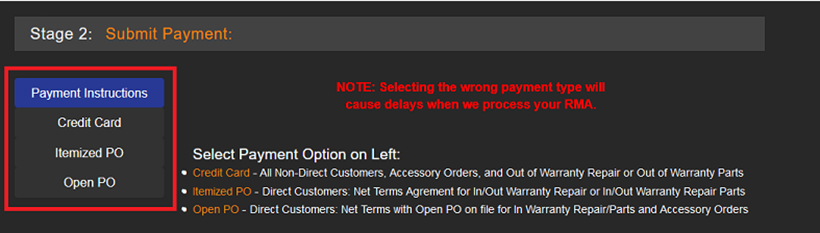
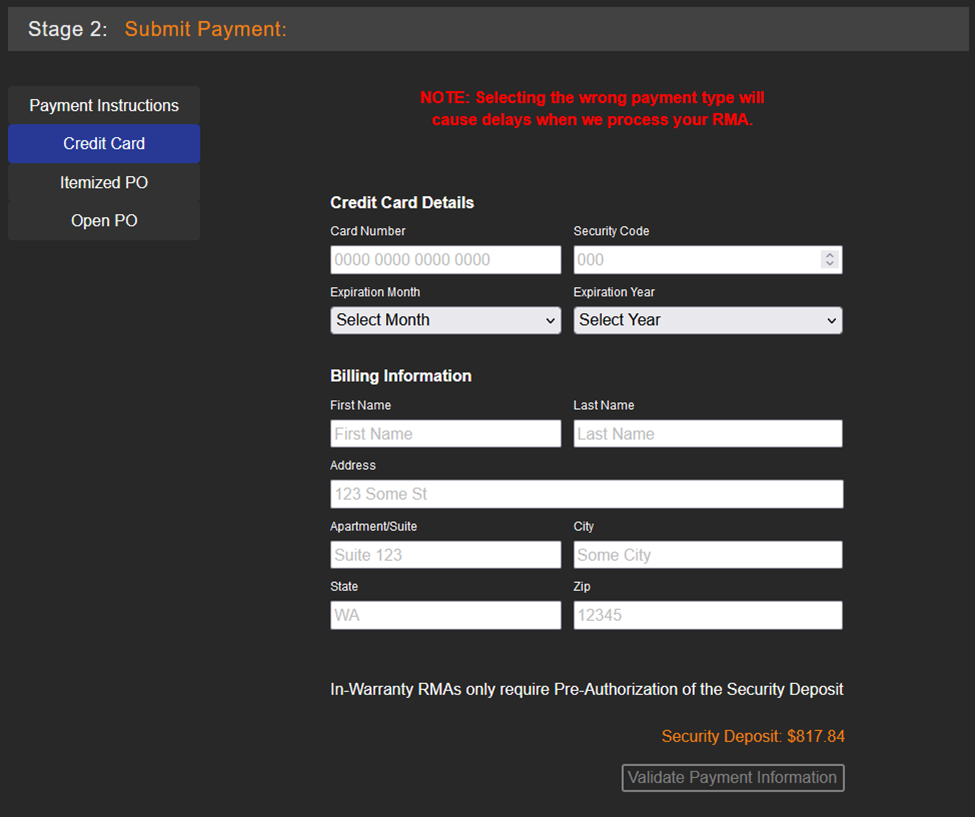
Credit Card
This will provide the option to enter the information of a credit card to provide payment/deposit for your RMA.
Itemized PO
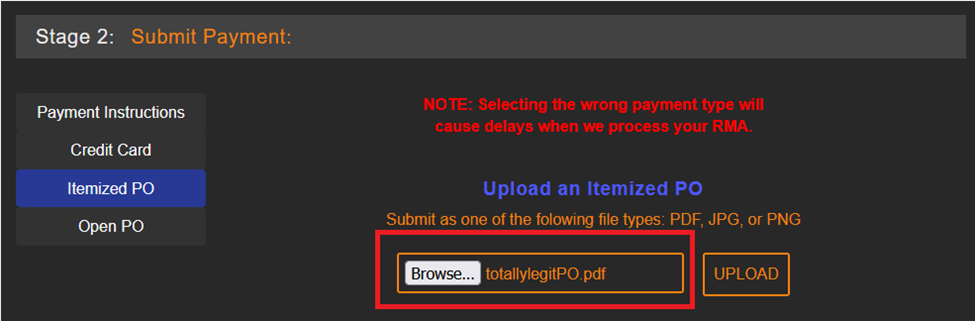
An itemized PO is a purchase order with an itemized list of the invoiced parts and labor. The selection of this option will present you with a Browse* and upload* button. You can click browse to select the itemized PO file from your device and then click the upload button to submit it as your payment type.
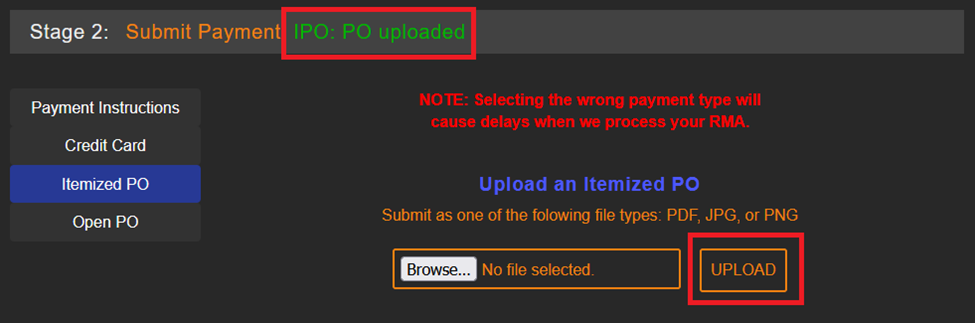
In this last screenshot, you will notice that the status of the payment is “IPO: PO uploaded”. This shows that the file was successfully uploaded and you may move on to the next step. If this message says something otherwise, then the file may not have been uploaded properly.
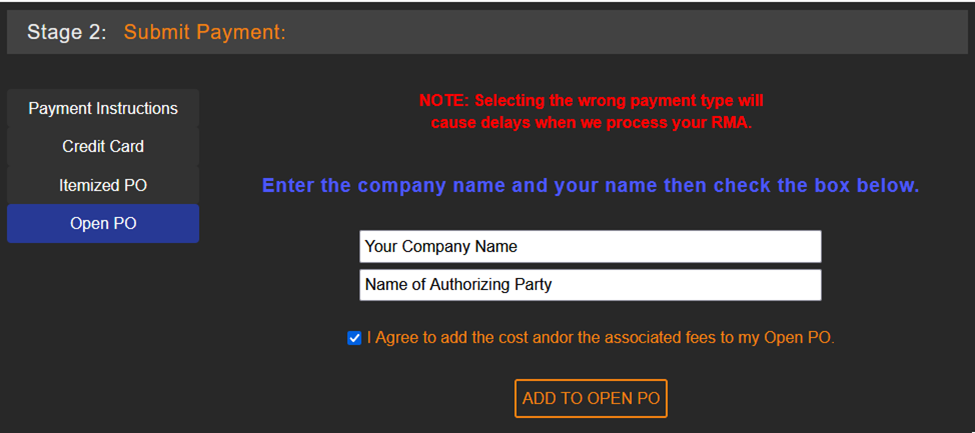
Open PO
An open purchase order is different from an itemized purchase order. An open PO can be charged without creating a separate document with an itemized list of the parts and labor. If your company has previously set up an Open PO with us, you may select this option. Please note, if your company has not set up an Open PO with us, you can still select this option and submit your RMA with it, but it will not be processed.
To use the Open PO option, you will need to enter the name of your company and the name of whoever is authorizing the use of the open PO in the provided Company Name* and Authorized Agent* fields. Next, check the small box indicating that you agree to add the cost and/or the associated fees to your Open PO. Lastly, click the Add To Open PO* button.
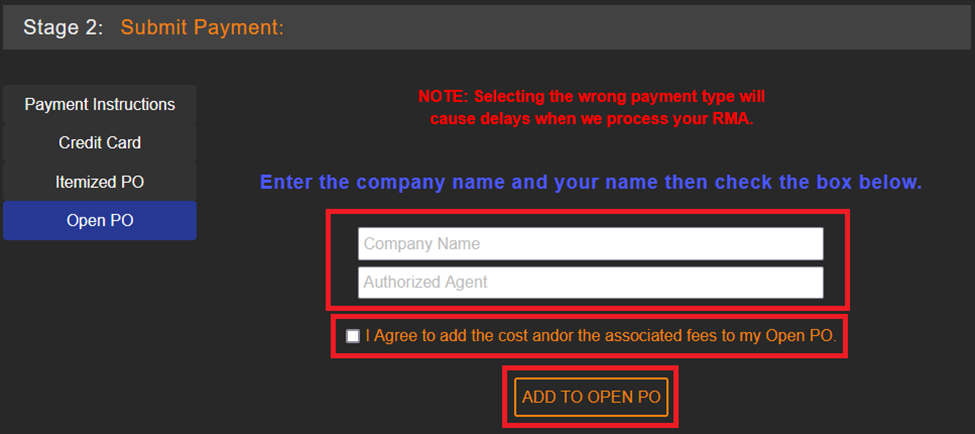
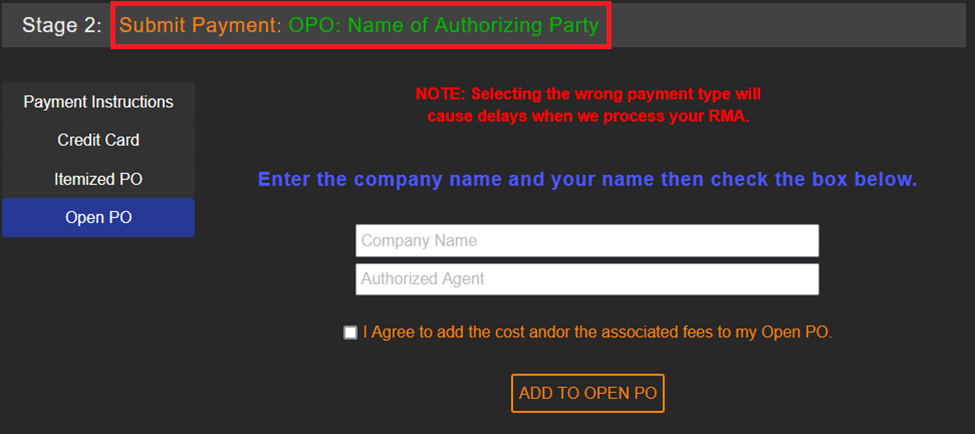
You will notice in this last example that it now says OPO: NAME* where the name is what was entered into the authorized agent field. This shows that the Open PO option has been successfully selected. You may move on to the next step at this time.
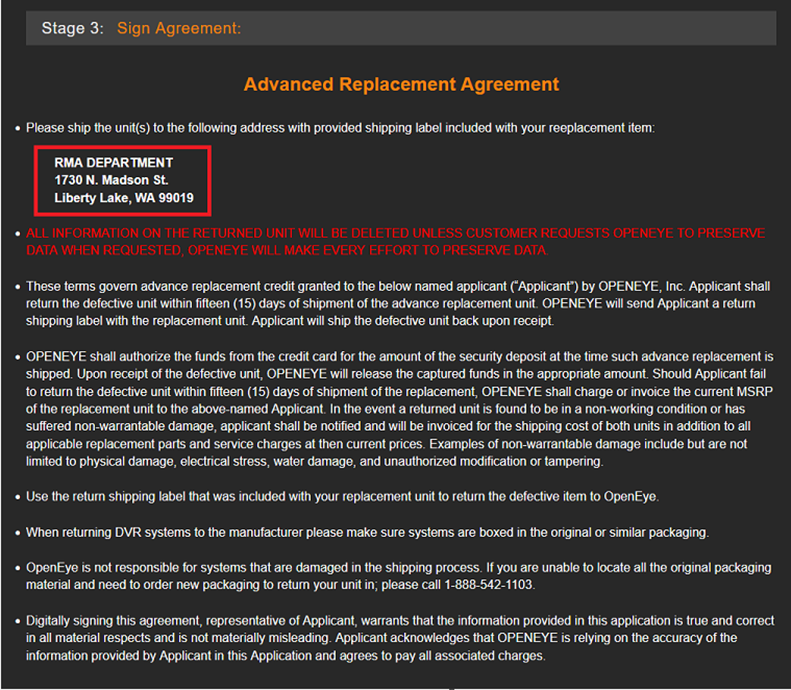
Stage 3: Sign the Agreement
Note: If a repair RMA is received without the RMA Agreement paperwork having been signed, the repair process will not begin until this step has been completed. If the RMA Agreement is not signed within 30 days of the item having been received, the item will be returned to the address on file in its original state.
The next step you will see is for the RMA agreement. This agreement may be different depending on the RMA type. For this example, we are using an advanced replacement so that is the agreement we will see. You will also notice that our address is listed in the event this RMA requires you to send the unit in:
Directly below the agreement, you will see where you can enter your name, agree to the terms, and Submit the Agreement*:
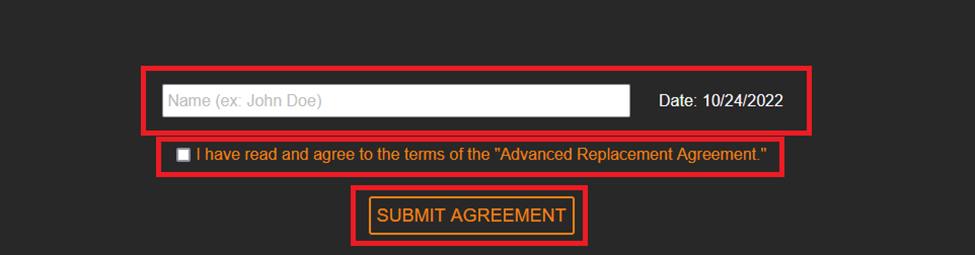
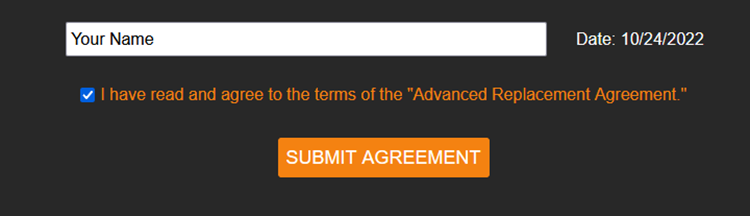
Please note, once you have signed and submitted the agreement there will show no change in the ability to complete this step. This does not mean that it was not submitted properly. If you need to double-check check it was submitted properly, check the light bar at the top of the page for the green check mark symbol. If you still see a yellow caution symbol, it is not submitted.
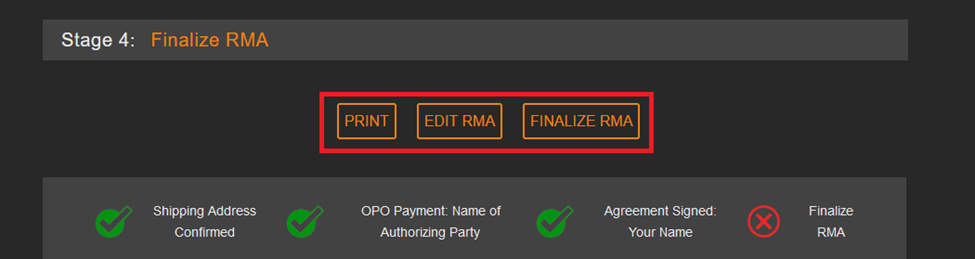
Stage 4: Review and Finalize
At the very bottom of the page, you will see the final step of the RMA portal, as seen below. You will click the button Next – Review and Finalize The RMA*

This will then move you to the next page. You can review all the RMA information from this page to double-check for any inaccuracies. You will also want to double-check the light bar for completed steps. On this page, the light bar appears both at the top and the bottom of the page. At this stage in the process, all steps except for Finalize RMA should have a green check mark next to them. If any of these steps are still showing a yellow caution symbol you will not be able to finalize the RMA. If this is the case, you can click the Edit RMA* button. This will take you back to the previous page so that you can complete the step(s) needed.
You can use the Print* button to print a PDF copy if needed.
The very last step of the process is to click Finalize RMA*. If everything up to this point has been done correctly, this will submit your RMA for processing.
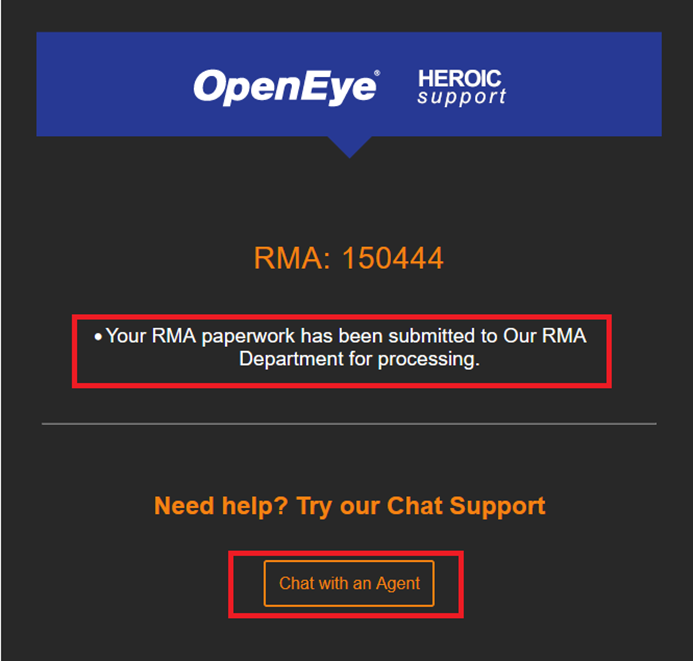
Once you have clicked the finalize RMA button you should then be redirected to a page similar to what is shown below. This page will let you know that the paperwork has been submitted. At this time you will be unable to enter the RMA portal again, as the link will become disabled once finalized. For more information on being unable to enter the RMA portal, you can reference the following knowledge base article:
If you believe you have made an error in the paperwork that you need to fix you can use the Chat with an Agent* button. This will take you to our webpage https://help.openeye.net/ which is used to begin chat support. Simply enter your information when prompted and one of our support agents will be with you shortly.