DMP Integration Instructions
|
|
DMP Panel Configuration Requirements
IMPORTANT
- If the site has a "Fire Keypad" installed. We will be unable to sync the DMP panel to get areas.
- The workaround is to change the Fire Keypad from a “Fire” device to a "Keypad" device. Sync info will now work and then they can set the Keypad back to "Fire".
- This change will need to be done by the tech inside Remote Link or inside Dealer Admin
- This is by design and DMP will not change due to compliance with city/county regulations.
- When a Fire device is in place. Remote Programming is disabled unless someone enters the passcode on the local keypad.
Enable DMP in OWS
Go to Manage > Integrations in the End User Portal.
- Choose DMP and click Next.
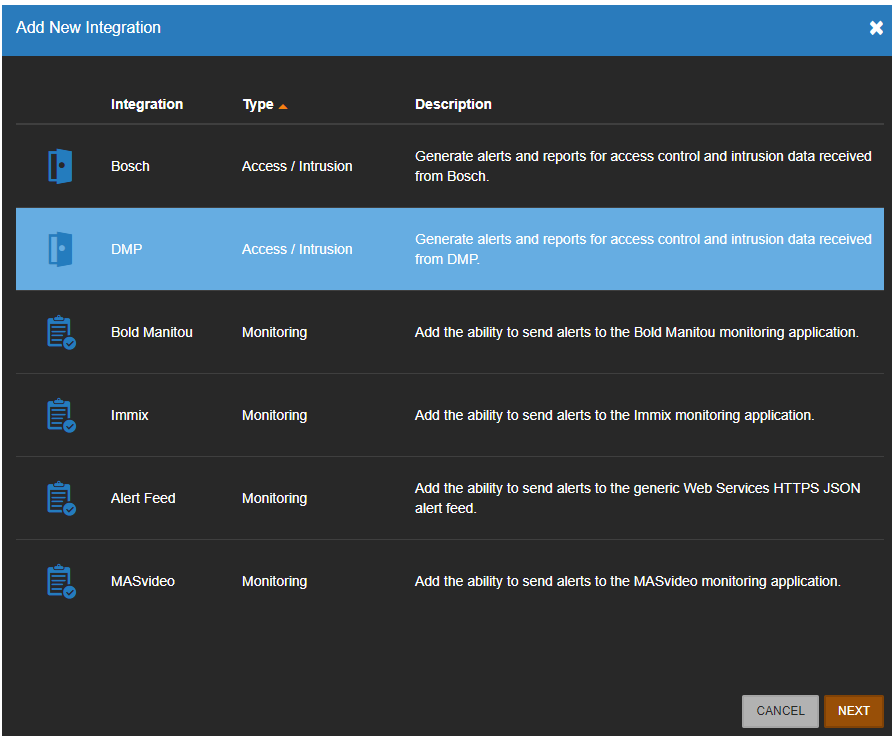
- The DMP Integration will be added to the Manage Integrations list.

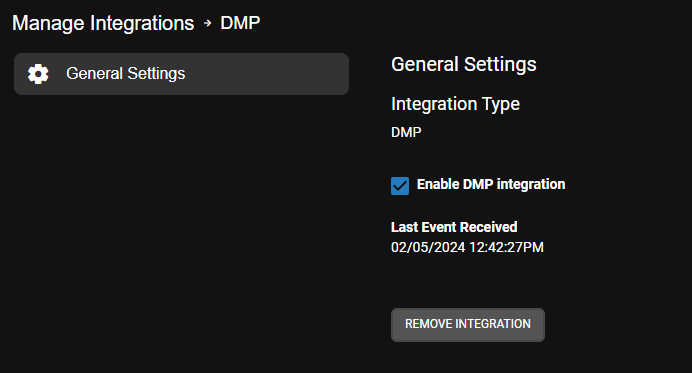
- Click Edit to enable or disable the DMP Integration in General Settings.
Dealer Admin Setup
To begin setting up a DMP panel, login at https://dealer.securecomwireless.com/#/page/login
- After logging in, you should see the customer list
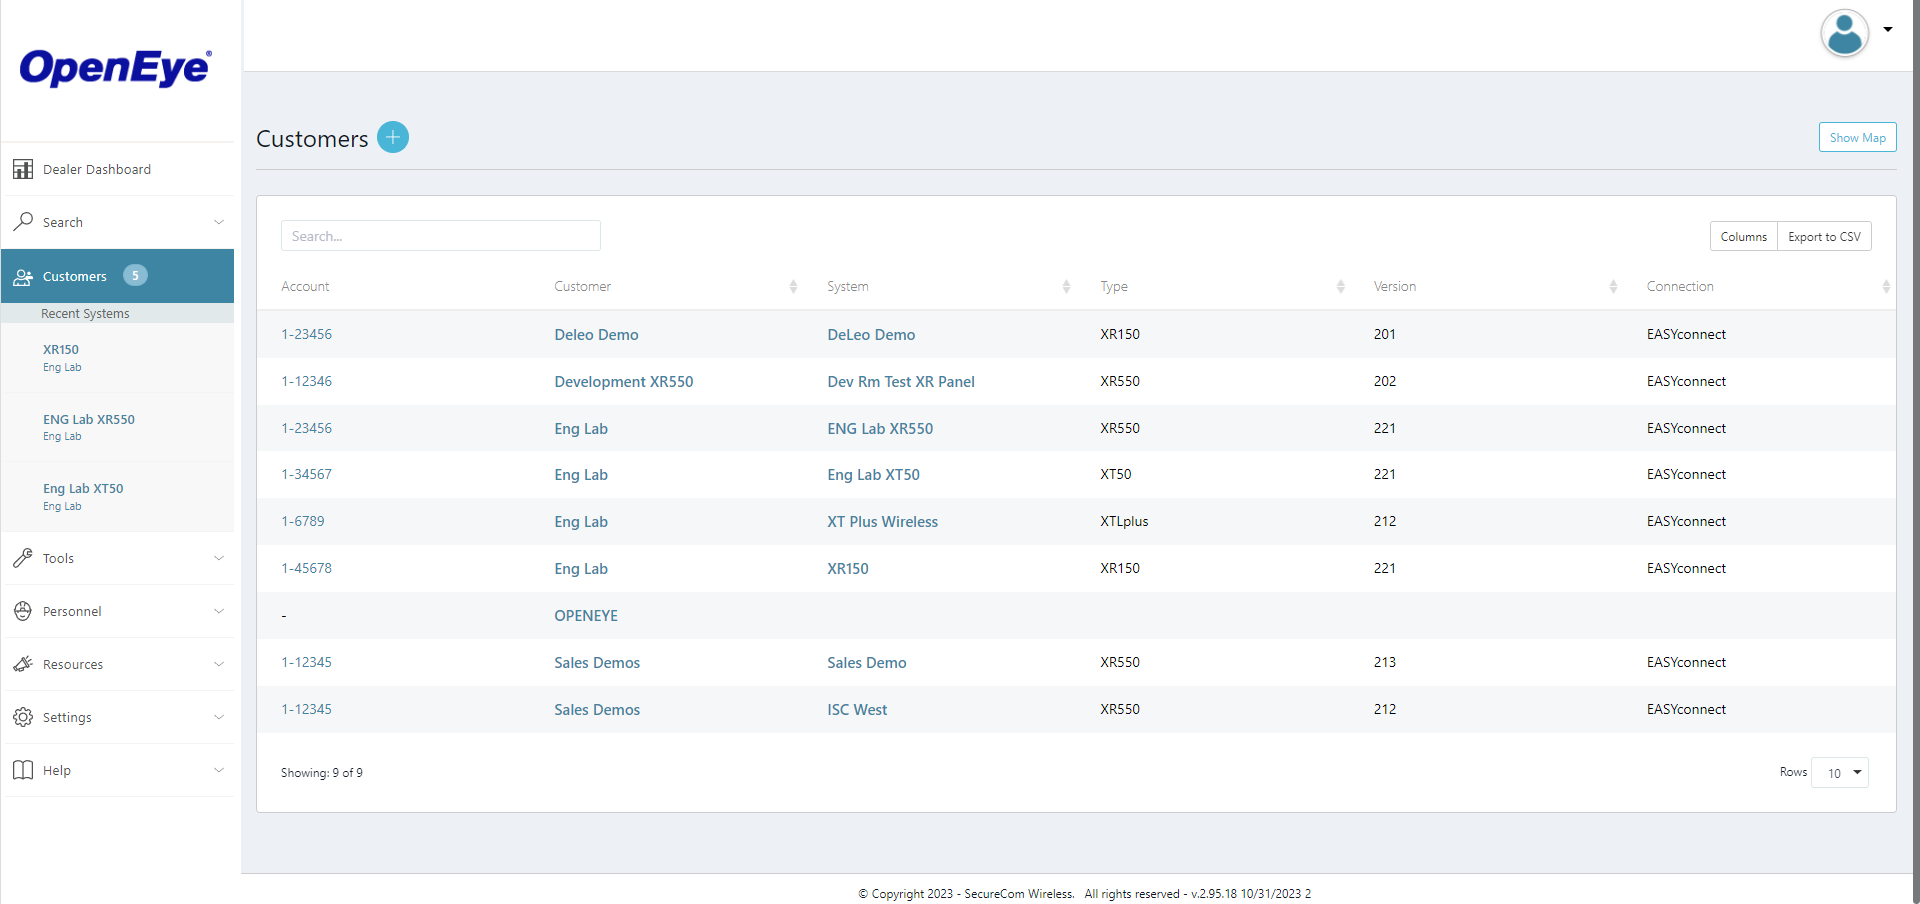
- From here, you will click on the customer in order to begin adding a new DMP panel

- Click the + symbol next to Systems to add the new DMP panel
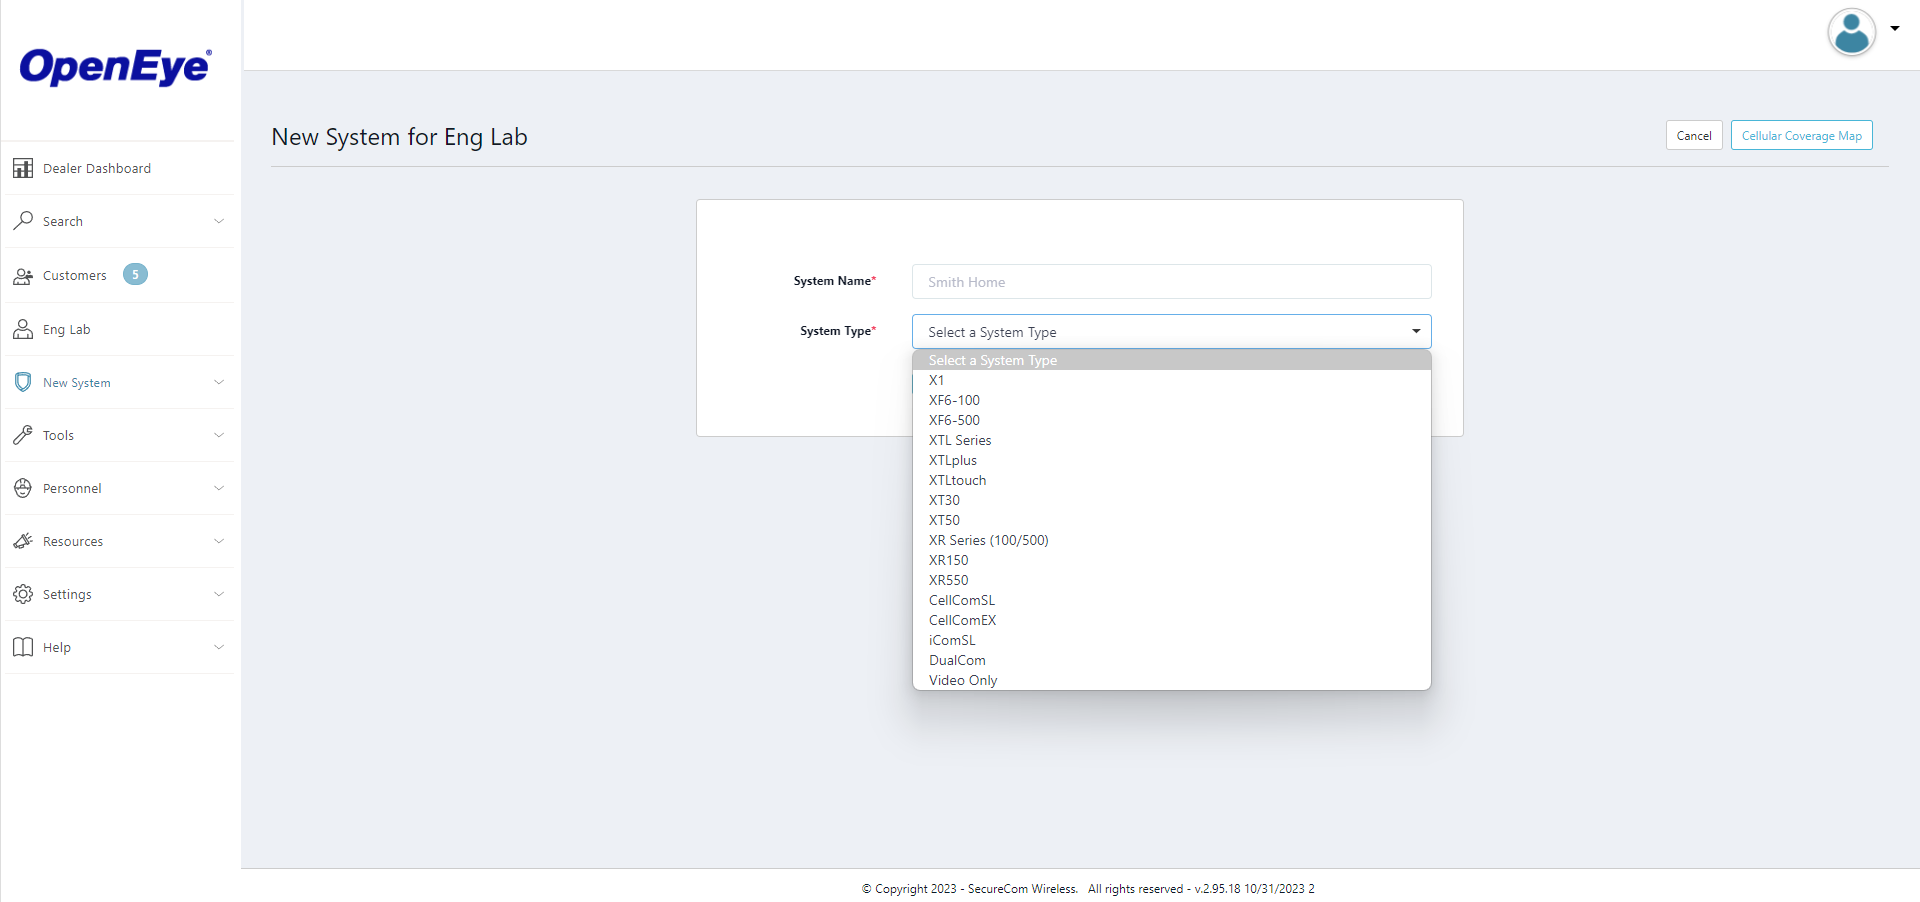
- Enter the account information for the DMP panel
- Serial number can be found on the panels board
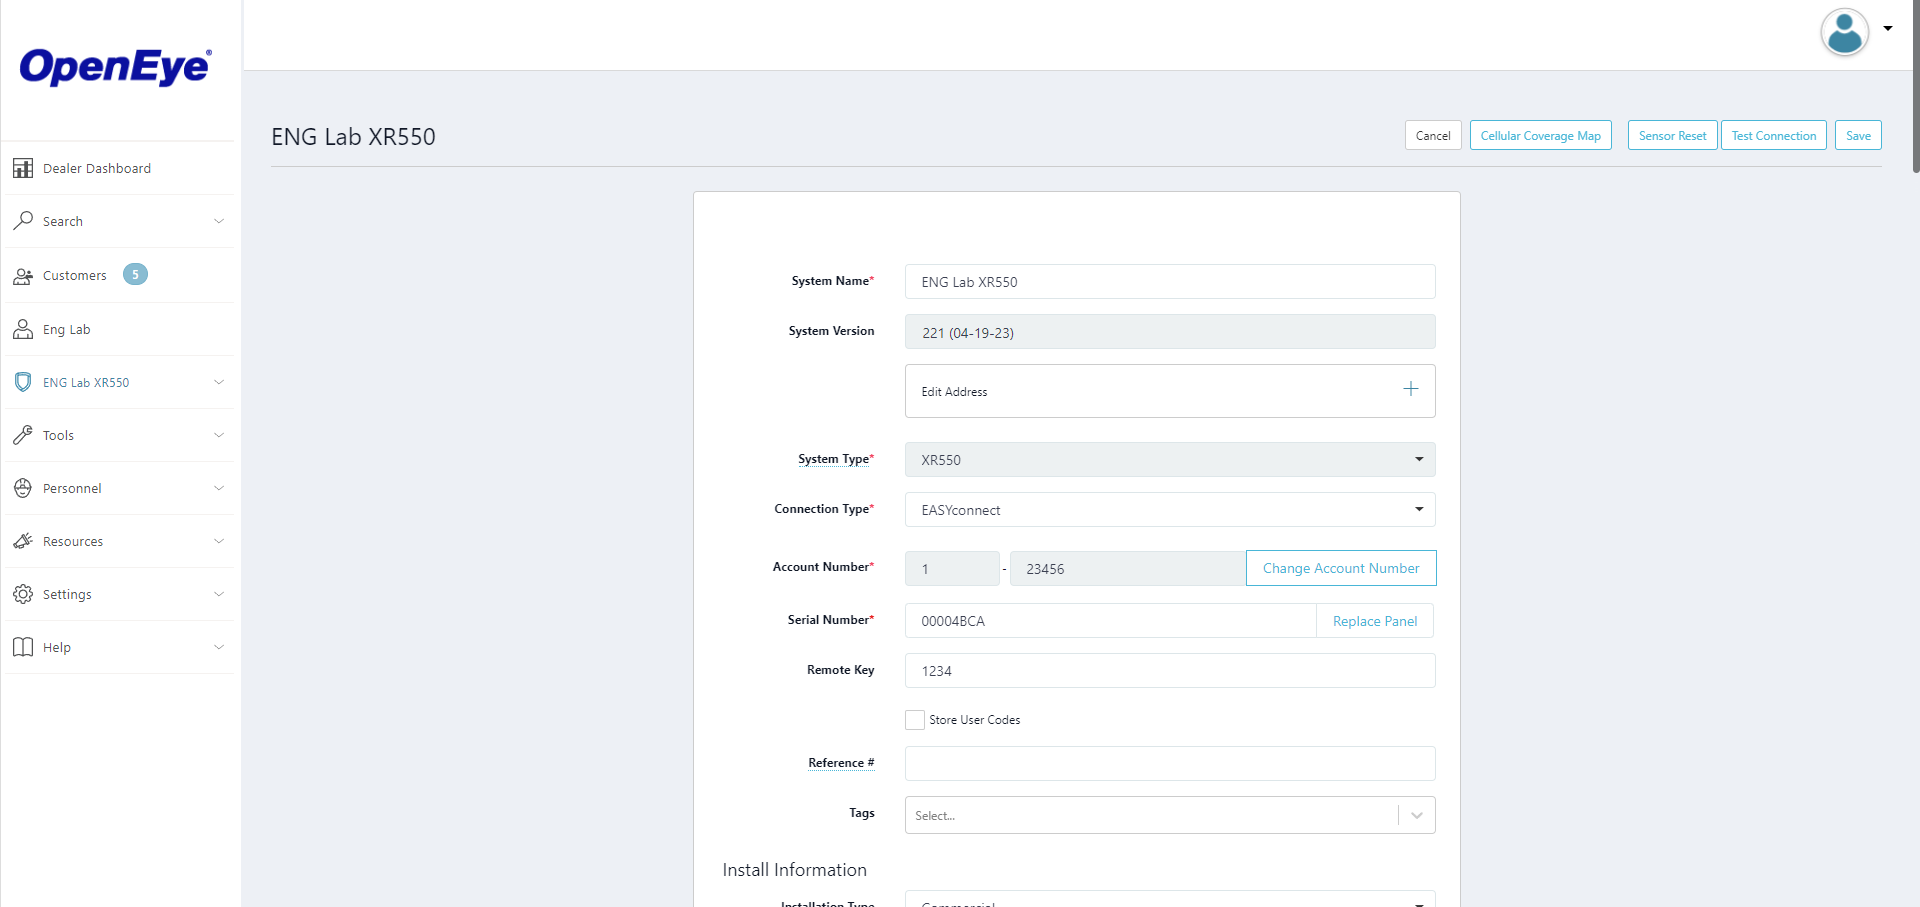
- Add any additional install information for the account and DMP panel
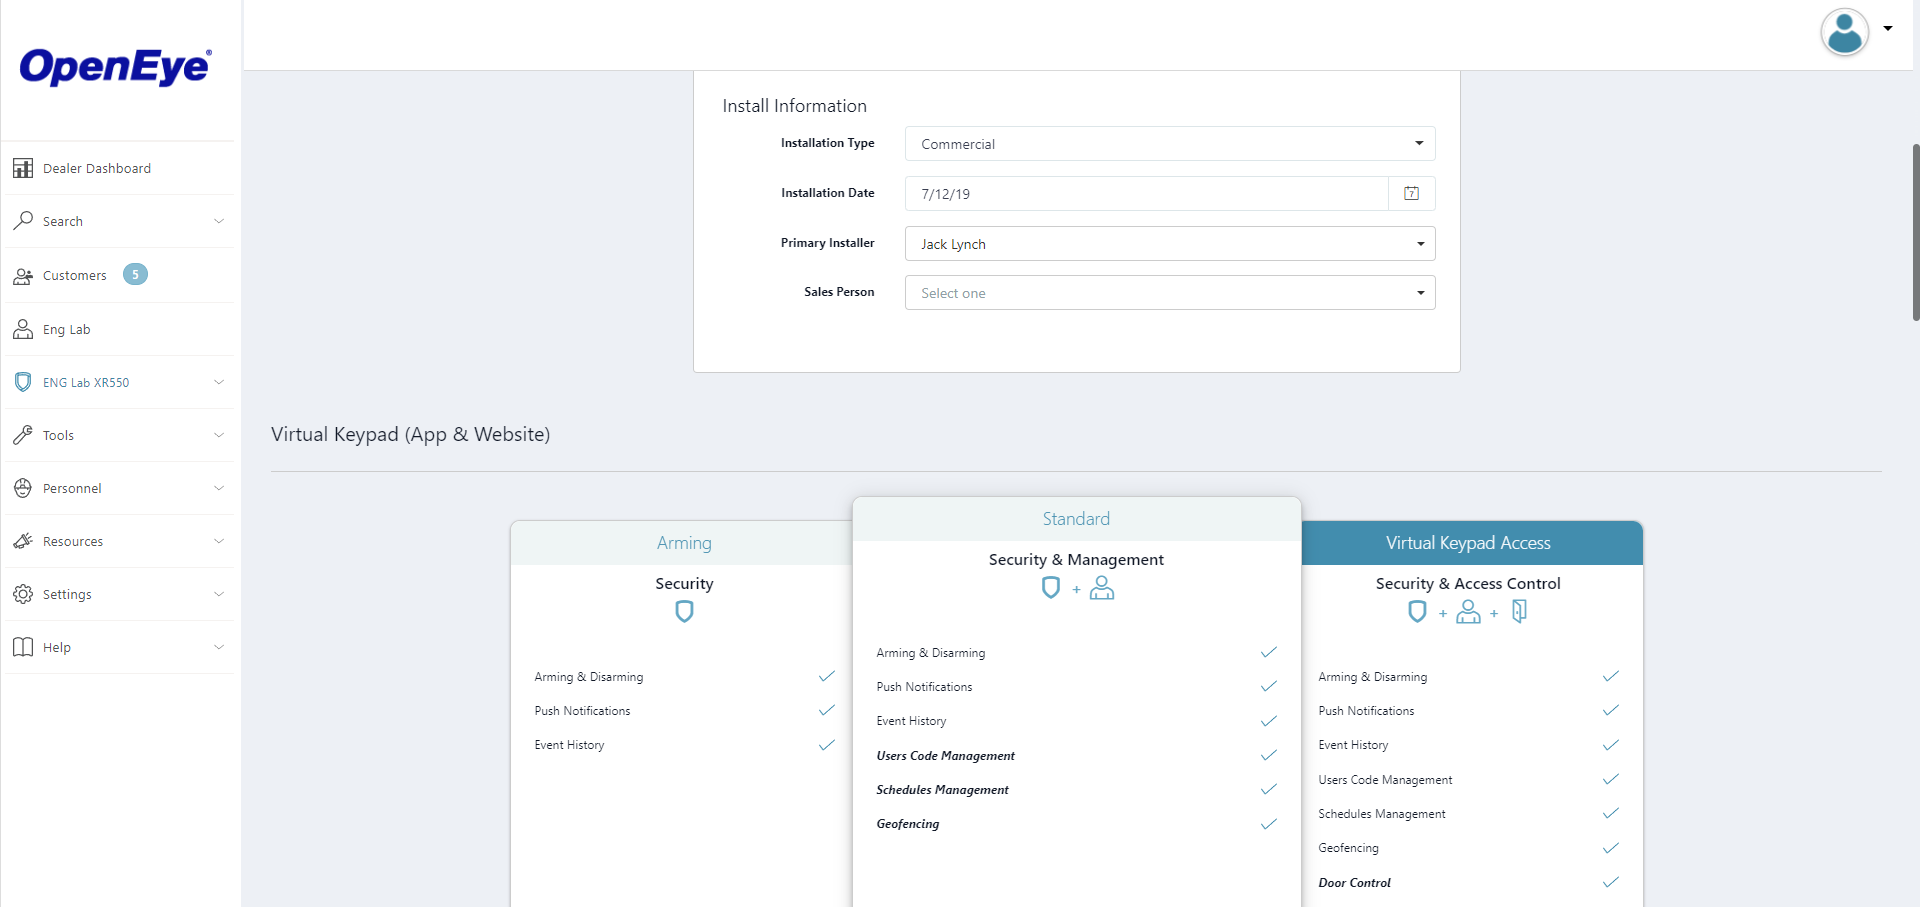
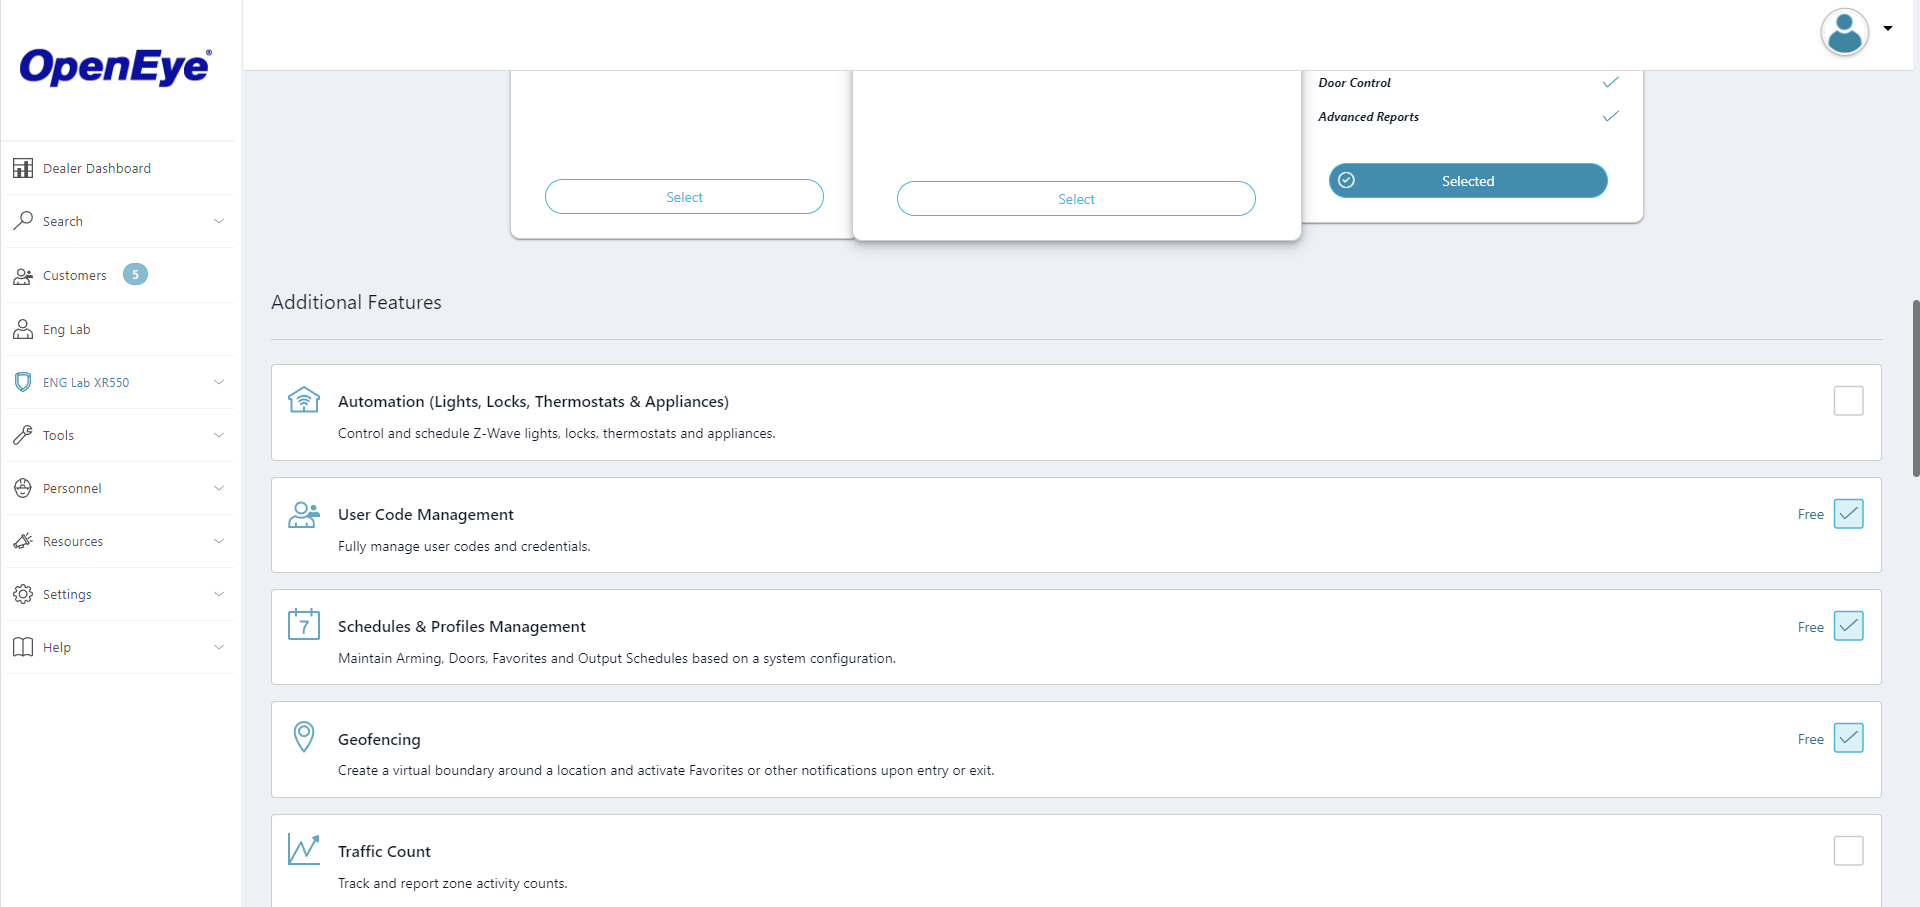
- Configure additional features
- Configure Virtual Keypad access

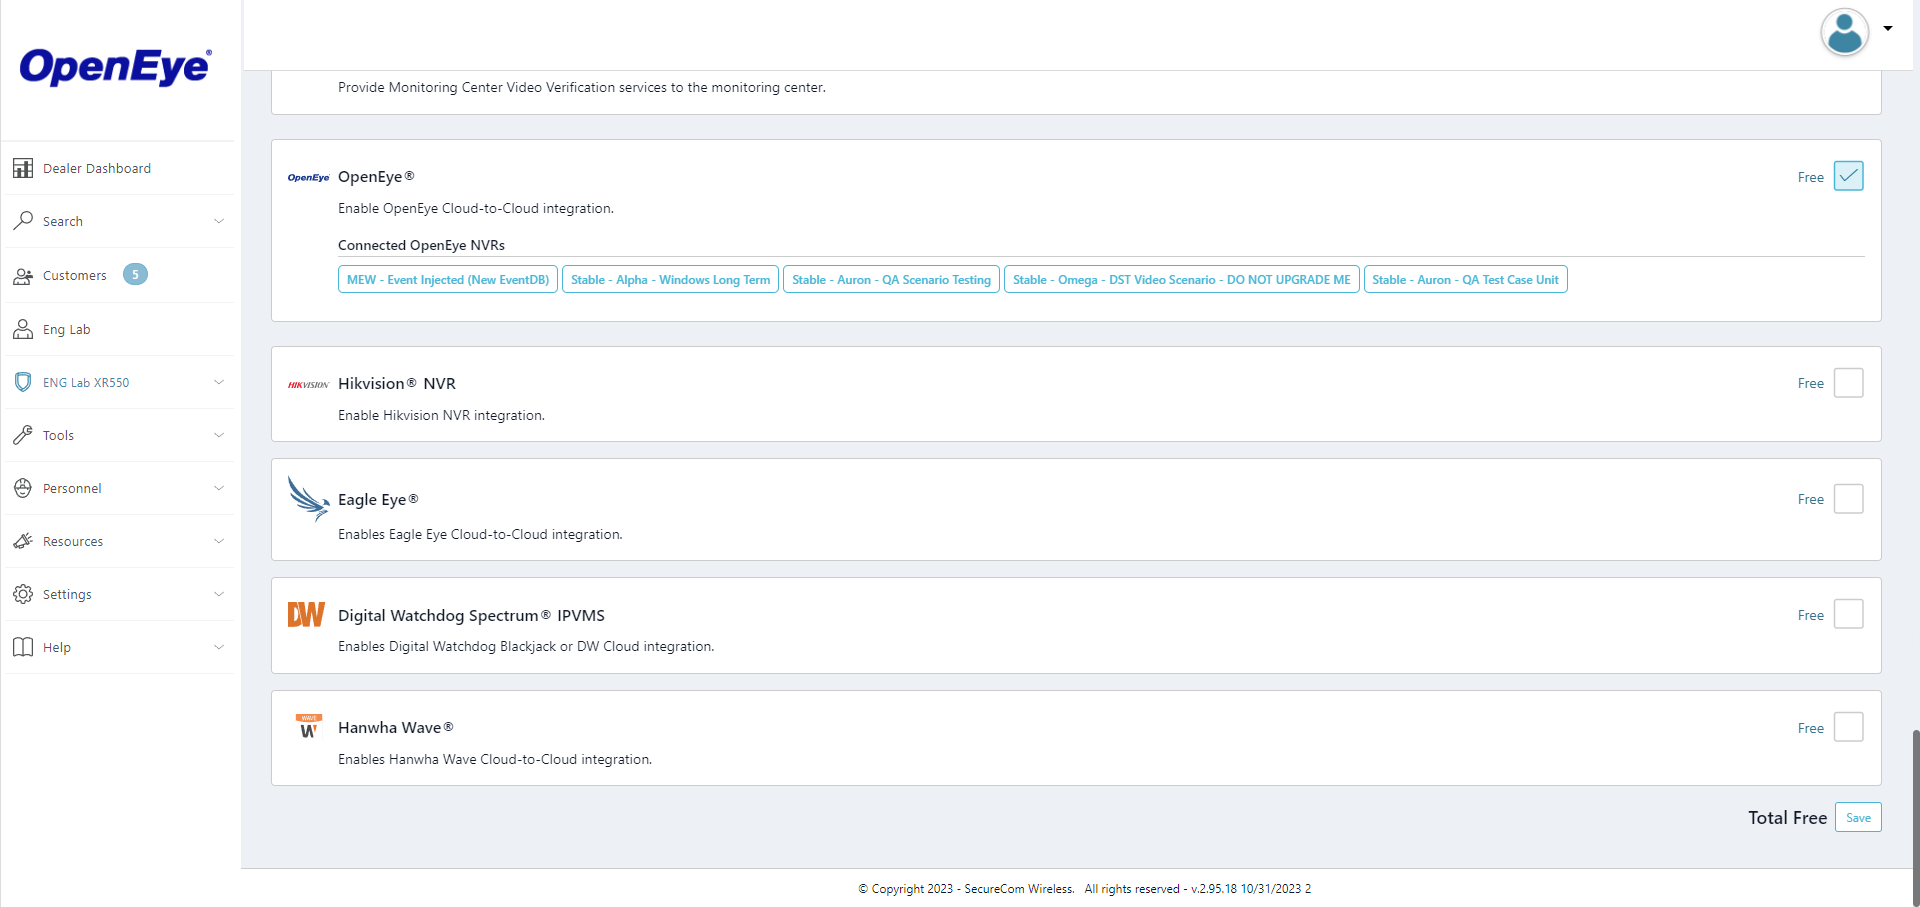
- Ensure you enable OpenEye Integration and then click Save once you are done with setup on this page
- On the left-hand side menu options, click Settings then Dealer
- This is where you will find the App Key which needs to be entered to the panel configuration
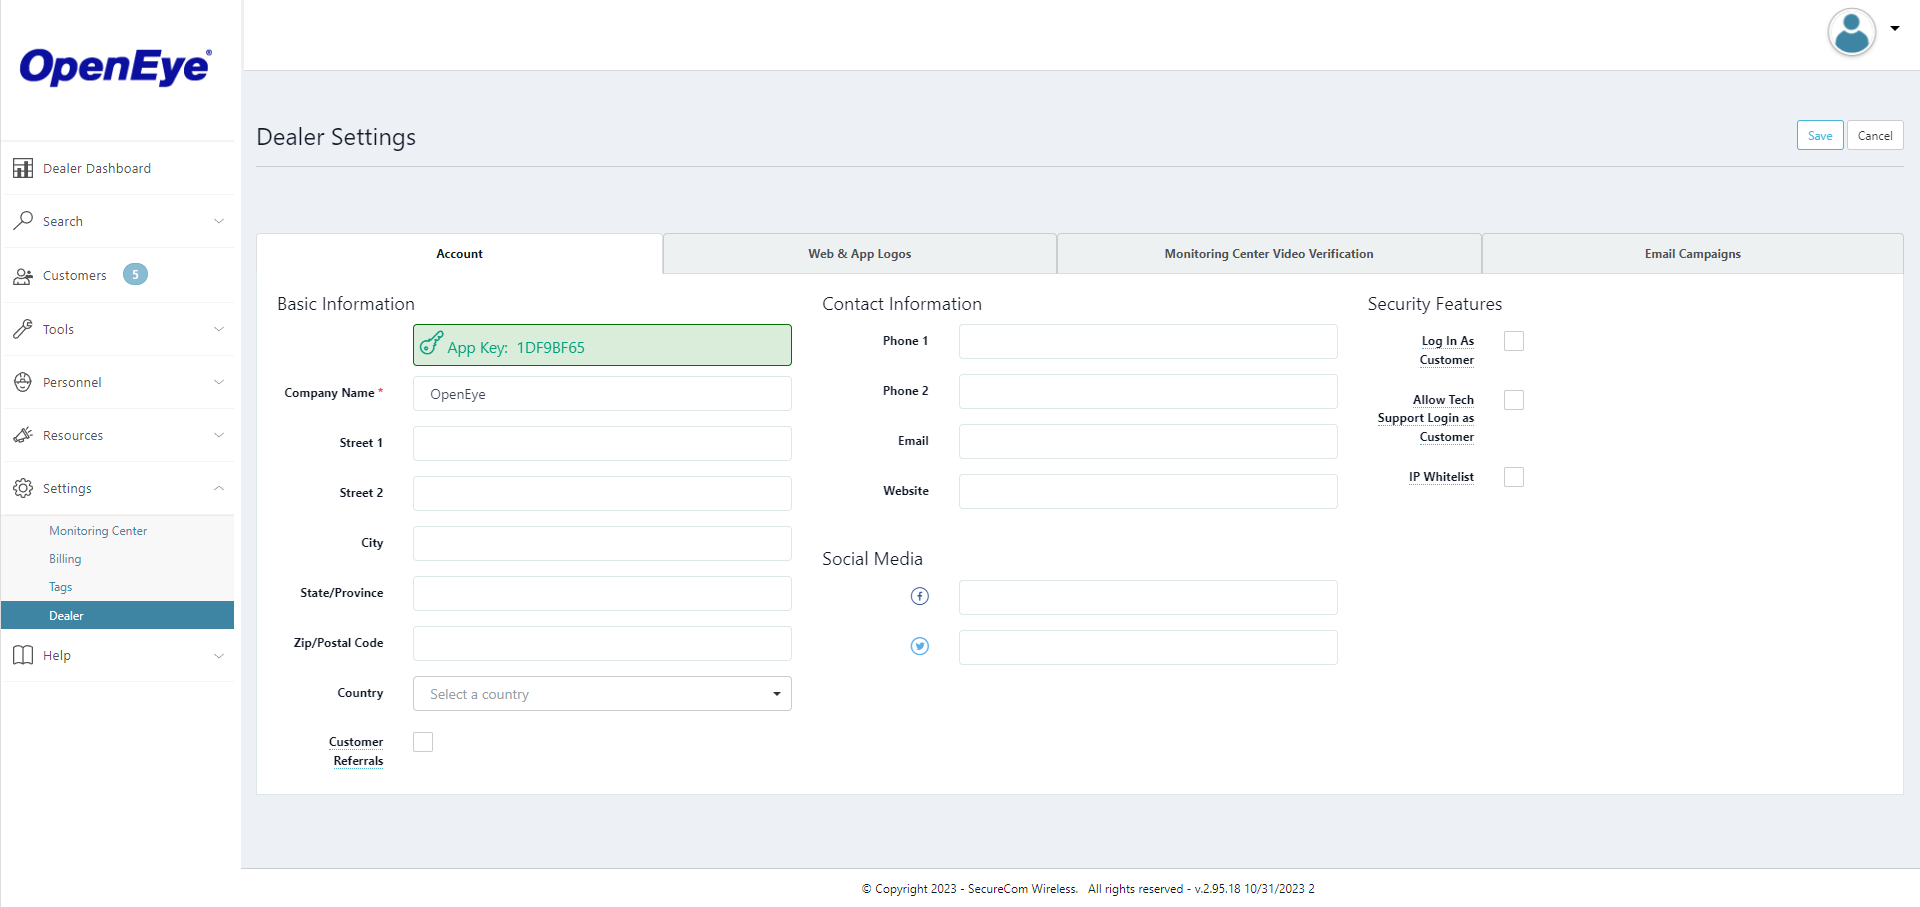
- Click on Customers again to view the newly added panel.
- Click on the panel name which will bring up a page to test the panel connection
- This may take time if the App Key was just added to the panel and if the panel is still pulling down information
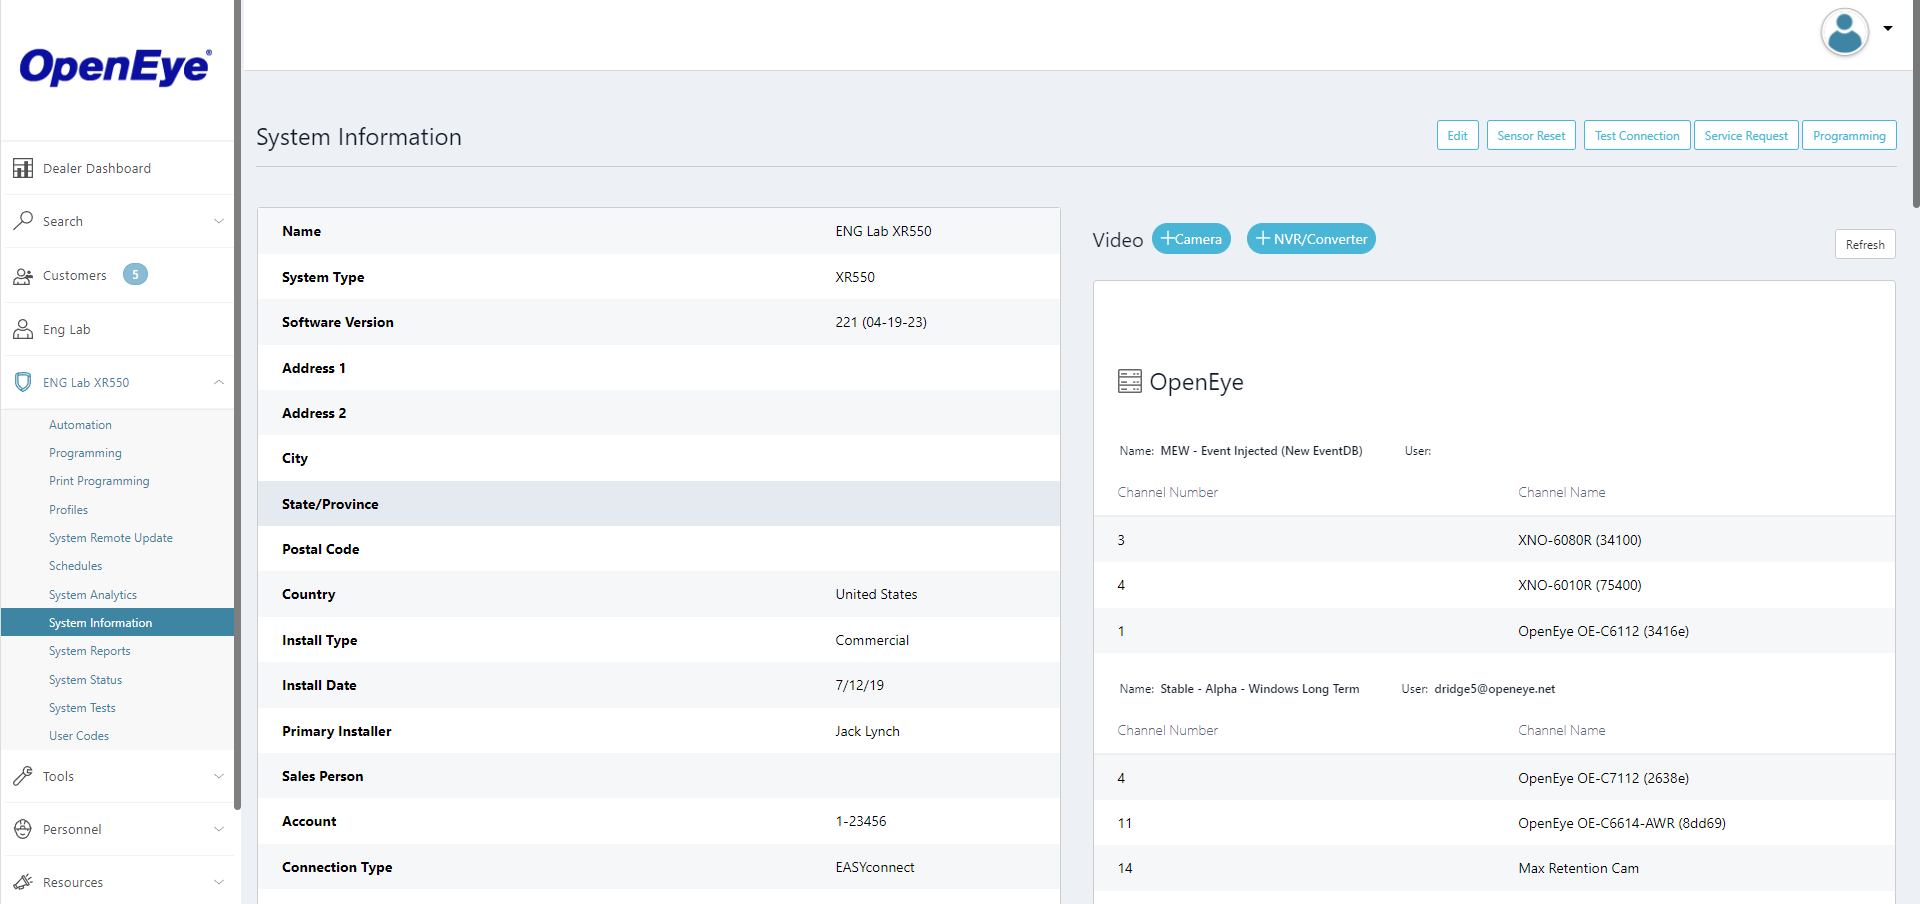
- Click on the Programming button and then click the 3-dots and select Retrieve All Programming, which will pull data into the portal based off what is currently on the panel
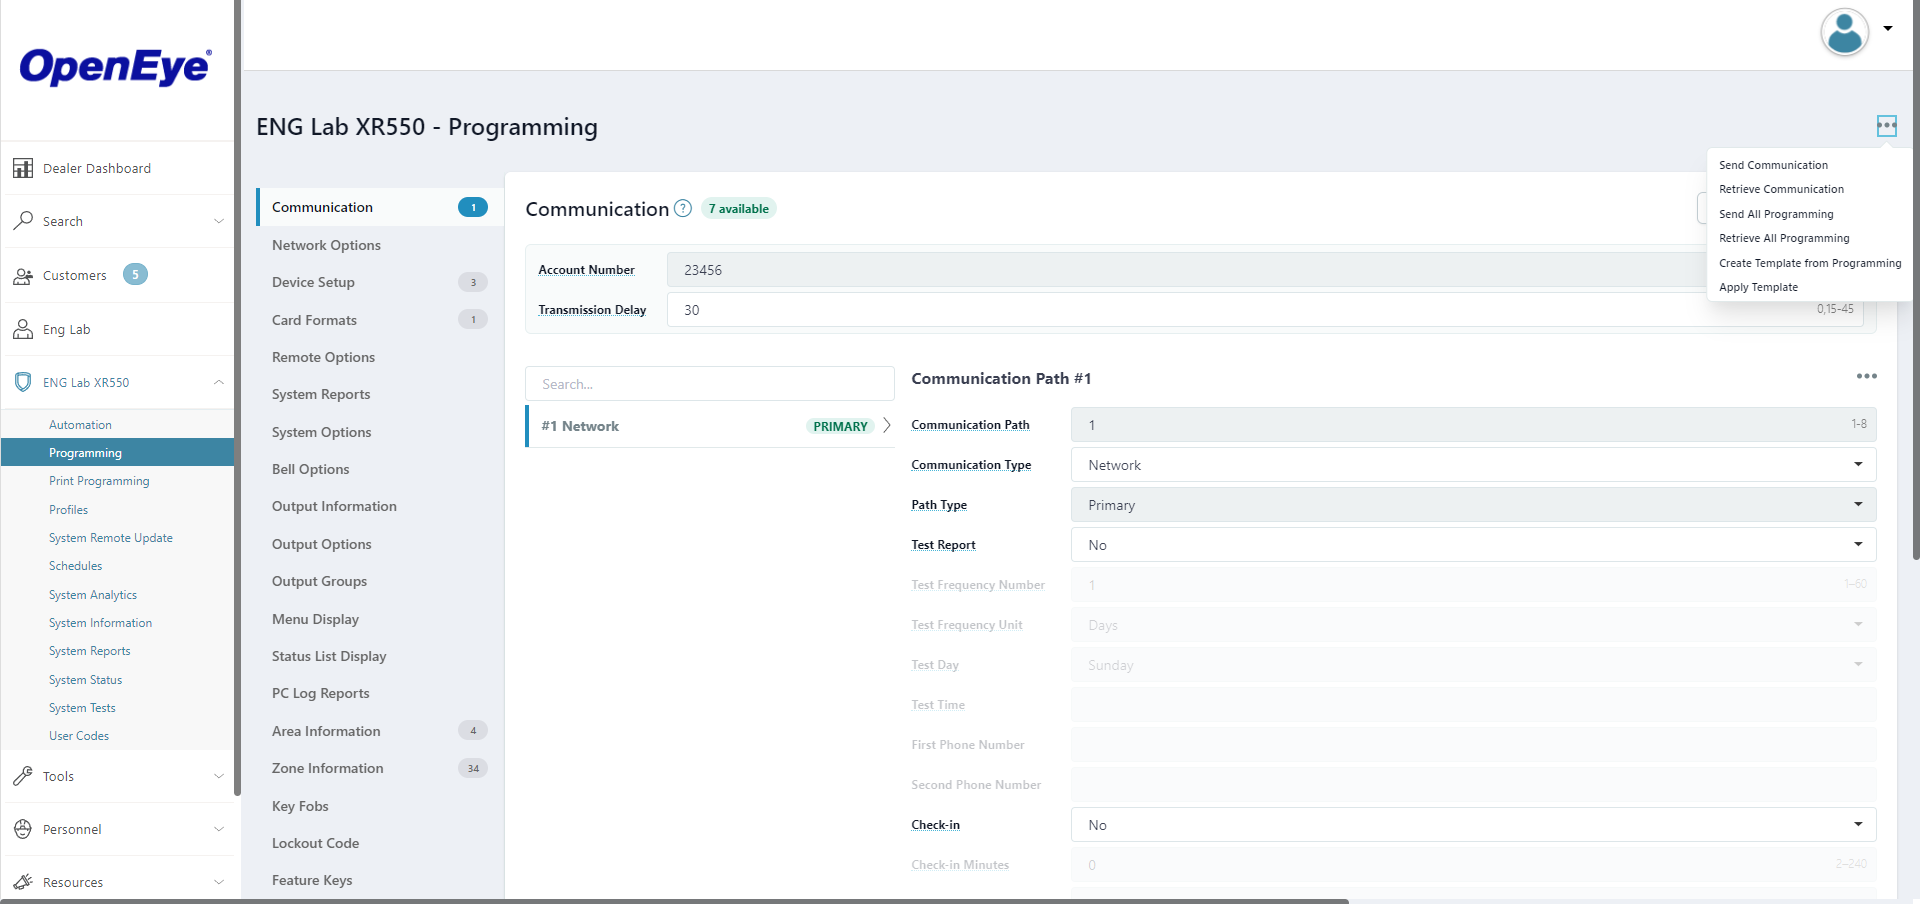
- To enter the recorder IP address, click Remote Options, scroll down to Integrator section and click the arrow to expand the options
- Enter the recorder IP address in the Integrator Incoming IP Address field

After you are done with setup in the DMP Dealer Admin portal, move onto setup on the recorder Adding an Intrusion Panel
Remote Link Setup
Setting Up XR Series Panels (for Panels with Versions Less than 192)
To set up an XR series panel for use, it is necessary to configure the PC Log Reports section in the Remote Link software connected to the DMP panel:
- Enter the IP address of the recorder in the Net IP Address box.
- Check all of the checkboxes under Options.
- Leave the Net Port at the default, 2001.
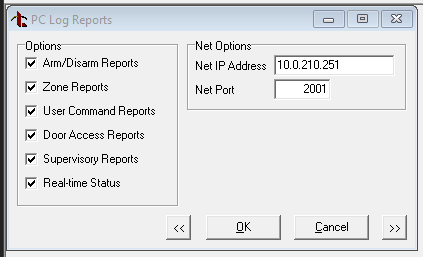
Note: XR refers to the Net Port, found in the Remote Link utility under PC Log Reports - Net Options. This is the communication port that is used to communicate with the recorder.
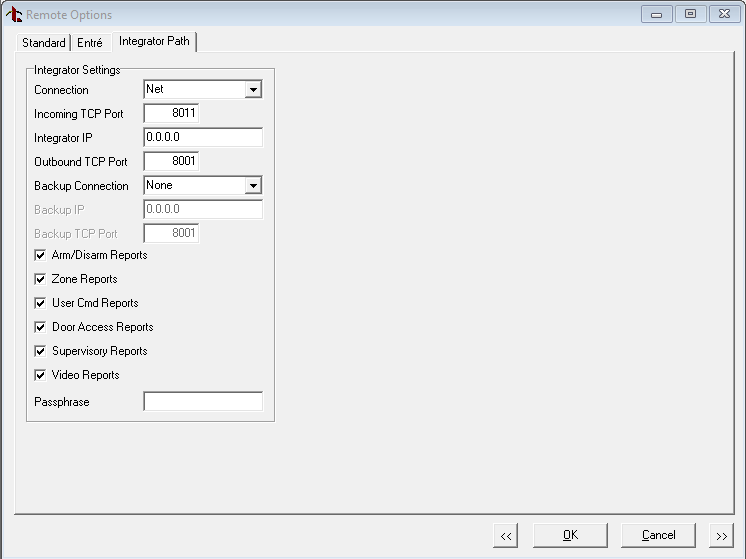
Setting Up XR Series Panels (for Panels with Firmware Revision 192 or Newer)
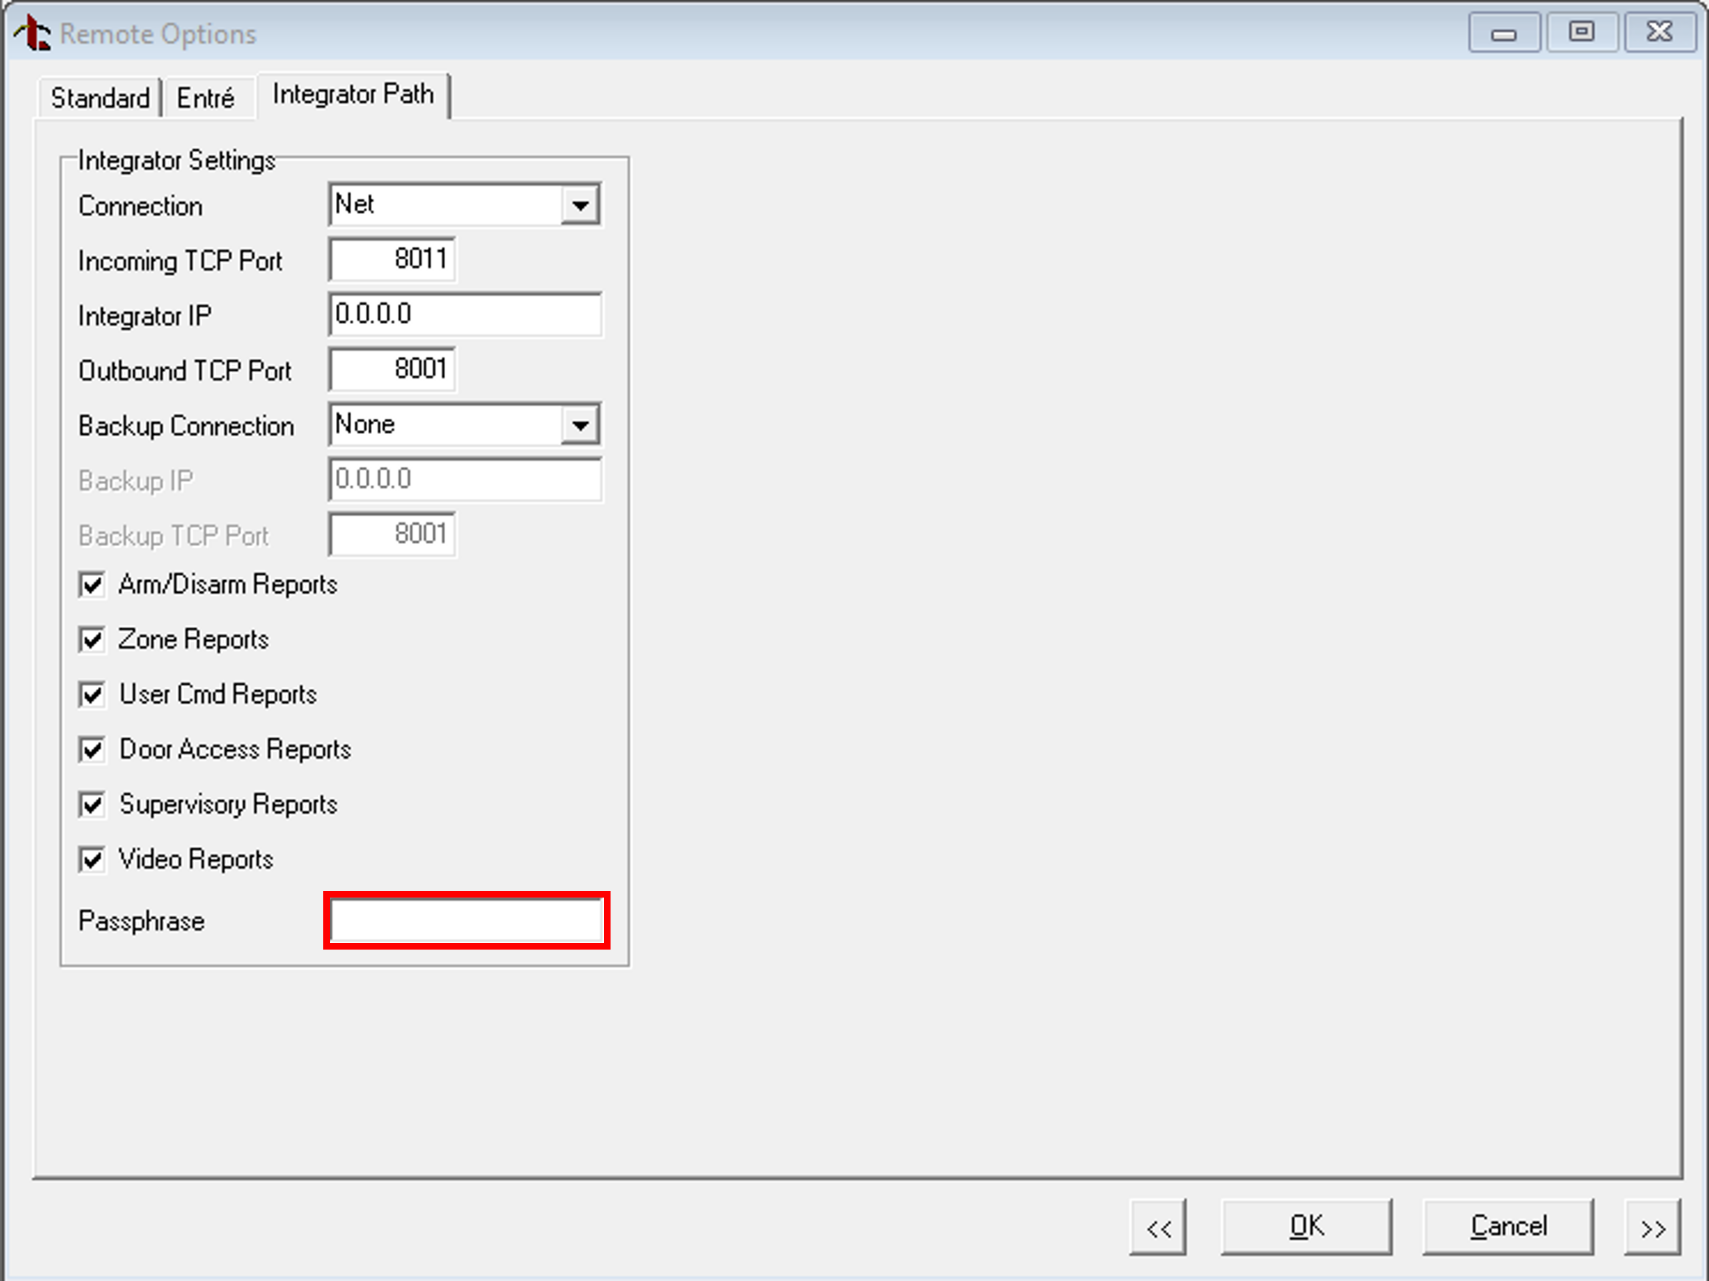
To set up an XR series panel, it is necessary to configure the Integrator Path in the Remote Options section in the Remote Link software connected to the DMP panel:
- Select Net as the Connection type.
- Enter the Incoming TCP Port (8011 as default).
- Enter the IP address of the recorder in the Integrator IP Address box.
- Enter the Outbound TCP Port (8001 as default).
- Leave Backup Connection as none.
- Select all event types.
- Leave Check-in Minutes at 0.
- Leave Passphrase blank.
NOTE: Currently, OpenEye supports the XR-Series (XR550, XR150) and XT-Series (XT50, XT30) alarm panels.
NOTE: Integration with XR-Series and XT-Series panels requires firmware 171 or greater on the panel. When upgrading the firmware be sure to reset the panel when complete. Manually reconfiguring the panel may be necessary depending on previous configurations. When upgrading the firmware be sure to reset the panel when complete. Manually reconfiguring the panel may be necessary depending on previous configurations.
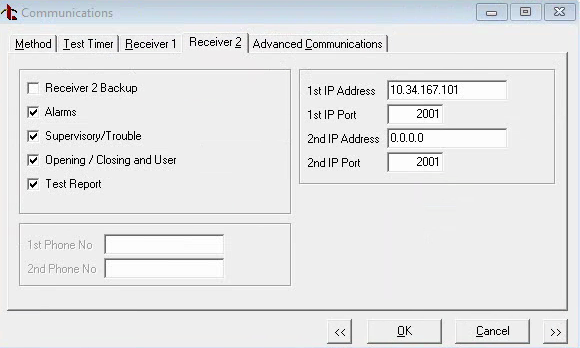
Setting Up XT Series Panels
To set up an XT series panel for use, it is necessary to configure the Communications - Receiver 1 or 2 section in the Remote Link software connected to the DMP panel:
- Enter the IP address of the recorder in the 1st IP Address box.
- Check Alarms, Supervisory/Trouble, Opening/Closing, and User and Test Report.
- Leave the Net Port at the default, 2001.
NOTE: To get events based on access control readers, an equivalent zone 2 (Door Contact) for the 734 Weigand Interface Module needs to be configured. These readers will then appear on the sensor list in setup and allow you to generate macros based on their activation or alerts based on area access. Please reference the 734 Installation Guide to determine the proper zone addresses.
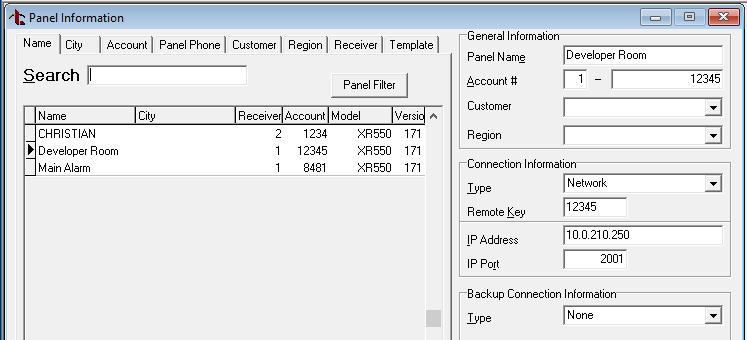
The following information will be required later to configure and can be obtained from the Panel Information window:
- Account Number
- Remote Key
- IP Address
The Controller Port is different depending on the panel being used:
- XT refers to the 1st IP Port in the panel under Communications > Receiver 2 > 1st IP Port (default 2001)
- XR (firmware older than rev 192) refers to Net Port in the panel under PC Log Reports > Net Port (default 2001)
- XR (firmware rev 192 and newer) refers to Incoming TCP Port in the panel under Remote Options > Integrator Path > Incoming TCP Port (default 8011)
Adding an Intrusion Panel
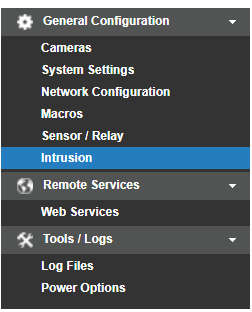
Add and configure an Intrusion Panel in the Intrusion tab under Setup > General Configuration > Intrusion.
There are two ways to add a DMP Panel to the system:
Auto Discovery (Preferred Method)
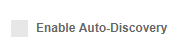
Go to Intrusion > Intrusion Panels and check the box labeled Enable DMP Auto-Discovery to have the system attempt to automatically add a connected intrusion panel. This setting must be enabled each time the recorder is powered on.
If the system is receiving data from the panel, it will automatically be added. Make sure to trigger an alert on the panel to ensure data is being sent. The easiest method is to arm, then disarm the panel. Once added, click on the panel in the intrusion menu and enter the Remote Key, then click Save.
Manual Add
To manually add the panel, click on the Add New Intrusion Panel option in the Intrusion section of setup. Refer to the Intrusion Panel Configuration section below.
Intrusion Panel Configuration

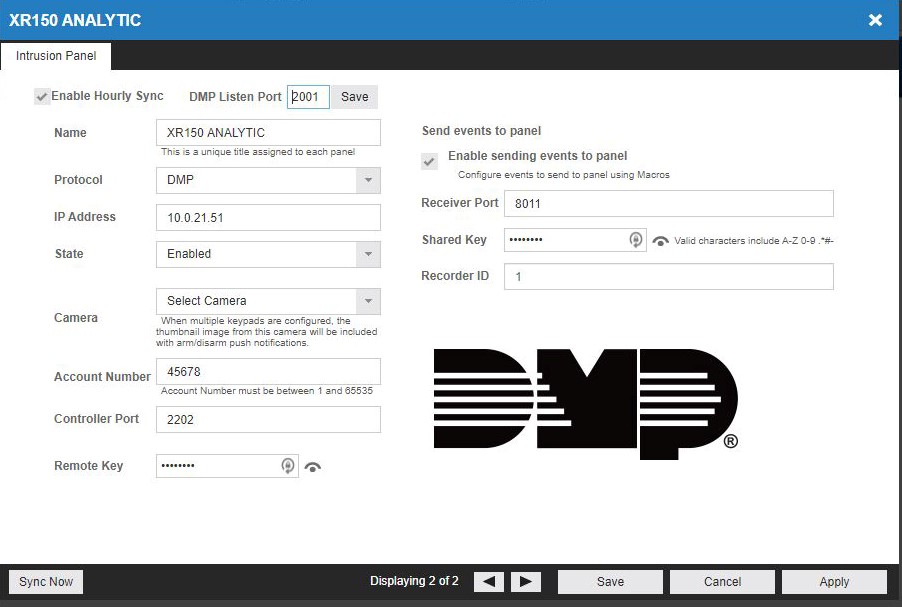
Intrusion Panels are used to set up connections to the DMP panel. In the Intrusion Panel, select Add New Intrusion Panel and complete the fields noted below:
- Name - Identity the panel being connected.
- Protocol - DMP
- IP Address - The IP of the DMP Panel (see the DMP Panel Configuration Requirements section).
- State - Select Enabled to connect to the panel. Disabled removes the connection.
- Location - Select a Location from the dropdown to associate with the panel.
- Camera – When multiple keypads are configured, the thumbnail image from this camera will be included with arm/disarm push notifications.
- Account Number - Enter the account number designated in the Communications Path information in the DMP Remote Link (this should be provided by your installer).
- Controller Port – Is used to receive the configuration from the panel. This is the Outgoing TCP Port on the DMP Panel.
- Remote Key - Enter the remote key designated in the Remote Options panel information in the DMP Remote Link (this should be provided by your installer).
Send Events to Panel
When enabled you can send events to the DMP Panel using Macros that are configured on the recorder.
- Receiver Port - This is the Incoming TCP port that the DMP panel will receive events on.
- Shared Key - This can be the same as the Remote Key. Valid characters include A-Z 0-9 .*#-
- Recorder ID - This is the unique identifier that can be used to ensure you are connecting to the correct recorder.
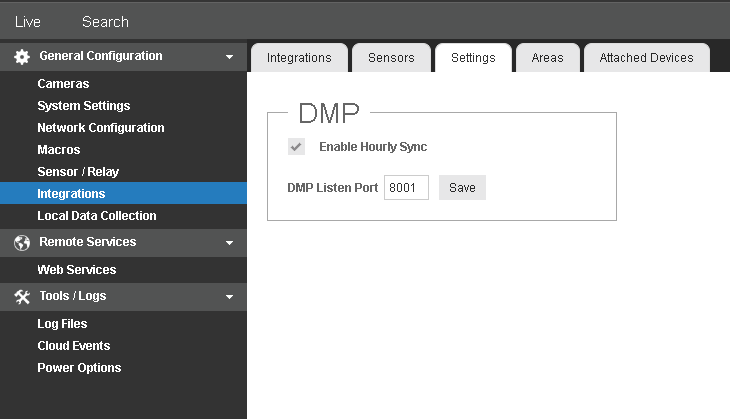
DMP Listen Port
In Setup > General Configuration > Integrations > Settings, make sure the port is set to match the Integrator Outgoing TCP Port, which is 8001 by default.
Sensors
Once a panel has been added, macros and cameras associated with the panel can be viewed in Setup > General Configuration > Intrusion.
NOTE: This tab is not visible unless an integration device has been added.

Enable – Enable or disable a sensor.
Number – Number value from the sensor input record.
Address – Sensor number associated with the recorder.
Sensor Name – Name of the sensor associated with the recorder.
Origin – Origin of the sensor being used by the recorder (typically internal to the recorder).
Current State – Current state of the sensor (open or closed).
Type – Shows the type of sensor.
Area – Associate a sensor with an intrusion area.
Associated Macros – Shows any macros associated with a specific sensor.
Associated Camera – Allows the association of a specific camera to a sensor.
Image Offset – The delay between the start of a sensor event and the time an event is captured.
Event Schedule – Select Always, Never, Weekdays or Weekends.
Areas
NOTE: This tab is not visible unless an integration device has been added.
Use this tab to view area names, origin, current state, and associated macros.

To assign a camera to an Area, follow these steps
- Open the Cameras menu
- Select the desired camera
- Select the Area drop down menu

- Select the desired Area from the list
- Click Save.
Intrusion Panels
Add and view panels in the Intrusion Panels tab. Click on an added panel to enter and edit information.
Sending Events to Panel
With the help of a Macro defined in the NVR setup (Macros) you can send Analytic events from the NVR to the DMP Panel.
To enable:
- Check Enable sending events to panel
- Enter Receiver Port, Shared Key and Recorder ID fields to allow events to send.
The shared key is required in order to send events to the DMP panel. This shared key is labeled as "Passphrase" in the Integrator Path options of the DMP Panel.
Receiver port will be the Incoming TCP Port in the DMP Setup.
Recorder ID can be left at 1 by default.
If multiple NVRs were sending events to the panel, you would change this number to give each NVR a unique ID.
Attached Devices
The Attached Devices tab displays a list of available devices configured on the panel. Associating a camera to a sensor will allow image snapshots to be included in configured alerts. Modify the Image Offset to increase the time by the specified number of seconds (from the beginning of the event) that the snapshot will be taken.
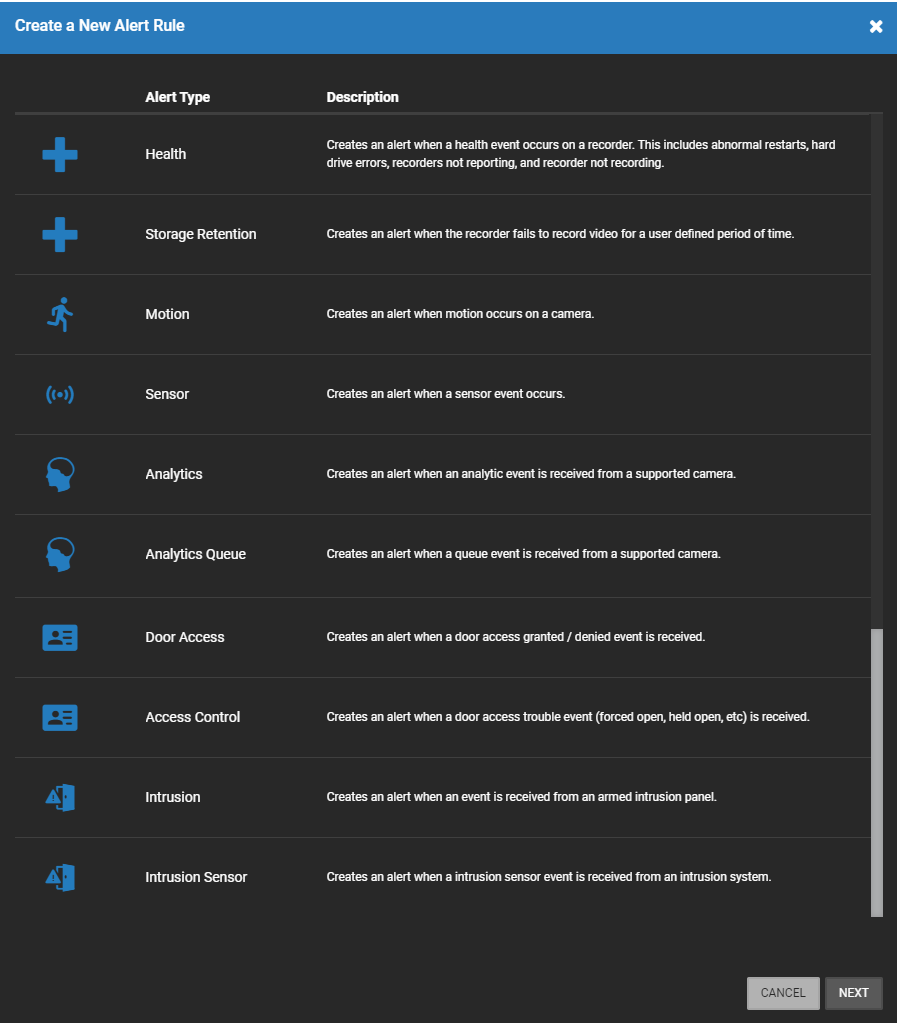
Create a New Intrusion Alert Rule
Creating a New Alert
Select one of the Access or Intrusion Alert Types when Creating a New Alert Rule:
- Access Alerts are alerts based on access control readers. You can generate alerts based on access being granted to an area, access being denied to an area and door status.
- Intrusion are alerts based on panel status. You can generate alerts based on areas being armed, disarmed or late to arm, intrusion alarms and the panel/device connection state.
- Intrusion Sensor Alerts are alerts based on intrusion sensors. You can generate alerts based on sensors being opened. A future update will enable the ability to generate alerts based on sensors being closed.
Defining an Intrusion Alert Rule
- Use the Event Group dropdown menu to select an Event Group.

- Use the Event Type dropdown menu to select an Event Type. For a Door Opened event type, enter the number of seconds the door should be open to trigger the event.
- Enter the Time of Day range that this rule should be active for.
- Check the boxes beneath the Days of the Week on which the rule should be active.
- Select Armed and Disarmed, Armed, or Disarmed from the Intrusion Area Armed dropdown. See Location Arming for more information.
- Active Alert (Optional) - Check the Active Alert box to add the alert to the Active Alert Dashboard and tag it as an Active Alert in email notifications.
- Click Save.
NOTE: All Area Event Group types can be added to the same rule or as separate rules. An alert will be generated when the panel becomes Armed, Disarmed, or Late to Arm during the applied times.
Adding Locations to an Intrusion Alert Rule
- Click Locations on the navigation sidebar.
- Click Add Location or Add Location Group.
- Click
 to include a location.

- Click Select.

NOTE: To apply the rule to every Location, click Select All.
Add User to an Alert Rule
NOTE: Adding Users to a rule will not automatically grant them permission to view alerts for cameras and locations they have access to. Users need to have permission in the User Group rule 'View Alerts.'
- Click Users/Notifications on the navigation sidebar.
- Click Add User or Add Group.
- Click the to add a User or User Group who will receive emails and/or push notifications when the alert is triggered.

- Click Add when finished.
NOTE: To receive email alerts, the Send Email box must be checked. Simply adding a user only gives them access to see this alert's history.
NOTE: Cardholders can be added to a Door Access Alert Rules. Go to How to Add Cardholders to an Alert Rule for more information.
DMP Intrusion Panel Arming in Locations
After configuring a compatible Bosch, DMP, or Alarm.com intrusion panel, you can set the associated location arm/disarm state.
Location Arming
- Choose the Location associated with the Integration from the Locations list.

- Click on the Location Arming tab.

- Choose the integration from the Arm State Owner dropdown. This option determines what integration sets the armed state for this location.
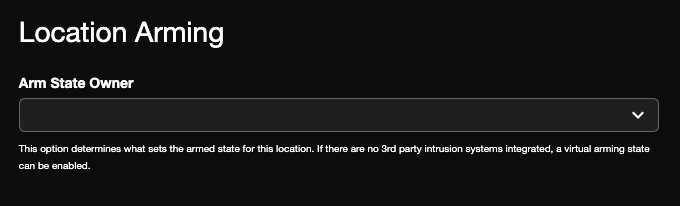
- Click Save.

NOTE: Once you have configured the arm/disarm state for an intrusion panel, your alert notifications can be driven by the panel arm state; however, no icon will appear in the device list for the intrusion panel arm/disarm state.
NOTE: Changing the Armed/Disarmed state in locations will not change the Armed/Disarmed state configured on the DMP panel.
Updating, Disabling, or Deleting an Alert Rule
- Click General Info on the navigation sidebar.

- Edit the Name and Description as desired.

- Click Disable Rule to turn the Alert Rule off without deleting it.
- Click Delete Rule to permanently remove the Alert Rule and delete all history associated with it.
- Click Clear All Active Alerts to permanently remove only the Active Alerts from the history associated with the Alert Rule.
- Click Save when finished.
NOTE: The Name given to an alert will appear as the subject line of email notifications sent by that alert.
Alert History
In OWS, Select Alerts > Alert History. Here you will find all Alert events created by associated locations that have rules assigned.

Hovering over the camera icon will show a snapshot of the video clip before viewing it. By selecting view, you will be taken to the video created by the camera associated with that event.
Event Search

To search for an event in Command Station or on the thing client:
- In the client window, click the Search tab.
- Select Event search type.
- Select Intrusion as the Event Type.
- Check the boxes next to desired Intrusion events, then click Search to display a list of captured Intrusion events along with detailed information and snapshots.
Notifications
Email alerts and mobile push notifications will be sent based on any intrusion, sensor, or access control event on a DMP panel.
Email Alert
Any User or User Group checked to receive email alerts for an event, are notified with Account, Location, Camera, Sensor, Date and Time information as well as a thumbnail image and links that allow additional DMP Event monitoring.

Push Notifications
A User or User Group that have Push Notifications enabled in an Alert Rule and have the OpenEye mobile app installed will receive notifictions on their mobile device with information, a screenshot, and associated video whenever an alarm condition is detected by the SMP system.

Activating recorders on DMP Systems
To activate OpenEye recorders on DMP systems, review the instructions available in this Technical Update provided by DMP.