OpenEye Server-Side Analytics
These instructions are for configuring OpenEye server-side or native analytics, as well as the ability to record based on analytic events on the edge (when supported). OWS analytics provide you with more actionable intelligence, natively available in OWS, enhancing the value from your existing video surveillance system. Harness the full power of OWS, receiving real-time notifications to email and mobile, or quickly search for these events on the timeline bar to easily locate the video you need. In addition to server-side analytics, OWS also gives you the ability to record on edge-based events where analytics capabilities exist.
NOTE: Recorder Analytics requires Apex Server Software version 3.0.2 or higher. Line Crossing, Loitering and Intrusion requires Apex Server Software version 3.1.0 or higher. If running a previous version of Apex Server Software, see instructions for Recording Motion or recording edge-based events using Macros.
NOTE: OpenEye Server-Side Analytics are only available with certain licensing tiers. See OWS Licensing for more information.
NOTE: The number of supported channels of server-side analytics will vary depending on both hardware configuration and the analytics or other features enabled. It is recommended that you leverage the system metric tools in OWS Server Software Setup under General Configuration > Cameras > Analytics when setting up analytics on your system.
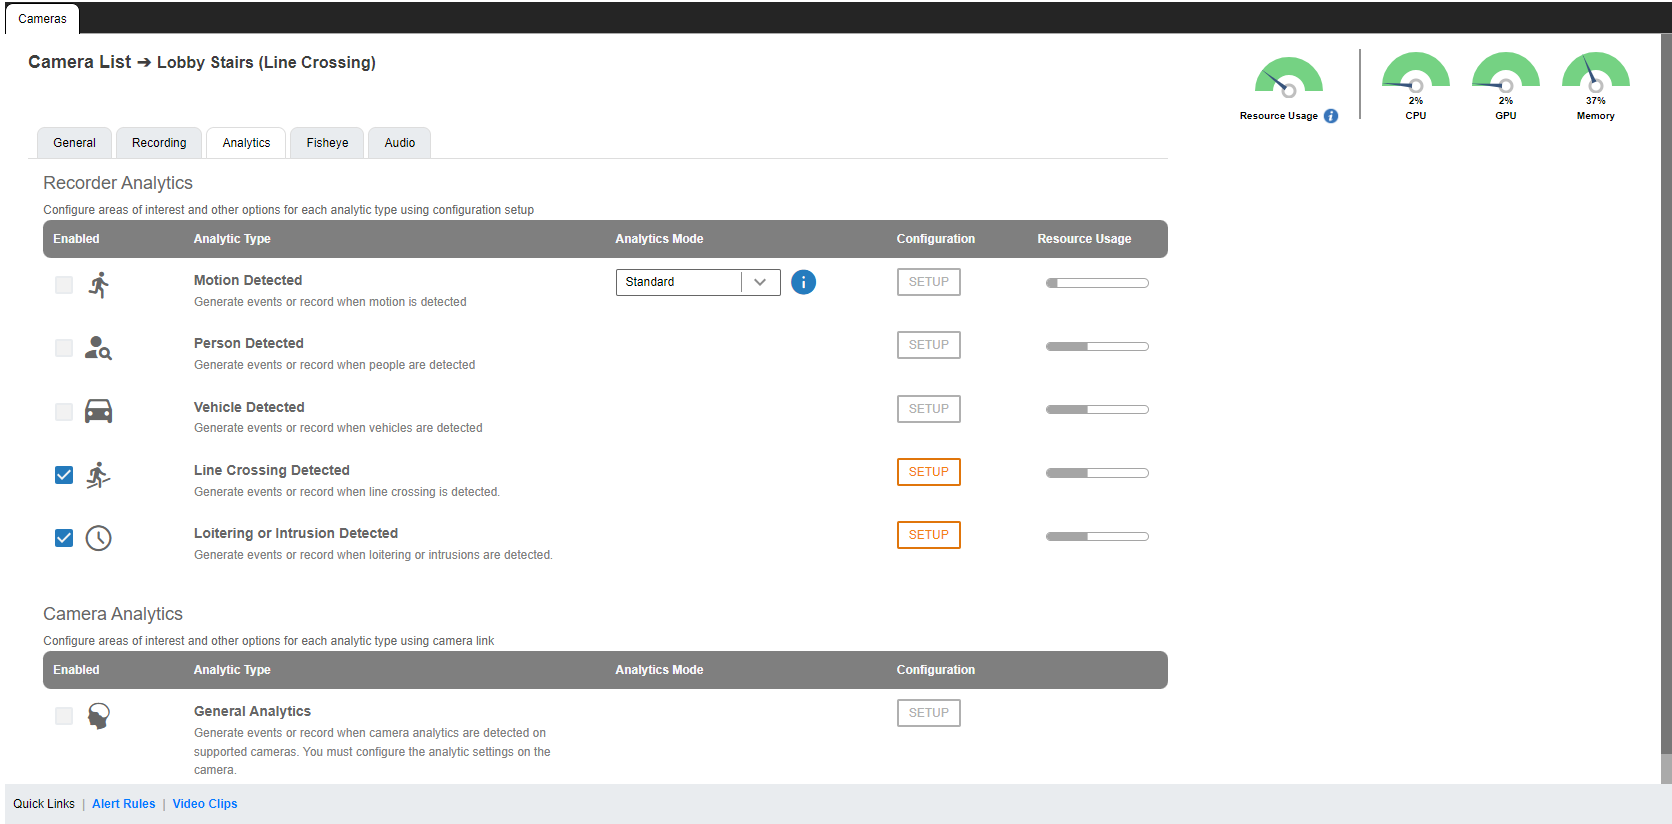
How to Configure Server-Side Analytics
To configure camera analytics:
- Connect to a recorder.
- Go to Setup
> Cameras under General Configuration and click on the specific camera from the Camera List.
- Click on the Analytics tab and check the boxes to enable Motion Detected, Person Detected, Vehicle Detected, Line Crossing Detected, Loitering or Intrusion Detected, or General Analytics for the supported camera.
NOTE: OpenEye edge analytic cameras have analytics enabled by default when added to a recorder.
NOTE: Some Analytic Types may not appear based on your version of Apex Server Software.
Recorder Analytics
Motion Detected
After you've selected a recording option, and the Motion Detected option is enabled, use the Analytics Mode dropdown to choose either Standard or Smart.
- Standard motion detection is performed directly on the recorder and focused on detecting any motion changes in the areas of interest. After selecting Standard, click SETUP to configure Motion Region Options.
- Smart motion detection is performed directly on the recorder. Reduces false events caused by the environment and increases days of recorded video by focusing on objects like people and vehicle motion detection.
NOTE: Not recommended for use on fisheye cameras or lenses.
Standard Motion
Standard Motion utilizes analytic techniques to register any movement within a specifically delineated area of your preference. By observing this defined region, it generates events and alerts based on the motion detected, ensuring you are promptly notified of any activity.
How to Configure a Standard Motion Area
- From the Analytics tab, check Motion Detected.
- Select Standard from the Analytics Mode dropdown.
- Click Setup under the Configuration column.
- Click Add Area, then click and drag the capture square to create the area.
NOTE: Left click, release, and move to draw a custom polygonal shape one line at a time. Draw and click the last line to the starting point to complete the Area.
NOTE: Motion Areas can be subtracted to disable motion detection for specific areas of the video stream and motion grids can be drawn over each other.
- Continue modifying Motion Areas as desired using the tools below the camera frame.
Motion and Motion Region Options
Motion Sensitivity – Reduce or increase the sensitivity of motion detection.
Noise Sensitivity – Reduce or increase noise sensitivity detected on a camera.
Pre Motion Recording – Time when recording starts from a motion event.
Image Offset – Offset when an image is captured from a motion event.
Record on event detection – Remove the check to disable events from being recorded on the event stream.
Reset Defaults – Resets motion sensitivity and noise sensitivity back to default values.
Select – Allows motion detection grids to be moved.
Select All – Draws a full motion detection grid over the image.
Add Area – Draw individual motion detection grids.
Remove Area – Allows removal of motion detection grid areas within a grid.
Clear All – Removes all motion detection area grids.
- Click Save.
How to Delete a Standard Motion Area
- Click to select the desired Motion Area.
- Click Remove Area to delete the selected area.
Smart Motion
Reduce false alerts and increase your days of recorded video using Smart Motion, OpenEye’s analytics-enabled motion detection. Using analytics to detect motion patterns associated with persons and vehicles, Smart Motion ignores reflections, shadows, trees and other objects in the environment which cause false motion events. Best of all, Smart Motion is enabled on the recorder and therefore will work with existing cameras, eliminating the need for a costly camera upgrade.
NOTE: Smart Motion should be used strategically, specifically for cameras that may produce several false motion events due to elements such as wind or shadows, as the number of channels that can be enabled for Smart Motion is limited to the recorder and processor.
How to Configure a Smart Motion Area
- From the Analytics tab, check the Motion Detected.
- Select Smart from the Analytics Mode dropdown.
- Click Setup under the Configuration column.
- Click Add Area, then click and drag the capture square to create or delete the area.
NOTE: Left click, release, and move to draw a custom polygonal shape one line at a time. Draw and click the last line to the starting point to complete the Area.
NOTE: Motion Areas can be subtracted to disable motion detection for specific areas of the video stream and motion grids can be drawn over each other.
- Continue modifying Motion Areas as desired using the tools below the camera frame and the Confidence Threshold.
Motion and Motion Region Options
Confidence Threshold – Used to determine when an object meets an acceptable definition of a person or vehicle. All objects are classified with a percentage likelihood that the object is legitimate from 0% - 100%. To help set the Confidence Threshold, a visual red outline will appear in the motion region when Smart Motion is detected. See Smart Motion Best Practices for more details.
Pre Motion Recording – Time when recording starts from a motion event.
Image Offset – Offset when an image is captured from a motion event.
Record on event detection – Remove the check to disable events from being recorded on the event stream.
Reset Defaults – Resets motion sensitivity and noise sensitivity back to default values.
Select – Allows motion detection grids to be moved.
Select All – Draws a full motion detection grid over the image.
Add Area – Draw individual motion detection grids.
Remove Area – Allows removal of motion detection grid areas within a grid.
Clear All – Reset all customized options back to original camera default settings.
- Click Save.
How to Delete a Smart Motion Area
- Click to select the desired Motion Area.
- Click Remove Area to delete the selected area.
Person Detected
With Person Detected events available natively within OpenEye Web Services (OWS), you can receive alerts or search for person-detected events, regardless of your camera's analytic capabilities. The server-side detection allows you to leverage motion events tied to individuals or surveil your business without a costly camera upgrade.
NOTE: The amount of channels for person-detected events is limited based on hardware compatibility. Contact your sales representative if you have any questions.
How to Configure a Person Detected Area
- From the Analytics tab, check Person Detected.
- Click Setup under the Configuration column.
- Click Add Area, then click and drag the capture square to create or delete the area.
NOTE: Left click, release, and move to draw a custom polygonal shape one line at a time. Draw and click the last line to the starting point to complete the Area.
NOTE: Person Detected areas can be subtracted to disable detection for specific areas of the video stream and motion grids can be drawn over each other.
- Continue modifying areas as desired using the tools below the camera frame and the Confidence Threshold.
Motion and Motion Region Options
Confidence Threshold – Used to determine when an object meets an acceptable definition of a person. All objects are classified with a percentage likelihood that the object is legitimate from 0% - 100%. See Best Practices for more details. To help set the Confidence Threshold, a visual red outline will appear in the motion region when a person is detected. See Smart Motion Best Practices for more details.
Pre Recording – Time when recording starts from a person detected event.
Record on event detection – Remove the check to disable events from being recorded on the event stream.
Reset Defaults – Resets Confidence Threshold back to default values.
Select – Allows detection grids to be moved.
Select All – Draws a full detection grid over the image.
Add Area – Draw individual detection grids.
Remove Area – Allows removal of detection grid areas within a grid.
Clear All – Reset all customized options back to original camera default settings.
- Click Save.
How to Delete a Person Detected Area
- Click to select the desired Person Detected Area.
- Click Remove Area to delete the selected area.
Vehicle Detected
With Vehicle Detected events available natively within OpenEye Web Services (OWS), you can receive alerts or search for vehicle-detected events, regardless of your camera's analytic capabilities. The server-side detection allows you to leverage motion events tied to vehicles to surveil your business without a costly camera upgrade.
NOTE: The amount of channels for vehicle-detected events is limited based on hardware compatibility. Contact your sales representative if you have any questions.
How to Configure a Vehicle Detected Area
- From the Analytics tab, check Vehicle Detected.
- Click Setup under the Configuration column.
- Click Add Area, then click and drag the capture square to create or delete the area.
NOTE: Left click, release, and move to draw a custom polygonal shape one line at a time. Draw and click the last line to the starting point to complete the Area.
NOTE: Vehicle Detected areas can be subtracted to disable detection for specific areas of the video stream and motion grids can be drawn over each other.
- Continuing modifying areas as desired using the tools below the camera frame and the Confidence Threshold.
Motion and Motion Region Options
Confidence Threshold – Used to determine when an object meets an acceptable definition of a vehicle. All objects are classified with a percentage likelihood that the object is legitimate from 0% - 100%. See Best Practices for more details. To help set the Confidence Threshold, a visual red outline will appear in the motion region when a vehicle is detected. See Smart Motion Best Practices for more details.
Pre Recording – Time when recording starts from a person detected event.
Record on event detection – Remove the check to disable events from being recorded on the event stream.
Reset Defaults – Resets Confidence Threshold back to default values.
Select – Allows detection grids to be moved.
Select All – Draws a full detection grid over the image.
Add Area – Draw individual detection grids.
Remove Area – Allows removal of detection grid areas within a grid.
Clear All – Reset all customized options back to original camera default settings.
- Click Save.
How to Delete a Person Detected Area
- Click to select the desired Vehicle Detected Area.
- Click Remove Area to delete the selected area.
Line Crossing Detected
With Line Crossing Detected events available natively within OpenEye Web Services (OWS), you can receive alerts or search for Line Crossing Detected events, regardless of your camera's analytic capabilities. The server-side detection allows you to leverage motion events tied to individuals or surveil your business without a costly camera upgrade.
NOTE: The amount of channels for Line Crossing Detected events is limited based on hardware compatibility. Contact your sales representative if you have any questions.
How to Configure a Line Crossing Detected Area
- From the Analytics tab, check Line Crossing Detected.
- Click Setup under the Configuration column.
- Click Add Line, then click to place the starting point for the line, and click again to place the endpoint.
- Check either Person or Vehicle for Detection type.
- Check Record on event detection to automatically begin recording when a line in a region is crossed.
- Click Save or Apply.
Line Crossing Options
+ - Add a new Line Crossing Detected region for the same camera. Added regions appear as a new numbered tab above the viewing pane. Adding different regions allows you to create customized events for specific areas of interest.
- Remove Region - Remove an added region.
Select - Select a line in the pane.
Add Line - Click, then click in the pane to create a new line.
Remove Line - Click, then click a line to remove it from the pane.
Clear All - Click to clear all lines in the pane.
NOTE: Resize the area of interest by dragging the bottom right-hand corner of the camera confirmation pane.
Loitering or Intrusion Detected
With Loitering and Intrusion Detected events available natively within OpenEye Web Services (OWS), you can receive alerts or search for Loitering and Intrusion Detected events, regardless of your camera's analytic capabilities. The server-side detection allows you to leverage motion events tied to vehicles to surveil your business without a costly camera upgrade.
NOTE: The amount of channels for vehicle-detected events is limited based on hardware compatibility. Contact your sales representative if you have any questions.
Loitering
How to Configure a Loitering Area
- From the Analytics tab, check Loitering or Intrusion Detected.
- Click Setup under the Configuration column.
- Click Add Area, then click and drag the capture square to create or delete the area.
NOTE: Left click, release, and move to draw a custom polygonal shape one line at a time. Draw and click the last line to the starting point to complete the Area.
NOTE: Loitering Detected areas can be subtracted to disable detection for specific areas of the video stream and motion grids can be drawn over each other.
- Continuing modifying areas as desired using the tools below:
Loitering Options
+ - Add a new Loitering or Intrusion Detected region for the same camera. Added regions appear as a new numbered tab above the viewing pane. Adding different regions allows you to create customized events for specific areas of interest.
- Remove Region - Remove an added region.
Select – Allows detection grids to be moved.
Select All – Draws a full detection grid over the image.
Add Area – Draw individual detection grids.
Remove Area – Allows removal of detection grid areas within a grid.
Clear All – Reset all customized options back to original camera default settings.
NOTE: Resize the area of interest by dragging the bottom right-hand corner of the camera confirmation pane.
- Check Loitering, then enter a number in the field and choose either Seconds or Minutes from the dropdown to set a threshold.
- Check Record on event detection to automatically begin recording when a loitering area threshold has been exceeded.
- Click Save or Apply.
Intrusion
How to Configure an Intrusion Area
- From the Analytics tab, check Loitering or Intrusion Detected.
- Click Setup under the Configuration column.
- Click Add Area, then click and drag the capture square to create or delete the area.
NOTE: Left click, release, and move to draw a custom polygonal shape one line at a time. Draw and click the last line to the starting point to complete the Area.
NOTE: Intrusion Detected areas can be subtracted to disable detection for specific areas of the video stream and motion grids can be drawn over each other.
- Continuing modifying areas as desired using the tools below:
Intrusion Options
+ - Add a new Loitering or Intrusion Detected region for the same camera. Added regions appear as a new numbered tab above the viewing pane. Adding different regions allows you to create customized events for specific areas of interest.
- Remove Region - Remove an added region.
Select – Allows detection grids to be moved.
Select All – Draws a full detection grid over the image.
Add Area – Draw individual detection grids.
Remove Area – Allows removal of detection grid areas within a grid.
Clear All – Reset all customized options back to original camera default settings.
NOTE: Resize the area of interest by dragging the bottom right-hand corner of the camera confirmation pane.
- Check Intrusion, then Enter or Exit, and Person or Vehicle.
- Check Record on event detection to automatically begin recording when an intrusion area has been entered or exited.
- Click Save or Apply.
Camera Analytics
General Analytics
Generate events or record when camera analytics are detected on supported cameras. You must configure the analytic settings on the camera.
How to Configure General Analytics
- From the Analytics tab, check General Analytics.
- Click Setup under the Configuration column.
- Modify the Motion Options as desired using the tools below
Motion Options
Pre Motion Recording – Time when recording starts from a motion event.
Record on event detection – Remove the check to disable events from being recorded on the event stream.
Reset Defaults – Resets motion sensitivity and noise sensitivity back to default values.
- Click Save.
- Return to the desired camera's Analytics tab and click Camera under the Configuration column.
- Enter Username and Password for the camera and Login.
- Configure the Analytic-Enabled Camera for video events.
Additional Page Tools
System Usage Metrics
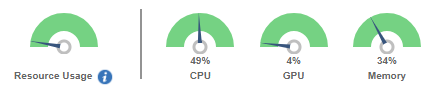
The system usage metrics display the current Resource Usage, CPU, GPU and Memory usage in the upper right hand corner of a camera's General set up page under Setup > General Configuration > Cameras > Camera List. The severity of usage is indicated as percentages and as green, orange, or red gauges.
NOTE: Analytic events may not be detected or recorded as configured if system usage nears or exceeds CPU, GPU or Memory capacities.
NOTE: The amount of channels for analytic events is limited based on hardware compatibility. Contact your sales representative if you have any questions.
Quick Links
Click on the Quick Links at the bottom of the Analytics tab to view Alert Rules or Video Clips associated with analytic events.
Best Practices for Configuring Analytics
Configure Cameras for Optimal Use
- For optimal detection, start at 10ppf and adjust from there to a higher count if needed.
NOTE: Apex Server Software uses the low stream to detect objects.
- Set the optimal light level at 7 lux and adjust higher if needed.
NOTE: Object detection will occur at lower lux levels, but may be less accurate. At lower lux levels, IR is recommended.
- Angle the camera so that objects you wish to detect can contrast against background objects. Detection accuracy will vary based on how well the object contrasts against the background. Higher contrast will result in better accuracy.
Setting up Detection in Apex Server Software
- Adjust confidence level based on how much the object will blend in to the scene.
- Higher confidence will reduce false positive events.
- Lower confidence will provide detection at further distances but may result in false positive events.
Keep in Mind
- Objects are only detected while moving.
- A person's head and shoulders need to be fully in the scene in order to be detected.
- Create a region of interest to exclude areas that might generate false alarms (such as high traffic areas that are not of interest).
Analytic Alerts and Notifications
Analytic event alerts can be configured to send notifications with multiple images. The first image will show the full camera view (configured detection areas will be outlined). The second image will show a close up of the detection area.
If an alert is configured as an Active Alert, the top of the notification will display "Active Alert."
NOTE: Multiple image person and vehicle alert email and mobile notifications can only be configured with analytics compatible OpenEye, AXIS and Hanwha cameras.