Third-party IP Device Association
NOTE: An additional license is required per speaker. See OWS Licensing for more information.
Adding a third-party IP device via a cloud camera is available for the following Axis devices:
- C1310-E Mk II
- C1310-E
- C1510
- C1610-VE
- Go to Management > Location Management > Locations, and select an available cloud camera.
- Click Add Device.

- Click Discover Devices.

- Select the audio device to add from the list, and enter the username and password for that device.

- Click Add.

The audio device will appear below the cloud camera in the device list.

NOTE: Only one audio device can be added per cloud camera.
Add Audio Device via Server Software Discovery
Adding an installed audio device to a recorder follows the same process as adding a camera:
- Click Setup (Gear Icon).

- Under General Configuration, click Cameras.
- Click Add Cameras.

- Under the Discovery tab, click Discover Cameras.
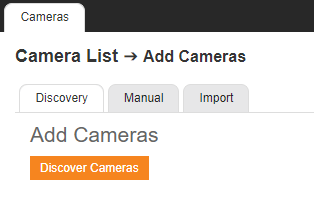
- Check the appropriate boxes to select the device(s) to be added.
- Enter the appropriate credentials (username and password) for the devices to be added, and then click Add Selected Cameras.

The added audio devices will display in the Cameras list.

Enabling Audio
To configure Audio for an individual device, connect to a recorder, click Setup > Cameras and select the device you want to configure from the list. Click on the Audio tab and select the desired option.
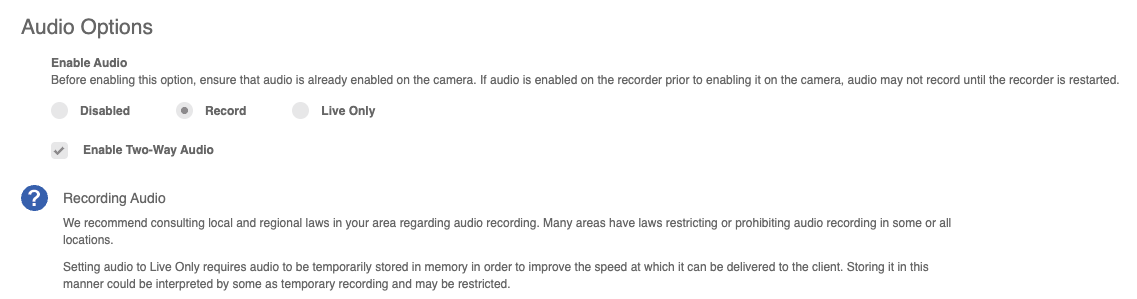
Disabled – No audio is received, transmitted or recorded by the device.
Record – All audio is recorded by the device.
Live Only – Audio can be received and transmitted through the device but is not recorded.
Enable 2-Way Audio – Audio can be transmitted through compatible device models.
- Select Record or Live Only to enable audio recording on a specific IP device.
- Check Enable 2-Way Audio to transmit audio through the IP device.
- Click Save or Apply.
Important Notes
Audio must be enabled on the IP device itself with the G.711 or AAC codec in order to record audio from the device. Check the manufacturer's manual on how to enable audio on the IP device.
We recommend consulting local and regional laws in the appropriate areas regarding audio recording. Many areas have laws restricting or prohibiting audio recording in some or all locations.
After adding a recorder with an added audio device to a location, an audio device can be associated with a camera from locations.
Audio Association in Locations
- Go to Management > Location Management > Locations > Audio Association.


- Click on an Audio Device to associate with a camera.

- Click Add Camera.

- Click
 to add a camera and then Select.
NOTE: Only one camera can be chosen per audio device.
The Associated Camera will be listed below the camera.

IP Audio Devices in the Cloud Video Player
Once added or associated, IP Audio Devices will appear in the Locations list, and can be dragged into a pane in a Cloud Video Player grid.
NOTE: An unassociated audio device will display as This is an audio-only device. Video will not be displayed.

Both associated devices and unassociated audio devices will appear in the locations list:
| Associated Device | Camera has an associated audio device. | |
| Audio Device | Audio device is not associated with a camera. |
Export Audio from the Cloud Video Player
Select a single audio or associated device and click Export  from the Cloud Video Player to export audio.
NOTE: Audio can only be exported from a single IP audio device.
- Select Single Camera.

- Select the Date/Time and Duration.

- Click Next.

- Select Export to Web Services or Export Locally.
NOTE: Video clips saved under Export Locally in the Downloads folder are MP4 files by default.
- If exporting to Web Services, Select Destination Folder, enter Title and Public Notes, and check if you want to Move to Group or Share Clip, and click Next.
- If Move to Group was selected, wither Move to new group (and enter Group Name) or Move to existing group, and select from the list.


- Click Next.
- If Share Clip was selected, add users and user groups.
NOTE: Check Set Expiration Date, Allow user to download video clip, and Add text to be included with email (optional) for additional sharing options.

- Click Export.