How to Add Devices to Locations
- Last updated
-
-
Save as PDF
NOTE: In order to add a recorder to a Location, the recorder will have to be registered to the OWS account before hand. After the recorder is added to OWS, you can move the recorder and cameras to the location desired.
How to Add a Recorder to a Location
Ensure Recorder is Added to OWS
To enable OWS on the recorder:
- Click Setup (gear icon) if not already in the Recorder Setup menu.
- Click Web Services under the Remote Services section.
- Enter the Account Registration Code (found within the OWS Channel Partner Management Portal under Customer Accounts. The code will be listed with the specific Customer Account).
- Modify the recorder name if needed (this will be the label in OWS).
- Click Connect.

NOTE: The Device ID will not display in Web Services until after the device has been added via the Account Registration Code. The image above shows a successfully connected device.
Recorder List
To move a Recorder to a Location, you will need to navigate to the recorder within the Recorder List
The Recorder List can be accessed by selecting Recorders from the Management > Locations > Recorders menu. This page displays a list of recorders associated with the Customer Account.

If a recorder is out of service, it will appear in a faded red color and display a caution symbol next to the name.

NOTE: For a recorder to display as Out of Service in Web Connect, System Summary Reports, and Inventory Reports, an option must be enabled in the General Info tab. For more information, see Display Out of Service Recorders.
NOTE: You can customize the table. See Table Functionality for more information.
If a user has appropriate permissions to manage Locations, they can modify a recorder’s General Info by clicking Edit. This will redirect to the recorder, which can also be navigated to under Management > Locations > Locations. Remote Network Settings can also be found in Locations.
How to Move a Recorder to a Location
From the Recorder List, select Edit to manage the recorder.

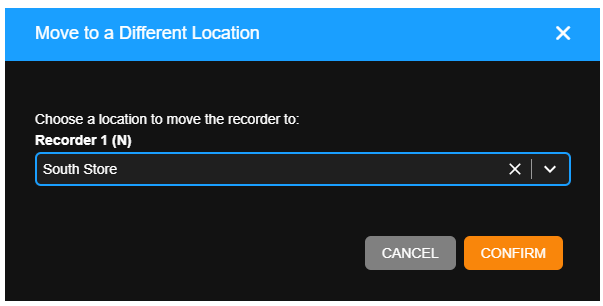
Select Move at the bottom of the screen to bring up the location to move the device to.
Moving a recorder to a different location will change what location the recorder is associated with and where the recorder will appear in the Locations list.
- Choose a Location from the dropdown and click CONFIRM.

- Click the new location in the Locations list to view the recorder.


