Online Return of Merchandise Authorization (RMA)
Once approval has been granted to begin the RMA process, a form is created and an email is sent by the system. Customers use a uniquely assigned RMA link and password to log into the portal. The RMA form must be finalized by the customer, meaning all stages are completed for the RMA request to process.
NOTE: The four stages necessary to confirm and submit in the RMA email: Confirm Shipping, Submit Payment Method, Sign and Submit Agreement, and Finalize must be completed before OpenEye can fully process the RMA request.
Initiate RMA Request
Contact Support to begin a Return of Merchandise Authorization (RMA) request to replace, repair, or return an OpenEye product:
- Call within the United States: 509-232-5261
- Chat with Support (5 a.m. to 5 p.m. PST): help.openeye.net
- Email Support: support@openeye.net
When contacting Support, any of the following information you can provide in the email, chat or over the phone can assist in beginning the RMA process:
- Name of Business
- Contact Name
- Contact Email
- Contact Phone Number
- Contact Location (Address)
- Sales Order Number
- Product Serial Number
- Work Order Number
NOTE: Support may help troubleshoot any product issues before resolving with an RMA.
RMA Approval
Once Support determines that an RMA is necessary to resolve a product issue, the warranty status is taken into consideration. If the product and service are still in-warranty, you will receive an RMA email after the request is approved.
NOTE: A warranty begins with the shipping date of a product. See Warranty for more information.
NOTE: If a product is out-of-warranty, additional fees are applied to approved RMA requests for the out-of-warranty product. Please allow more time for approval with RMA requests for out-of-warranty products.
Receive RMA Email
When the RMA request is approved, you will receive an email with login information:

NOTE: The information shown in an actual RMA email may appear different depending on the type of RMA requested.
Log in to the RMA Portal
- Click the Go to RMA button to go straight to the RMA portal link (same as the provided Link in the email).
- The email will have an RMA number and the related Serial Number of the device for verification purposes.
- The Link provided will take you to the RMA portal webpage. Use the Password to log in.
- If you have further questions about the RMA or see something that is incorrect, you can click Chat with an Agent.
- Enter the provided Password and click Login.

RMA Instructions
The RMA Instructions outline the RMA Stages you will have to complete.
NOTE: Stages with "if required" may not apply to every RMA type.

As you complete the RMA Stages, a bar at the top of the pages will display status changes:
| This step has been completed | |
| This step has not been submitted | |
| The RMA has not been submitted to the RMA department |
Click to chat with an Agent will take you to Remote Support.
Next will go to the next Stage in the RMA portal.
Completing the RMA Stages

The status of each stage completion displays at the top of the page. Product Information (serial number, model number, part description, and warranty end date) and RMA Information (type and reason for the RMA) display below the status bar.
NOTE: If any of the information in Product Information and RMA Information are incorrect, contact Remote Support.
Stage 1: Confirm Shipping
Confirm Shipping displays the address that was entered when the RMA was created.
Confirm the address is correct and click Confirm Shipping.
NOTE: If the address is not correct, click Chat Support or Email Support. See Shipping Address Change for RMA for more information.

Invoiced Parts & Labor
Invoiced Parts & Labor displays an overview of the item prices entered on your RMA. This pricing may differ depending on the type of RMA you are handling.
NOTE: With certain RMAs, you will see the MSRP Value of the item and the Required Deposit in different amounts. A deposit is required on all replacement RMAs and is based off a percentage of the MSRP value. See RMA Security Deposits for more information.

NOTE: Review Invoiced Parts & Labor before submitting payment. If any displayed amount is not correct, click Chat Support or Email Support.
Stage 2: Submit Payment
Submit Payment provides options for payment types. Click to choose one payment type.
NOTE: Verify with Support or with your business organization if there is a preferred method of payment.

Credit Card
Credit Card will provide the option to enter your credit card information to make a payment/deposit for your RMA.

Itemized PO
An Itemized PO is a purchase order with an itemized list of the invoiced parts and labor.
- Browse to select the itemized PO file from your device.
- Click the UPLOAD button to submit the Itemized PO as your payment type.

When the Itemized PO has been successfully submitted, IPO: PO uploaded  will display.
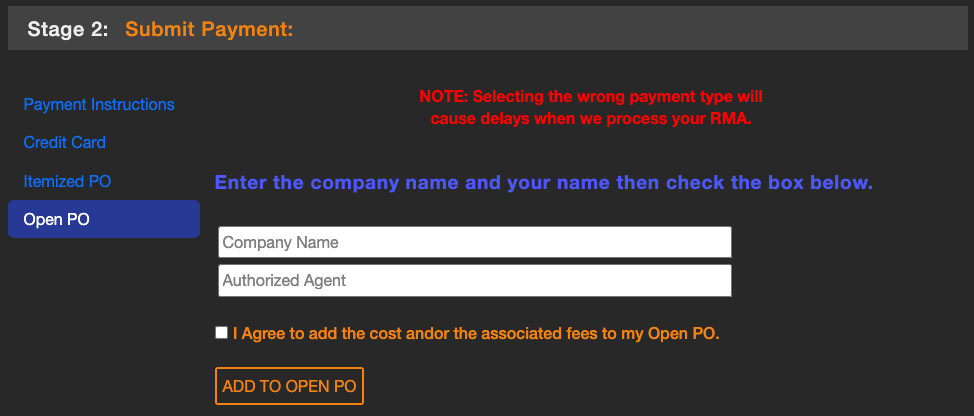
Open PO
If your company has an Open PO, an Open PO (Purchase Order) can be charged without creating a separate document with an itemized list of parts and labor.
NOTE: If your company does not have an Open PO, you can still select this option and submit the RMA, but it will not be processed.
- Enter Company Name.
- Enter Authorized Agent.
- Click I Agree to add the cost and/or the associated fees to my Open PO.
- Click ADD TO OPEN PO.
When the Open PO has been successfully entered, OPO: (Name entered for Authorized Agent)  will display.
Stage 3: Sign the Agreement
By signing the RMA, you are agreeing to ship any products to OpenEye's RMA Department and to pay for invoiced parts and labor.
NOTE: If a repair RMA is received without the RMA Agreement paperwork having been signed, the repair process will not begin. If the RMA Agreement is not signed within 30 days of the item having been received, any sent items will be returned to the address on file in its original state.
NOTE: The RMA Agreement may be different depending on the RMA type.

- Enter Name.
- Check I have read and agree to the terms of the "Advanced Replacement Agreement."
- Click Submit Agreement.
To see if this step has been successful, look for the green checkmark ![]() next to Sign Agreement at the top of the screen.
next to Sign Agreement at the top of the screen.
Stage 4: Finalize
When the previous steps have been completed, click the button Next – Review and Finalize The RMA.

Review all the RMA information from this page to double-check for any inaccuracies. You can also double-check the top and bottom of the page for completed steps. All steps except for Finalize RMA should have a green check mark next to them.
NOTE: If any of the steps are still showing a yellow caution symbol, you will not be able to finalize the RMA. Click the EDIT RMA button to go back to the previous page to complete the step(s) needed.
NOTE: You can use the PRINT button to print a PDF copy if needed.
Click Finalize RMA to submit your RMA for processing.

You will receive a notification that the RMA has been submitted. You will be unable to enter the RMA portal provided by the initial email, and the link will become disabled once finalized. See Why Can I No Longer Access the RMA Portal or My RMA Paperwork for more information.
If you have any questions after the RMA has been submitted, click Chat with an Agent.
