Line Crossing, Loitering and Intrusion Analytics
OpenEye Web Services (OWS) line crossing, intrusion and loitering AI analytics, provides you with more actionable intelligence, and is available natively in OWS, creating more value from your existing video surveillance system.
NOTE: For configuring Person and Vehicle Analytics, see Person and Vehicle Detection.
NOTE: OWS AI analytics are only available with certain licensing tiers. See OWS Licensing for more information.
NOTE: The number of supported channels of AI analytics will vary depending on both hardware configuration and the analytics or other features enabled. It is recommended that you leverage the system metric tools in OWS Server Software Setup under General Configuration > Cameras > Analytics when setting up analytics on your system.
Line Crossing Detected
With Line Crossing Detected events available natively within OpenEye Web Services (OWS), you can receive alerts or search regardless of your camera's analytic capabilities. The OWS AI analytic detection allows you to leverage motion events tied to individuals or surveil your business without a costly camera upgrade.
NOTE: The amount of channels for Line Crossing Detected events is limited based on hardware compatibility. Contact your sales representative if you have any questions.
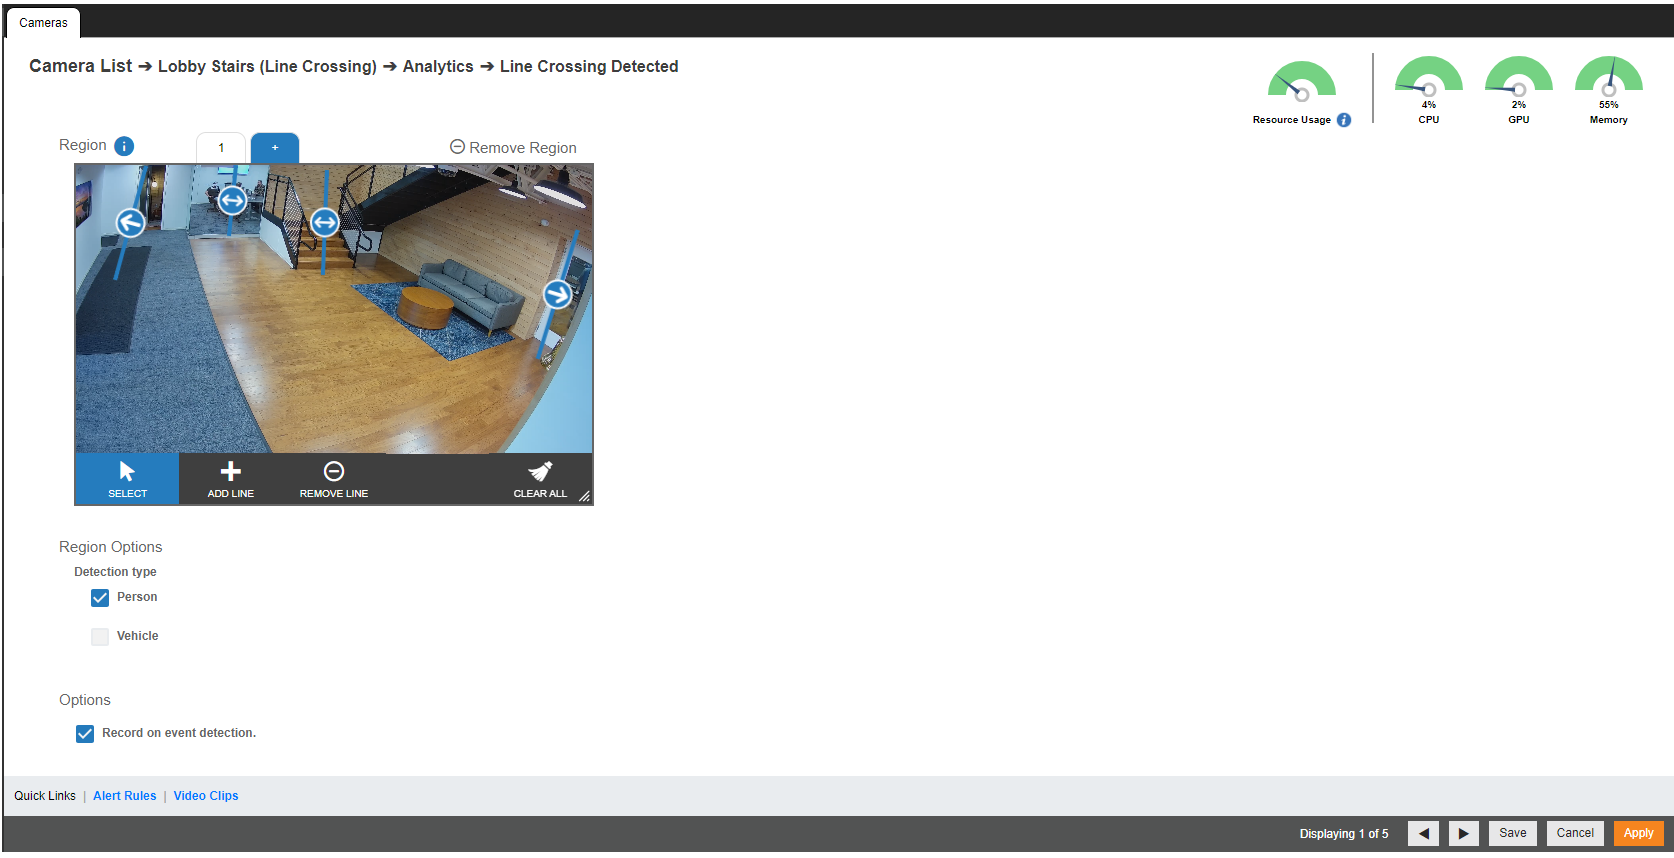
Configure a Line Crossing Detected Area
- From the Analytics tab, enable Line Crossing Detected.
- Click Setup next to Line Crossing.
- Select the Add Line plus sign if it is not selected, then click to place the starting point for the line, and click again to place the endpoint.
- Check either Person or Vehicle for Detection type.
- Check Record on event detection to automatically begin recording when a line in a region is crossed.
- Click Save or Apply.
Line Crossing Options
+ - Add a new Line Crossing Detected region for the same camera. Added regions appear as a new numbered tab above the viewing pane. Adding different regions allows you to create customized events for specific areas of interest.
- Remove Region - Remove an added region.
Select - Select a line in the pane.
Add Line - Click, then click in the pane to create a new line.
Remove Line - Click, then click a line to remove it from the pane.
Clear All - Click to clear all lines in the pane.
NOTE: Resize the area of interest by dragging the bottom right-hand corner of the camera confirmation pane.
Loitering or Intrusion Detected
With Loitering and Intrusion Detected events available natively within OpenEye Web Services (OWS), you can receive alerts or search events, regardless of your camera's analytic capabilities. The ows AI analytic detection allows you to leverage motion events tied to vehicles to surveil your business without a costly camera upgrade.
NOTE: The amount of channels for vehicle-detected events is limited based on hardware compatibility. Contact your sales representative if you have any questions.
Loitering
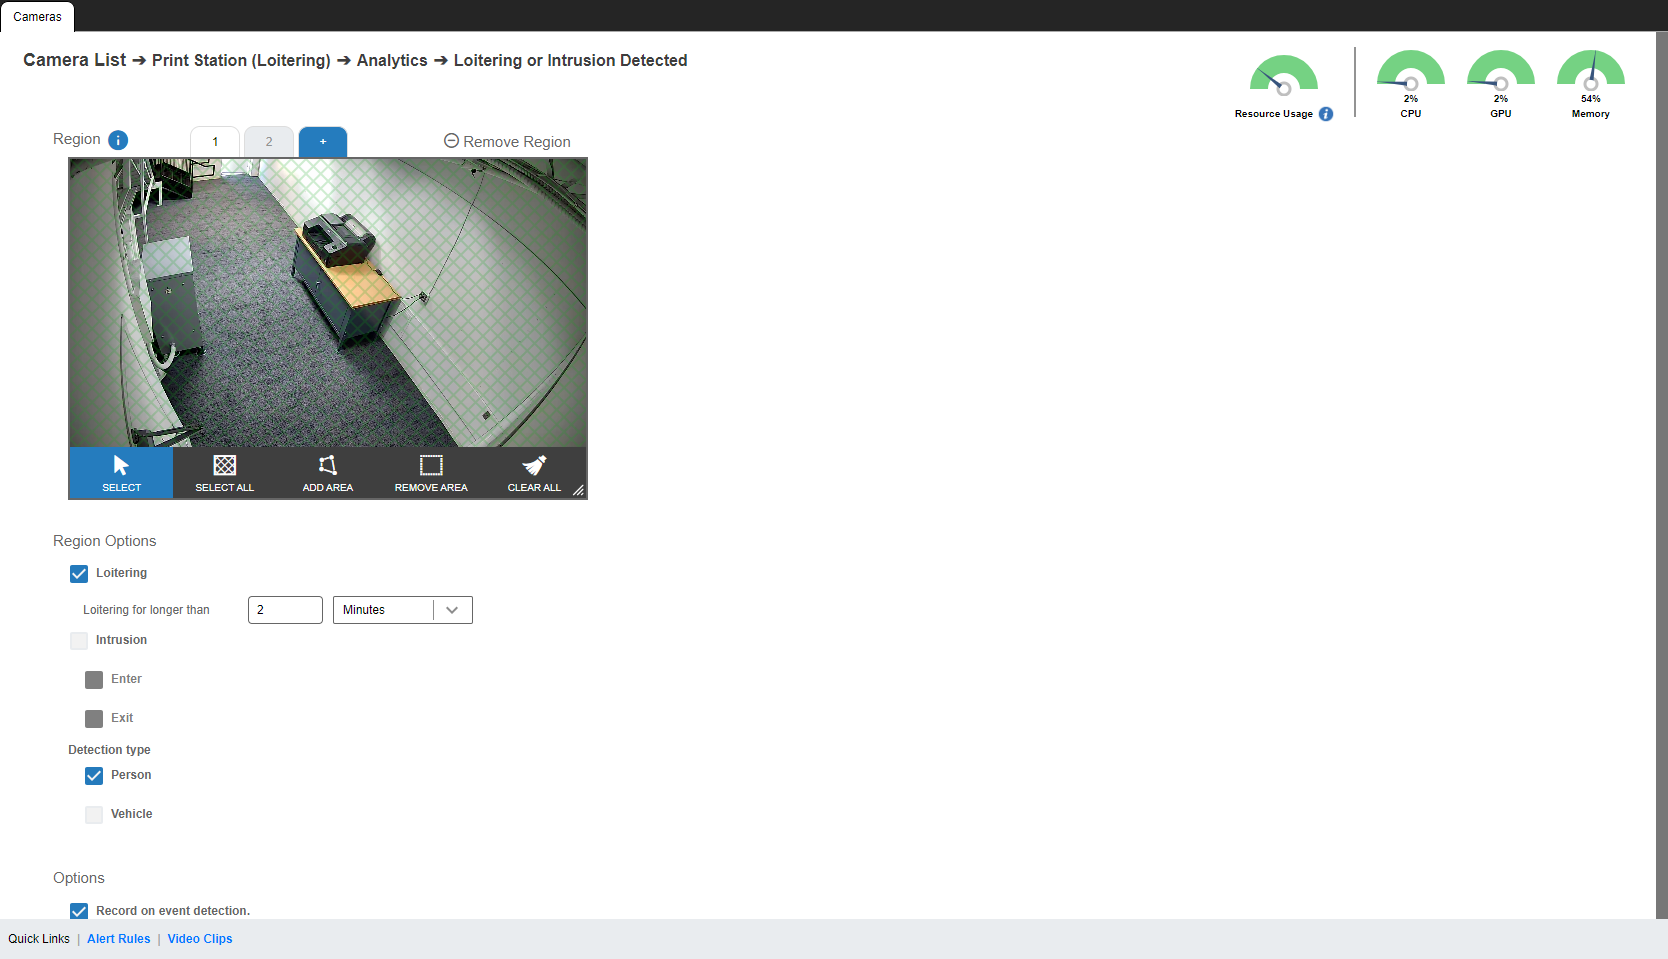
Configure a Loitering Area
- From the Analytics tab, check Loitering or Intrusion Detected.
- Click Setup under the Configuration column.
- Click Add Area, then click and drag the capture square to create or delete the area.
NOTE: Left click, release, and move to draw a custom polygonal shape one line at a time. Draw and click the last line to the starting point to complete the Area.
NOTE: Loitering Detected areas can be subtracted to disable detection for specific areas of the video stream and motion grids can be drawn over each other.
- Continuing modifying areas as desired using the tools below:
Loitering Options
+ - Add a new Loitering or Intrusion Detected region for the same camera. Added regions appear as a new numbered tab above the viewing pane. Adding different regions allows you to create customized events for specific areas of interest.
- Remove Region - Remove an added region.
Select – Allows detection grids to be moved.
Select All – Draws a full detection grid over the image.
Add Area – Draw individual detection grids.
Remove Area – Allows removal of detection grid areas within a grid.
Clear All – Reset all customized options back to original camera default settings.
NOTE: Resize the area of interest by dragging the bottom right-hand corner of the camera confirmation pane.
- Check Loitering, then enter a number in the field and choose either Seconds or Minutes from the dropdown to set a threshold.
- Check Record on event detection to automatically begin recording when a loitering area threshold has been exceeded.
- Click Save or Apply.
Intrusion
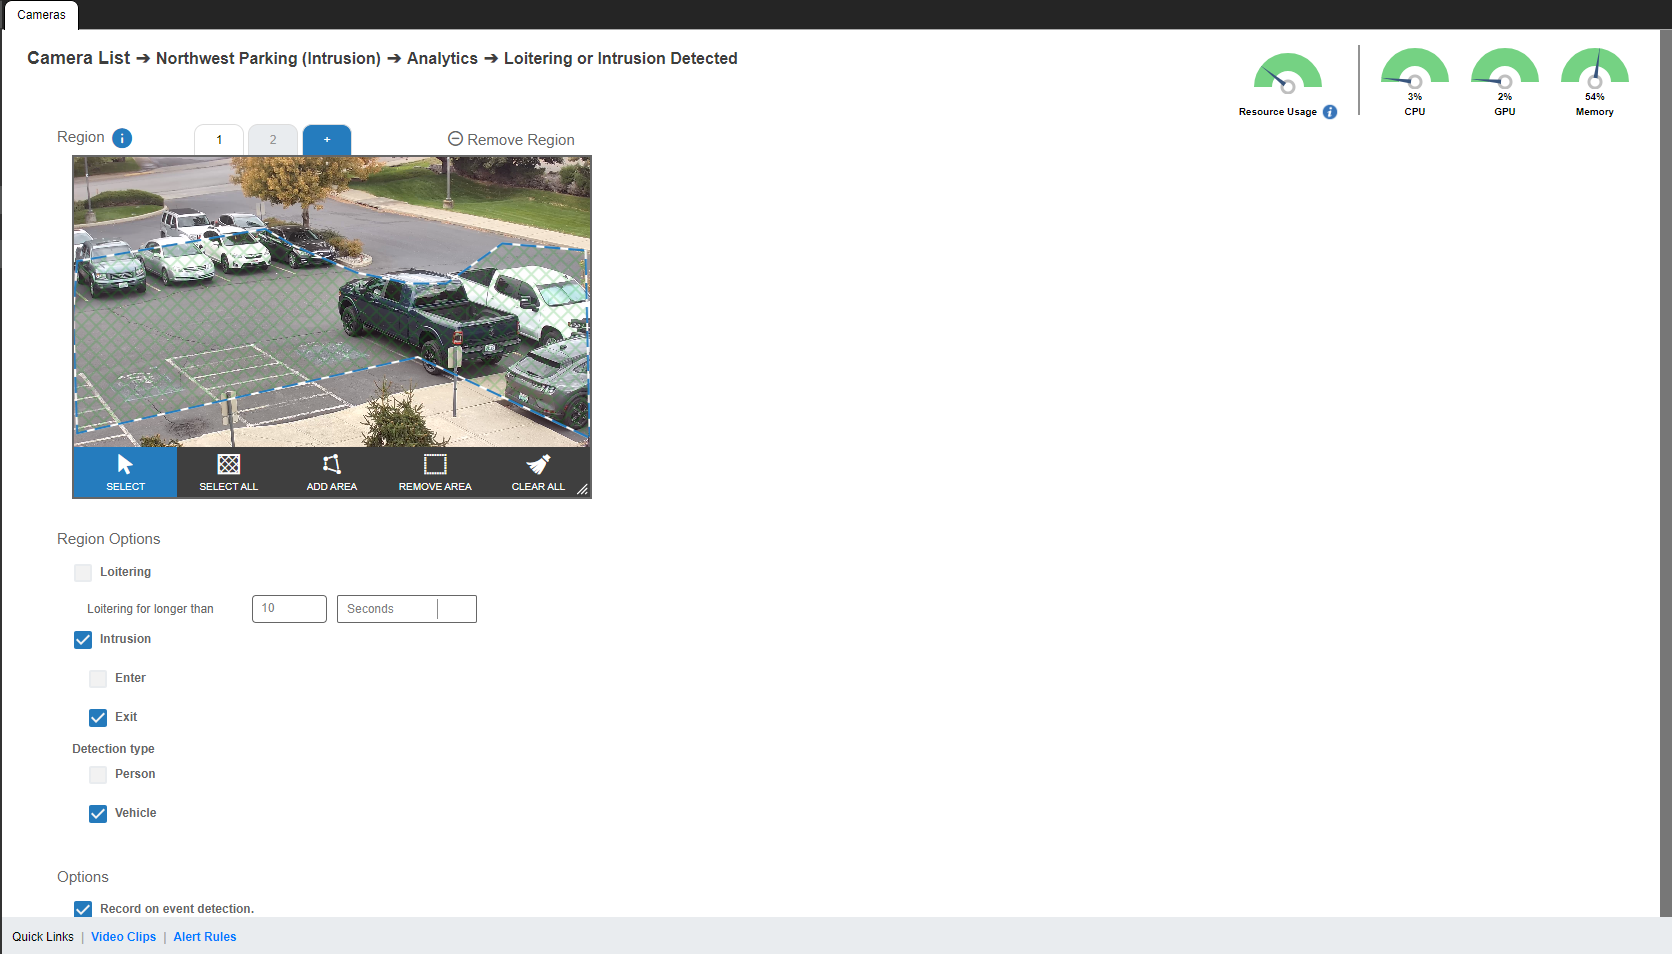
How to Configure an Intrusion Area
- From the Analytics tab, check Loitering or Intrusion Detected.
- Click Setup under the Configuration column.
- Click Add Area, then click and drag the capture square to create or delete the area.
NOTE: Left click, release, and move to draw a custom polygonal shape one line at a time. Draw and click the last line to the starting point to complete the Area.
NOTE: Intrusion Detected areas can be subtracted to disable detection for specific areas of the video stream and motion grids can be drawn over each other.
- Continuing modifying areas as desired using the tools below:
Intrusion Options
+ - Add a new Loitering or Intrusion Detected region for the same camera. Added regions appear as a new numbered tab above the viewing pane. Adding different regions allows you to create customized events for specific areas of interest.
- Remove Region - Remove an added region.
Select – Allows detection grids to be moved.
Select All – Draws a full detection grid over the image.
Add Area – Draw individual detection grids.
Remove Area – Allows removal of detection grid areas within a grid.
Clear All – Reset all customized options back to original camera default settings.
NOTE: Resize the area of interest by dragging the bottom right-hand corner of the camera confirmation pane.
- Check Intrusion, then Enter or Exit, and Person or Vehicle.
- Check Record on event detection to automatically begin recording when an intrusion area has been entered or exited.
- Click Save or Apply.
Best Practices for Configuring Line Crossing, Loitering and Intrusion Analytics
Configure Cameras for Optimal Use
- For optimal detection, start at 10ppf and adjust from there to a higher count if needed.
NOTE: Apex Server Software uses the low stream to detect objects.
- Set the optimal light level at 7 lux and adjust higher if needed.
NOTE: Object detection will occur at lower lux levels, but may be less accurate. At lower lux levels, IR is recommended.
- Angle the camera so that objects you wish to detect can contrast against background objects. Detection accuracy will vary based on how well the object contrasts against the background. Higher contrast will result in better accuracy.
Setting up Detection in Apex Server Software
- Adjust relevance level based on how much the object will blend in to the scene.
- Higher relevance will reduce false positive events.
- Lower relevance will provide detection at further distances but may result in false positive events.
Keep in Mind
- Create a region of interest to exclude areas that might generate false alarms (such as high traffic areas that are not of interest).
Line Crossing, Loitering and Intrusion Alerts and Notifications
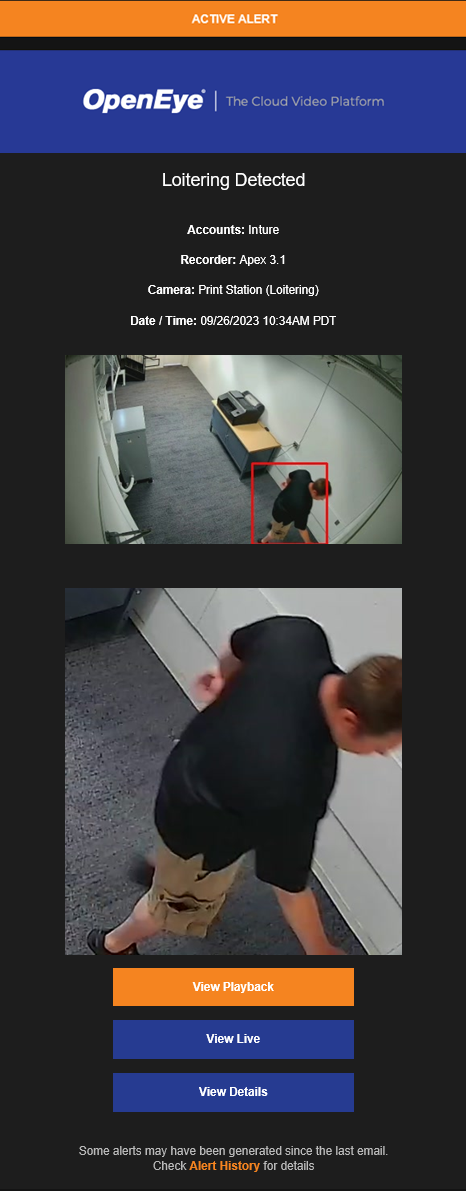
Analytic event alerts can be configured to send notifications with multiple images. The first image will show the full camera view (configured detection areas will be outlined). The second image will show a close up of the detection area.
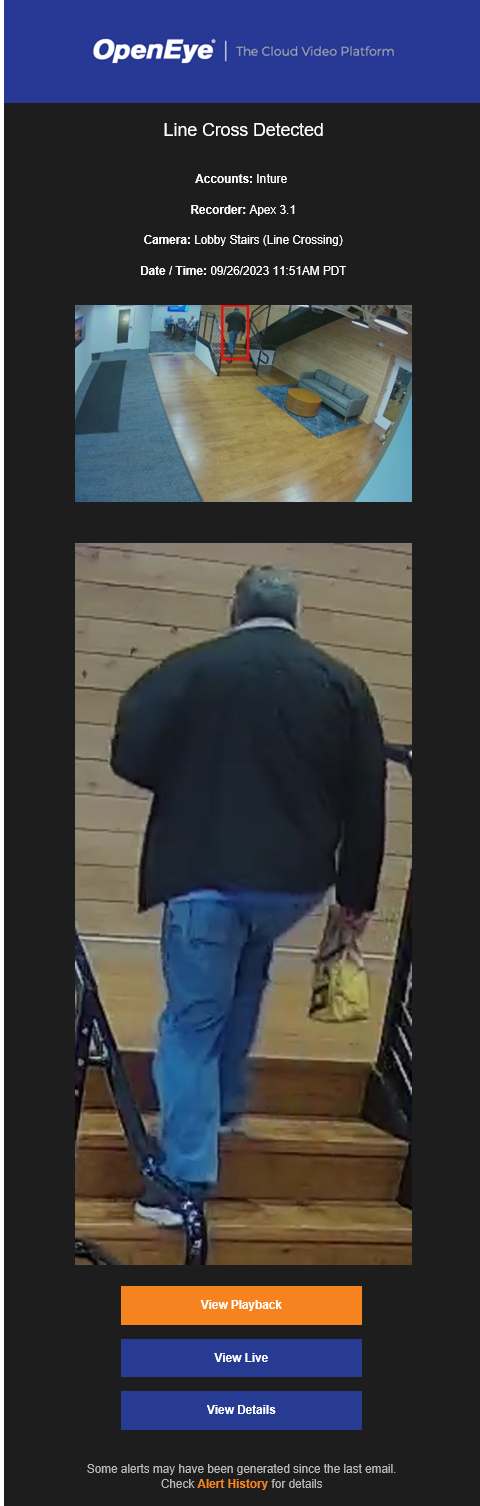
If an alert is configured as an Active Alert, the top of the notification will display "Active Alert."
NOTE: Multiple image line crossing, loitering and intrusion alert email and mobile notifications can only be configured with analytics compatible OpenEye, AXIS and Hanwha cameras.