How to Add Cameras in Bulk using DHCP Utility and Network Camera Manager
This process is meant only for setting up cameras on an External Switch connected to the Camera Switch port. The onboard PoE will already have DHCP running.
If we’re using a Linux unit, we will need to be in Support Tools. This can be found in the Setup Menu by navigating to Support Tools on the left and selecting Launch Support Tools.
If we're using a Windows unit, you will already be at the desktop with access to the necessary programs after logging into Windows
I will be using a Linux unit for this example/reference pictures
- Ensure your Camera Adapter is set for “192.168.51.1” and using the /24 subnet “255.255.255.0”. The DHCP utility will not be able to run without the adapter set this way
- Launch DHCP utility
- There should be an icon for it on the desktop; See below for a reference icon
![]()
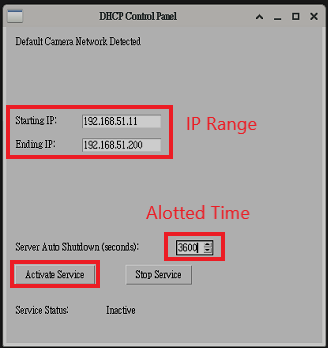
- In this DHCP utility program, you will be able to define the IP range for the cameras. This IP range will at least need to start with 192.168.51 to match the current network details.
- The timeout can also be defined. It is measured in seconds, and by default will last ten minutes (600 seconds). We recommend adjusting that time in accordance with the amount of cameras that need to be added. In this example, I've allotted an hour (3600 seconds) and kept the default IP range

- Once ready, select Activate Service. If you receive an error about a DHCP service already running, ensure no other devices on the Camera network are running DHCP
- Network Camera Manager, our camera discovery tool, is typically used in concurrence with DHCP Utility. This program will assist with identifying which cameras the system is able to see and make necessary changes.
- There should be an icon on your desktop for this program as well. See the below image for reference
![]()
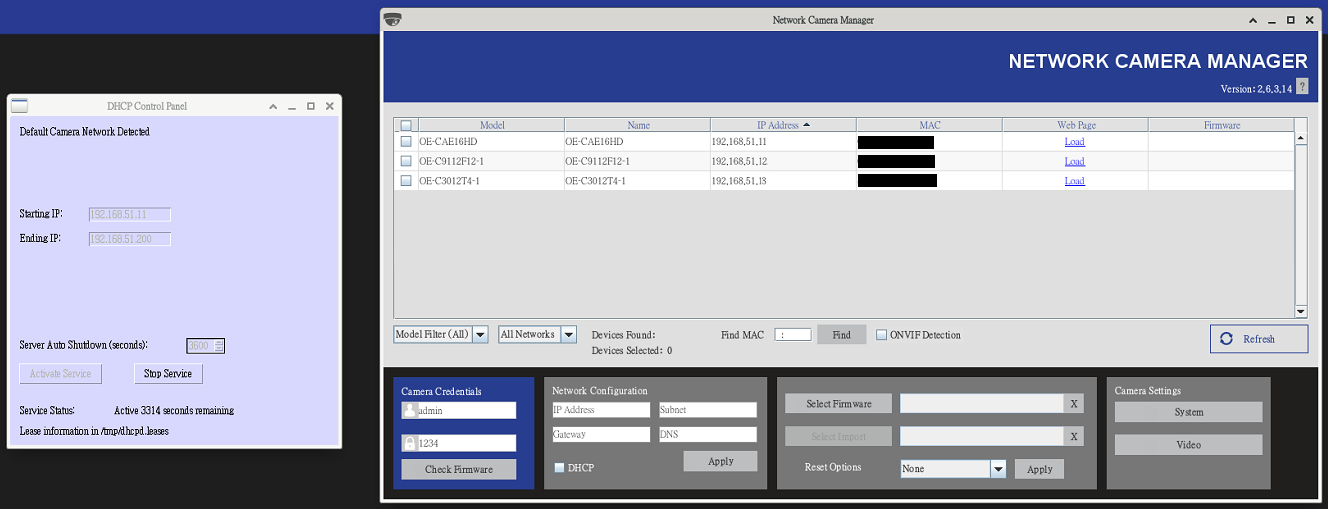
- Once we have both programs open, your screen should look similar to the below image. From here, we can see the DHCP utility running successfully and the cameras which the system was able to pick up.

- From here, we now have a visual representation of all the cameras are where they are currently living. The biggest thing to keep in mind here, this DHCP server is temporary. We will need to connect into each camera and assign static IP addresses which match the desired IP schema. By default, our NVR's are setup to use 192.168.51.x, but that can be changed.
- Ensure the Camera Credentials field at the bottom left of the NCM window match the credentials of the camera
- NOTE: For new OpenEye branded cameras, you will need to set a new password with Network Camera Manager. See this guide on how to do so: Assigning Camera Passwords in Network Camera Manager - OpenEye Knowledge Base
- Check the box next to a camera or cameras
- Manually enter an IP Address, Subnet, Gateway and DNS for the camera
- NOTE: Selecting multiple cameras and entering a Starting IP address will set an IP address on all selected cameras, starting at the specified IP address and increasing by 1 per camera
- Click Apply
- It may take a minute for the changes to be reflected in NCM. Use the Refresh button to see if the changes stuck
More information on our Network Camera Manager tool can be found here: Network Camera Manager - OpenEye Knowledge Base
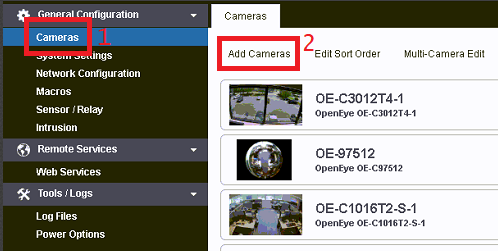
Once we have the cameras assigned to static IP addresses, we can now get them added into the NVR. For this example, I'm using our Discovery tool. This can be found by navigating to the Setup Menu and selecting 1. Cameras > 2. Add Cameras

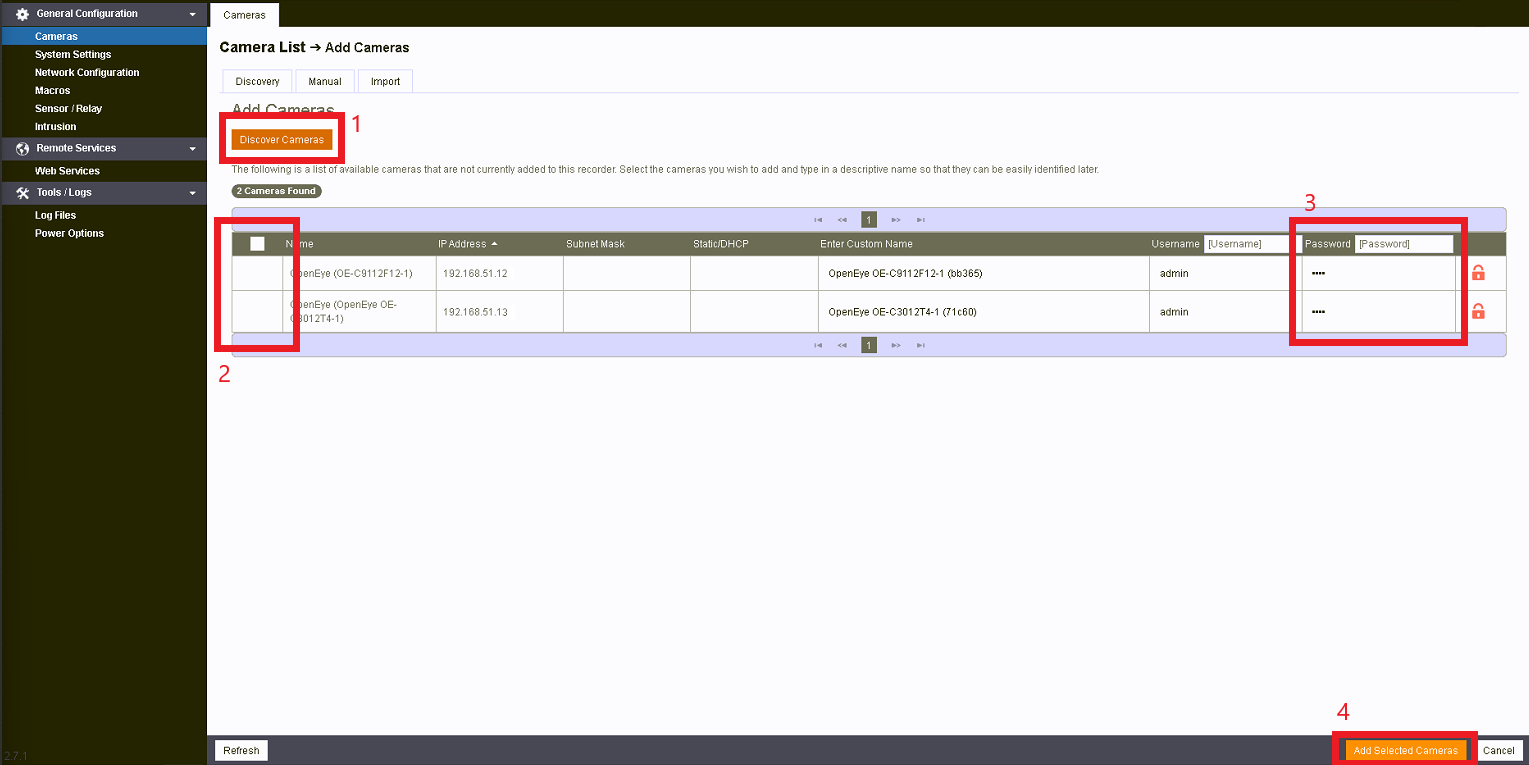
- Click the orange "Discover Cameras" button. This should bring up a list of cameras which the system was able to find on its network
- Select the checkboxes next to which cameras you'd like to add, or the top checkbox to select all the cameras in this view
- Fill out the password field applicably to each camera. Alternatively, the topmost password field will apply the password to all cameras
- Once ready, select the orange "Add Selected Cameras" button on the bottom of the window

At this point, we should have all the applicable cameras successfully assigned static IP addresses and added into the Apex system. Keep in mind this process is specifically designed for OpenEye and Onvif compatible products. You may encounter different results when testing with other manufacturer's cameras. If you are having trouble, feel free to give us a call here in support and we'll see what we can do for you.
