Live View in the Legacy Web Client
The following information is for viewing live video after connecting to a recorder via Web Connect (or the Legacy Web Client) with notes of differences in viewing live video in Local Console.
To view more information on Live View in other clients, select:
Cloud Video Player | Command Station Desktop Client | iOS Mobile App | Android Mobile App
Live Screen Viewing Pane in the Legacy Web Client
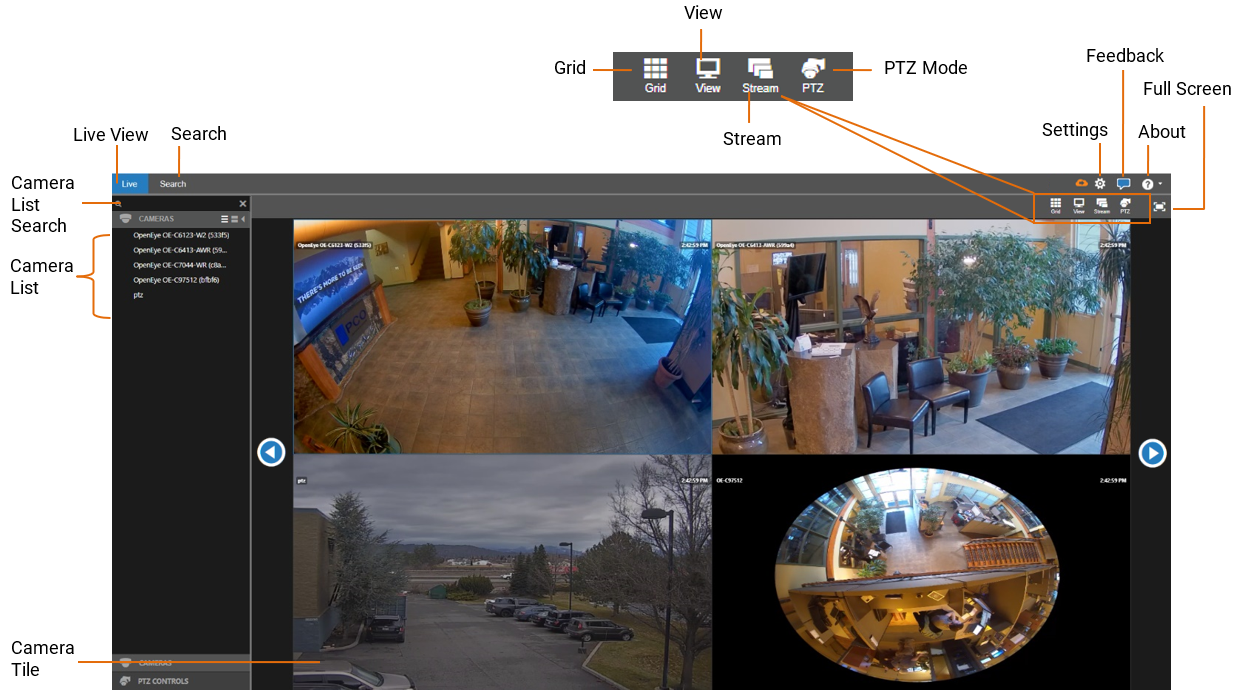
The Live screen displays the camera list and live video. Customize the Live screen to view specific cameras in different layouts.

Live View Menu
Camera List Search – Manually type in the Camera List Search field to filter Camera List by camera name.
Camera List – List of connected cameras. These cameras can be dragged into a camera tile to display live video.
NOTE: To edit camera order in the Legacy Web Client Live View, rearrange cameras in Management > Locations > Locations > Cameras.
On-Screen Display – Displays the resolution, video format, bit rate, and frame rate of the camera.
Camera Tile – Individual tile for viewing live video from one camera.
Viewing Pane – Comprised of camera tiles and makes up the viewing space in the Live Screen.
Grid – Designate a screen division [1, 2, 4, 6, 8, 9, 10 (choice of three different grids displaying ten cameras), 13, 16, 17 or 25 camera tiles] to view live video from cameras in the viewing pane.
View – Dropdown selection of Live video viewing options [4:3, 16:9, original (displays original aspect ratio of all cameras)], and stretch (stretches camera images to fit Camera Tile).
Stream – Designate the stream quality for cameras in the Viewing Pane.
PTZ Mode – Enter PTZ Mode to enable PTZ mouse controls and control PTZ cameras in the camera tiles (Legacy Web Client only).
Full Screen – View live video in full screen mode (Legacy Web Client only).
Settings or Setup– Access the General Configuration, Remote Services, and Tools/Logs menus.
Feedback – Submit feedback directly to OpenEye.
About – View version and copyright information.
Use the Left and Right arrows at the sides of the Viewing Pane to manually cycle through camera views.
Right-Click Menu
Right-clicking on a live camera tile while viewing live or recorded video will display the right-click options menu.
Remove Camera – Remove the camera from the current Live Screen viewing pane (Legacy Web Client only).
Remove All Cameras – Remove all cameras from the current Live Screen viewing pane (Legacy Web Client only).
OSD – On-Screen Display Camera Name, Diagnostics Information (Video Resolution, Video Format, Bitrate, and Frames Per Second), Recorder Date, and Time.
Zoom In – Zoom in on a supported PTZ camera or focus select analog HD cameras.
Zoom Out – Zoom out on a supported PTZ camera or focus select analog HD cameras.
360 View Mode – (for 360 enabled cameras) Dewarp a camera with a 360 view to Interactive, 360 Panorama or 2 x 180 Panorama. View more details on 360 View.
Camera Grid
Adjust the Grid
1. In the Live or Search screen, click Grid.
2. Click on the desired screen grid. The screen grid will automatically apply.
3. Assign the available cameras to the desired camera tiles.
Add cameras to the camera tiles
Leverage a smaller grid size and the next and back arrows to page through the Live and Search screens.
Aspect Ratio
The Live screen view affects the camera tiles and the aspect ratio / format of the live video being displayed.
To adjust the Live Screen View:
1. In the Live screen, click View.
2. Click the desired View. The Live Screen view will automatically apply
NOTE: Choose from aspect ratios of 4:3 or 16:9, and choose a format of Stretch or Original.
Stream Quality
The Stream Quality option affects the resolution of live video as seen on the Live Screen. The stream resolution can be set to low, medium, high, or automatic.
To adjust the Live Video Stream Quality in the Legacy Web Client:
1. In the Live screen, click Stream.
2. Click the desired streaming resolution (Low, Medium, or High). The Live Screen will automatically adjust.
NOTE: The available streaming resolutions are dependent on camera setup. View details on camera settings under Recording Options.
