
Android Mobile App
NOTE: The OpenEye Android app is able to perform a collection of basic tasks quickly and easily. If you would like more functionality, the OpenEye Mobile Browser is also available on your phones and tablets.
Select Account and Location
- After logging in to OpenEye Web Services, select an account from the list.

NOTE: Enter a location name in Search to filter by location name.
- Use the dropdown to select a location.

NOTE: If all devices are available for a location, a green circle appears next to that location. If some devices are available, a yellow circle appears. If no devices are available, a red circle appears.
Live and Recorded Screens

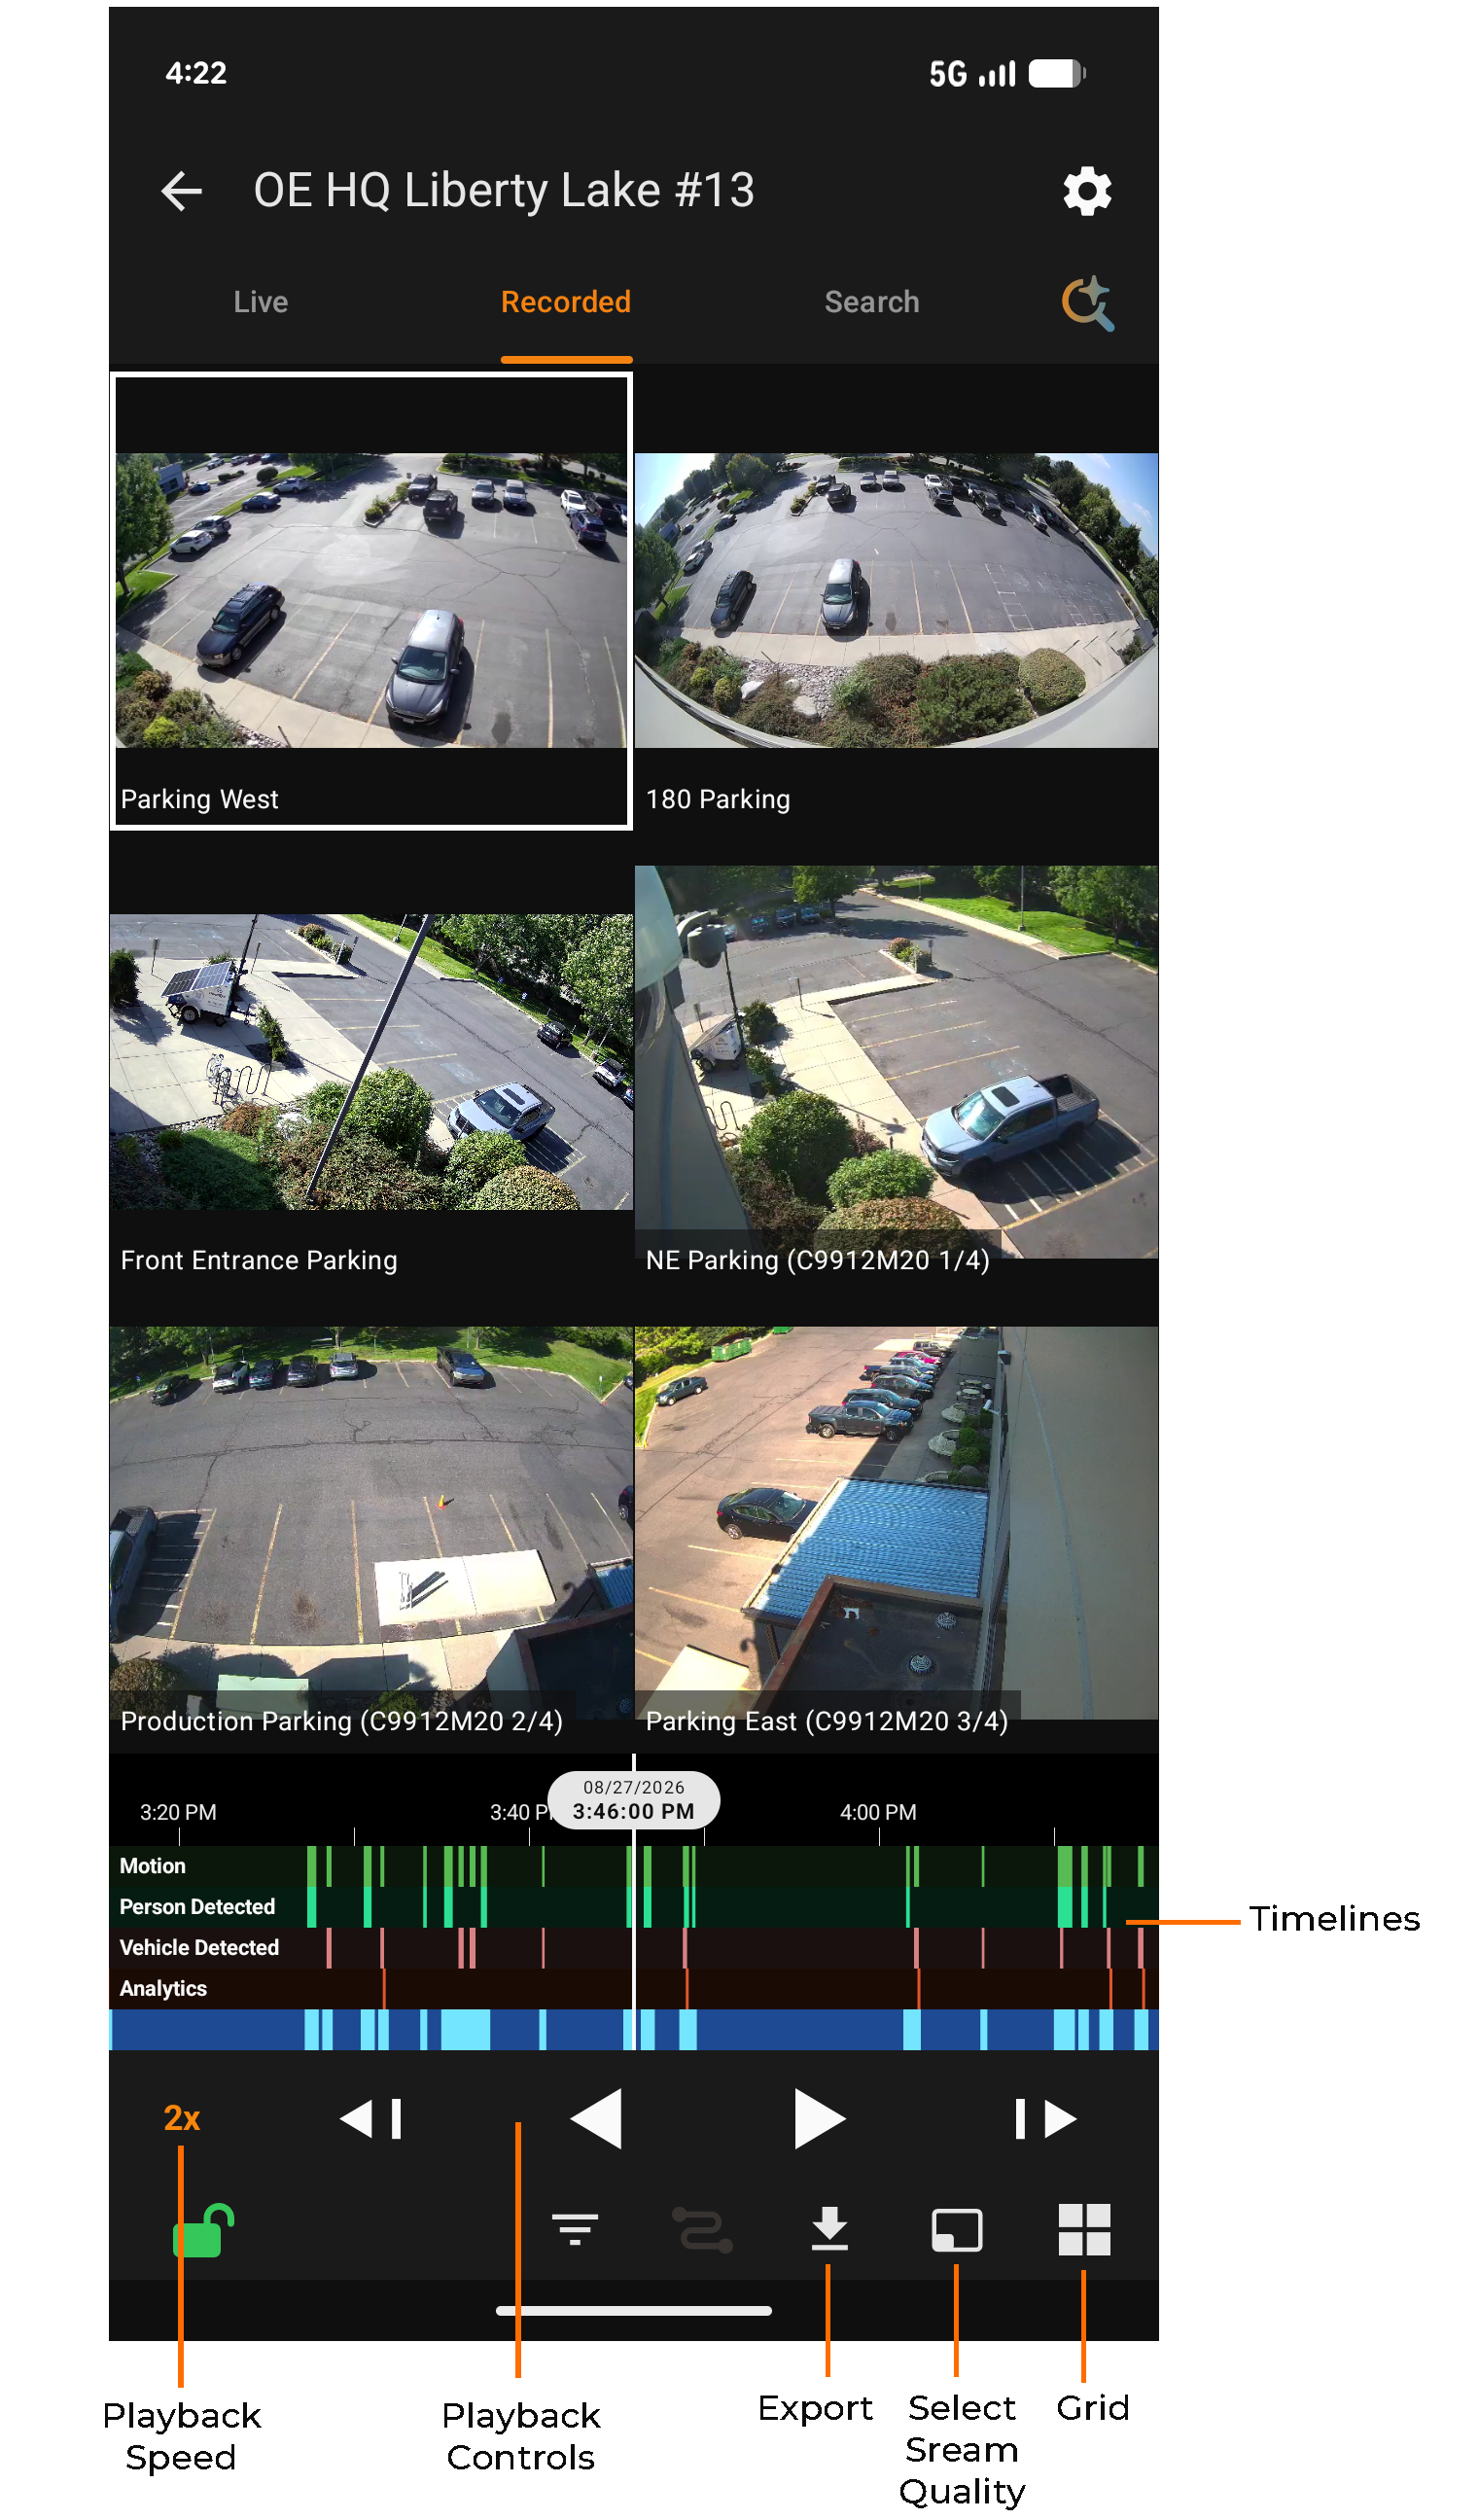
| Viewing Pane | Displays Live screen views of cameras within the Grid selection, view settings, and stream settings. |
| Camera Tile | View live video from a specific camera in each individual tile. |
| Live | Transition from the Recorded screen to the Live screen. |
| Locations | View the list of available locations. |
| Recorded | Play back recorded video. |
| Search | Search video by date, time, and event. |
| AI Visual Search | Use written prompts to search recorded video. |
| Timelines | Default continuous recording is represented by dark lines on the Timeline Search bar, with lighter lines on the Timeline Search bar representing events. Selecting additional timelines from Timeline Filters will represent continuous recording as a darker color and events as lighter events. |
| Playback Speed | Control the speed of video playback. |
| Activate Relays | Activate or deactivate relays associated with your cameras. To activate a relay, click on the desired camera viewing pane, select Activate Relay, choose a relay from the list of enabled relays, and a small ✔️ will appear on the right-hand side next to the relay name. |
| Export | Export selected video. |
| Select Stream Quality | Specify the stream quality for cameras in the Viewing Pane. Available stream qualities may change between grid layouts and Live and Recorded screens. |
| Grid | Specify a screen grid to view video from cameras in the Viewing Pane. |
| Arm / Disarm State | Displays the arm/disarm state of the currently selected location. |
NOTE: The order of cameras cannot be changed within the app. Edit Sort Order has more details on changing camera arrangements.
NOTE: The message, "This is an audio-only device. Video will not be displayed," will appear instead of an image for third-party audio devices. Live, search, and two-way audio will still work for these devices.
Recorded Playback Controls

| Playback Speed | Control the speed of video playback. |
| Skip Backward | Move to the previous frame of recorded video. |
| Play Backward | Play recorded video backward. |
| Play / Pause | Play or pause recorded video. |
| Play Forward | Play recorded video forward. |
| Skip Forward | Move to the next frame of recorded video. |
| Play Events | Displays only event video as indicated by the lighter lines on the Timeline. |
Expanded Menu Controls

| Timeline Filters | Select to display events by timeline. |
| Activate Relays | Activate or deselect relays associated to your cameras. To activate a relay, simply click on the desired camera viewing pane, select Activate Relay, choose a relay from the list of enabled relays, and a small ✔️ will appear on the right hand side next to the relay name. |
| Export | You can export a video clip to your OWS cloud account directly from your Android mobile device. The video clip will appear in your Web Services Account after the export is complete. |
| Select Stream Quality | Specify the stream quality for cameras in the Viewing Pane. |
| Grid | Specify a screen grid to view live video from cameras in the Viewing Pane. |
PTZ Controls

| PTZ Controls | Move the camera view by using touch controls on the camera tile. |
| PTZ Presets | Where supported, preset your PTZ controls. |
| Home | Return to default camera view. |
| PTZ Controls | In the Live Viewing Pane, PTZ controls allow you to pan and tilt the camera's view as well as zoom in or out using the touch screen. Use one finger to drag the camera view in the direction desired and two fingers to zoom. |
| Digital Zoom | By expanding or pinching two fingers on a Camera Tile, you can zoom in on live or recorded video for detailed viewing. |
Audio Controls

| Audio / Two-Way Audio | Where supported, click to enable Audio or Two-Way Audio for cameras with speaker and microphone. |
Select Event Type
- Click Search to filter by event type.

- Select Date / Time and Duration.

- Click Search to view results.

- Click a video from the Thumbnail list to view.

AI Visual Search
- From the Live or Recorded screens, click AI Visual Search.

- Enter a description to begin a search.
NOTE: AI results may be irrelevant or incomplete. Review carefully.

- AI Visual Search looks for visual matches to the description.

- Click a video from the Thumbnail list to view.

Export
- From Search, click Export.

- On the Export screen, choose Date / Time, Video Quality, Video Resolution, Audio (if available), Cameras and click Next.

- Enter Clip Name and Public Notes to be included and click Export.

Set Location Arm/Disarm State
Set a location's arm/disarm state from your Android device. See Location Arming for more information.
- Swipe right on a Location and tap the option to arm or disarm a location.


- Click Arm to confirm changing the location from a disarmed to an armed state.

- The location will display as armed in the location list.

Activate Relays
- Click on the desired camera viewing pane.
- Select Activate Relay.

- Choose a relay from the list of available relays.

Notifications
If mobile event push notifications have been enabled, a thumbnail image of the event appears on the mobile screen. Click View Details for more information or View Video to view the event.
