Network Configuration
Settings
The Settings tab allows for manual ping of an IP address, edit ports, proxy setup, auto-discovery and video streaming configuration.
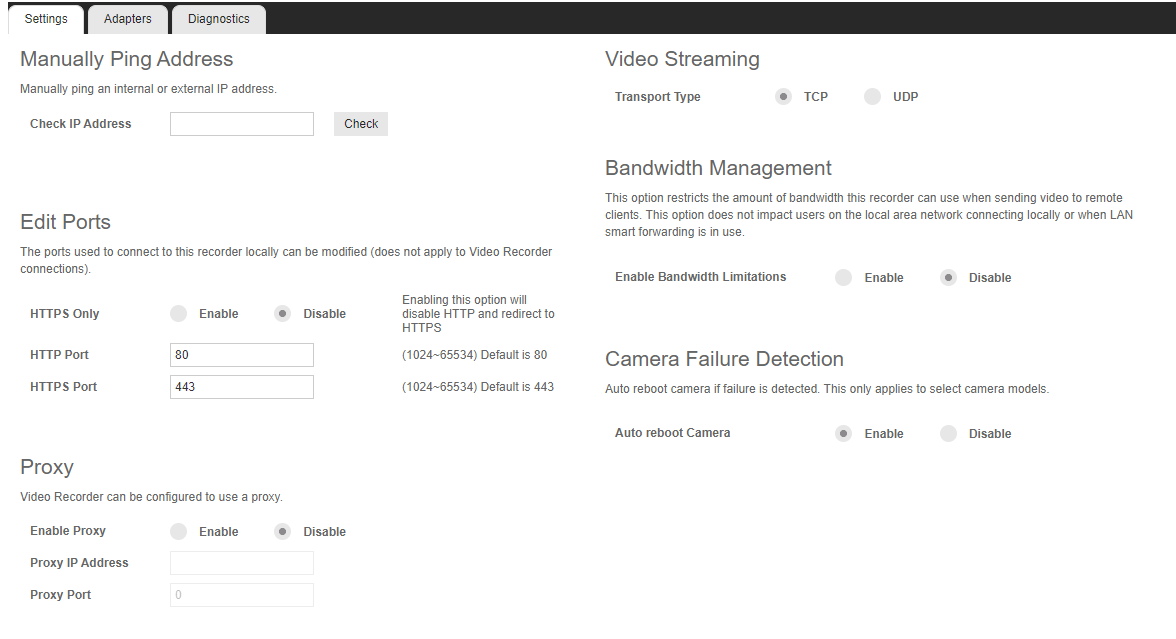
Manually Ping Address
Manually ping an internal or external IP address.
Edit Ports
The ports used to connect to the recorder can be modified.
Disable – Disables HTTPS Port
Enable – Enables HTTPS Port
Enabling this option will disable HTTP and redirect to HTTPS whenever an HTTP address is attempted.
Proxy
The proxy can be enabled/disabled and configured.
To enable a proxy server:
1. On the console or in the Web Client, click Setup.
2. In the desktop client, right-click the connected recorder and select Configure.
3. Click Network Configuration in the menu, and then click the Settings tab.
4. At the bottom of the page, check the box labeled Enable in the Proxy section.
5. Enter the Proxy Address and Port Number used by the network proxy server.
6. Click Save.
NOTE: Proxy is HTTP 1.1 compliant.
Video Streaming
Designate the video streaming transport type for global IP network traffic: TCP or UDP.
Bandwidth Management
The Bandwidth Management can be enabled/disabled and configured.
To enable Bandwidth Management:
1. On the console or in the Web Client, click Setup.
2. In the desktop client, right-click the connected recorder and select Configure.
3. Click Network Configuration in the menu, and then click the Settings tab.
4. At the bottom of the page, check the box labeled Enable in the Bandwidth Management section.
5. Enter a Max Bandwidth limit the recorder can use when sending video to remote clients.
6. Check the Add a time-based exception option and enter a time range and bandwidth limit if different than the default or determined bandwidth limit.
7. Add to the Subnet Exception list if any subnets should be excluded from the bandwidth limit.
8. Click Save.
Camera Failure Detection
Auto reboot camera if failure is detected. This only applies to select camera models.
Adapters
This tab displays the Client Network Interface Card (NIC) and Camera NICs available on select M-Series Apex recorders.

To make changes to a NIC (Linux only):
1. Click Setup.
2. Select Network Configuration under General Configuration and the Adapters tab.
3. Click the desired NIC and make any necessary changes to the Configuration Type, Subnet Mask, Default Gateway, Primary DNS, and Secondary DNS.
NOTE: The Client NIC must be set to static to manually choose an IP address.
There are two network paths used for communication on a NVR (three on a recorder with built-in POE).
- The network port labeled “Client” in software and on the physical port. This port is set to DHCP by default and intended to be used as the primary communication path to the internet, and for users connecting to the system for viewing video. If needed this port can be used to connect to cameras, but OpenEye recommends the Camera NIC be used for that whenever possible. This NIC can be set to a static address if needed.
- The network port labeled “Camera” in software and on the physical port. This port is set to 192.168.51.1 / 255.255.255.0 (with no Gateway or DNS so the system does not try to use it to communicate to the internet). This port is intended to connect to cameras running on additional POE devices and/or on the customer’s network. This NIC can be changed to a different static address or set to DHCP if needed.
NOTE: The camera port provides a great way for a field tech to install a recorder without ever needing a monitor, keyboard, or mouse. Set a laptop to 192.168.51.2 and direct connect an ethernet cable from the laptop to the Camera NIC. On the laptop, type in the Camera NIC address in a web browser to gain full access to the recorder to configure cameras and join the recorders to the appropriate OWS account.
Additional Network Settings
| Client NIC IP Address | Set to DHCP | |
| Camera NIC IP Address | 192.168.51.1 | |
| IP Address Reserved for PoE* |
192.168.50.1 (Internal PoE) Reserved 192.168.50.2 (Internal NIC) Reserved 193.168.50.11-192.168.50.26 (PoE Ports) |
*PoE reserved IP addresses apply to PoE appliances only
NOTE: Only plug cameras directly into the built-in PoE switch on the recorder. Connecting PoE ports to a regular network could cause DHCP conflicts to occur.
NOTE: On Windows systems, network configuration will be done in Windows Network Configuration.
Diagnostics
The Diagnostics tab shows the operational status of various connections, ports, and relays for the recorder. This is a helpful tool for troubleshooting. A green checkmark means that the respective connection, port, or relay is functioning correctly.
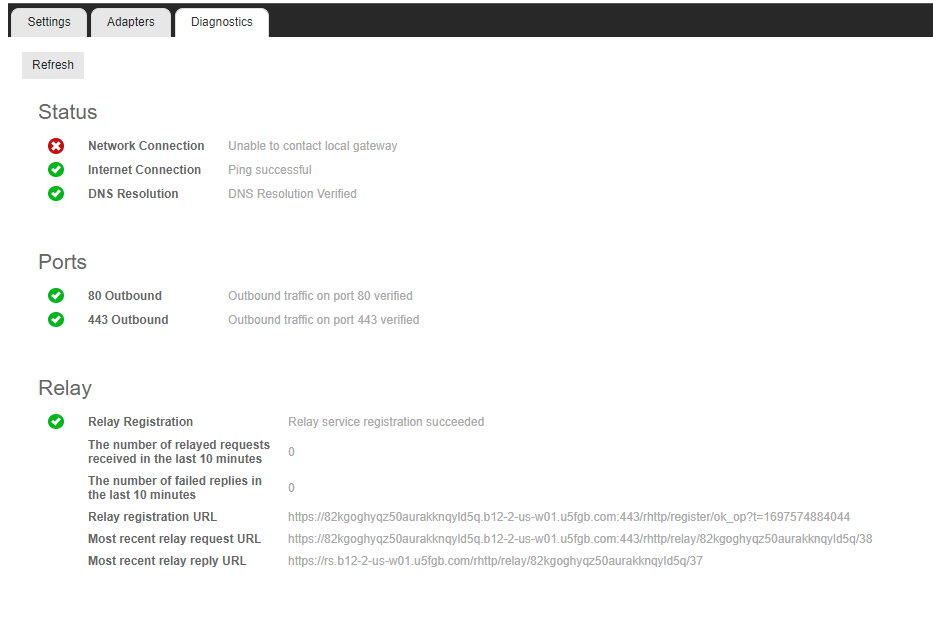
Status
Network Connection – Test pings the local gateway setup on the recorder. In some cases, this may fail if internal ICMP is disabled on the firewall/router. In these rare cases a red X may appear, but service may work without issue.
Internet Connection – Test pings an IP (8.8.8.8) to see if internet connectivity is working correctly.
DNS Resolution – Check to ensure you can resolve DNS names.
Ports
Tests the recorders' outbound connection to OWS over 80 and 443.
Relay
Diagnostics information used by technical support. See below for Diagnostics Scenarios.
Diagnostics Scenarios
View Diagnostics Scenarios for help with troubleshooting.
Power over Ethernet
Power over Ethernet allows users to disable automatic add and record for PoE cameras, as well as power cycle individual ports, which will reset the connected camera.
To disable plug and play:
1. Click Setup.
2. Click Network Configuration under General Configuration, and then click the Plug and Play tab.
3. Uncheck the Enable Plug and Play checkbox.
OR
Uncheck the Enable PnP checkbox for the desired camera.
To power cycle the PoE camera, click the Cycle Power icon in the row for the desired PoE camera.
To enable automatic adjustment of camera resolutions when adding them for the first time, check the box beneath Enable Plug and Play.
Certificates
The custom certificate feature allows users to further harden their security by importing a security certificate for local connections. Import a certificate, signed by a public or internal certificate authority, into the server software, replacing the self-signed certificate that ships with the recorder. View certificate details, upload an existing certificate or generate a new self-signed certificate if needed. View details here.