Edit Cameras
General

Title – Customizable camera name, seen on the Camera List and in the Live Screen.
State – Set the camera to Enabled or Disabled.
Enabled: Uses a recording channel license, can be viewed in live and recorded.
Disabled: Does not use a recording channel license and cannot be viewed in live or recorded.
Associate Camera – Select another camera to transfer camera information to in case of hardware failure or change in camera status.
IP Address – Change Camera IP address and Port number.
Username and Password – Credentials to access camera. Click to view Password. View Default Camera Password.
Area – Associate a camera with an intrusion area.
Enable PTZ/Autofocus – Enable Pan, Tilt, Zoom, (PTZ) capabilities or autofocus on supported cameras. If a camera does not have PTZ capabilities this option will be unavailable.
Hidden Camera – Enable to allow only users with local hidden camera permissions to view this camera.
NOTE: Checking the hidden cameras check box for a specific camera will hide that channel to all local users who do not have hidden camera permissions assigned to their account. These settings can be accessed under General Configuration > User Management > Users. See User Group Permissions for more details.
IP address – Clicking the IP address in this setup window allows direct access to the camera’s web setup for OpenEye cameras.
Synchronize – Manual check of IP device for latest information.
Model – Model of the IP camera or device.
MAC Address – Displays the MAC address of the IP device. Currently only available on Arecont devices.
Firmware Version – Displays the firmware version of the IP device. Currently only available on Arecont devices.
Integration ID – Integration ID is the channel number used in 3rd party integrations over the API.
Update Image – Update the thumbnail image for this camera to the current live view.
NOTE: The thumbnail preview images for cameras is automatically set 48 hours after the cameras are added if not already set by the user.
Camera Notes – Enter additional information to appear in the inventory report.
Additional Page Tools
System Usage Metrics
The system usage metrics display the current Resource Usage, CPU, GPU and Memory usage in the upper right hand corner of a camera's General set up page under Setup > General Configuration > Cameras > Camera List. The severity of usage is indicated as percentages and as green, orange, or red gauges.
Enabling on-board analytics and other functionality requires dedicated system resources. The Resource Usage meter visualizes the total resource pool used or available and is specific to this hardware.
NOTE: Resource Usage is not an average of CPU, GPU, Memory, or overall system load.
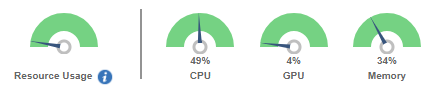
NOTE: Analytic events may not be detected or recorded as configured if system usage nears or exceeds CPU, GPU or Memory capacities.
Quick Links
Click on the Quick Links at the bottom of the Analytics tab to view Alert Rules or Video Clips associated with analytic events.