Adding Cameras Manually
It is recommended to first try to Add Cameras via Discovery, before adding manually.
Cameras can be added using ONVIF, Arecont, Hanwha, Vivotek, AXIS, or RTSP protocols. If RTSP is selected, the stream URLs need to be input manually if a pre-defined camera manufactures RTSP is not listed. Consult the camera manufacturer’s documentation for URL stream information
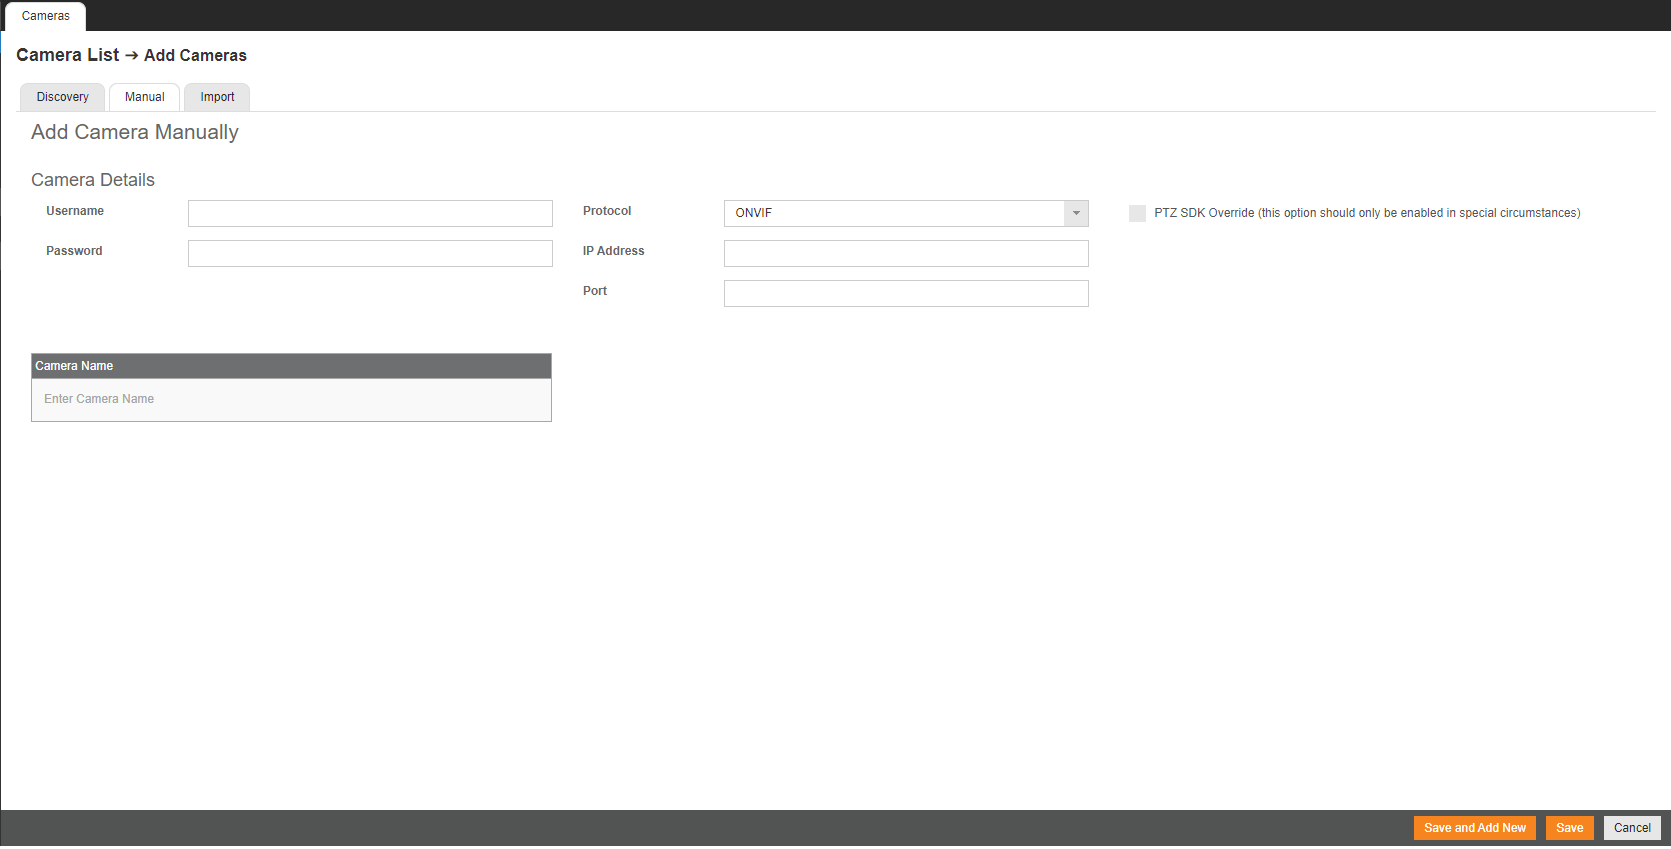
Manually Adding a Camera
- Click Setup (Gear Icon).

- Select Cameras under General Configuration.
- Click Add Cameras.

4. On the Add Cameras page, click the Manual tab.
5. Enter the appropriate connection information including Protocol, IP Address, Port, Manufacturer, Model, Username, Password, and Camera Name. For adding with RTSP, follow the details here.
6. Click Save or Save and Add New to add another camera.
Manually Importing Multiple Cameras
|
|
OpenEye Web Services (OWS) makes high camera count installations easier by allowing users to import large numbers of cameras at once using CSV import. Using the same information required when manually adding cameras in OWS, you can easily add all cameras to the system in one streamlined step. Export the CSV to save the configuration file for future deployments. The CSV import/export function saves you time, especially when deploying across network subnets where camera discovery isn't an option, making setup faster and more efficient.
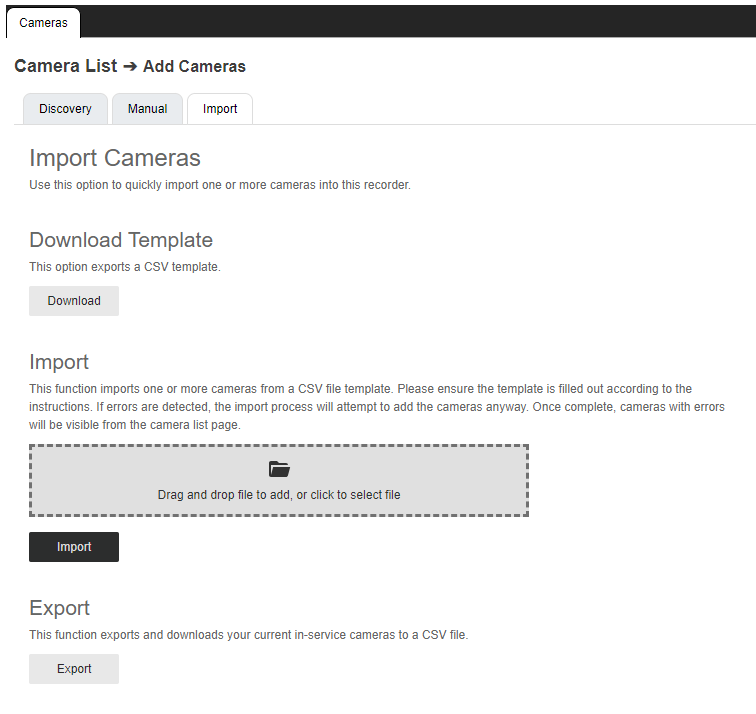
Import a CSV File
- Click Setup.
- Under General Configuration, click Cameras.
- Click Add Cameras, then Import.
- Download the CSV template.
- Open the file in Excel or a text editor.
- Add one row for each camera to be added.
NOTE: Devices with multiple camera sensors should be represented as a single line - the system will auto-detect the different streams.
- Fill out each column according to the template instructions:
NOTES:
- Lines beginning with the # character are ignored
- Each row represents a video device
- Each row requires the first six columns
- The additional four columns are optional depending on protocol
- RTSP protocol requires at least one of the three URL columns
Supported Protocols:
arecontcontera
arecont
axis
flir
hikvision
mobotix
sightlogix
sunell
vivotek
hanwha
onvif
genericrtsp
rtsp
arecont contera
Columns:
Integration_ID: Optional can be left blank to assign next available number
Camera_Name: Required
IP_Address: Required
Protocol: Required
Username: Required
Password: Required
Port: Optional defaults to 80
Rtsp_Url_1: At least one URL column required for RTSP protocol
Rtsp_Url_2: At least one URL column required for RTSP protocol
Rtsp_Url_3: At least one URL column required for RTSP protocol
Examples:
1 Camera 1 10.10.10.1 onvif admin 12345
Camera 2 10.10.10.2 rtsp admin 12345 80 rtsp://10.10.10.2/h264 rtsp://10.10.10.2/h264_2
- After completing the template, click the folder icon in Import and search for the completed CSV file or drag and drop the file onto the drag-and-drop area on the page.
- Click the Import button.
NOTE: The import time depends on the number of cameras and protocols added to the CSV file.
NOTE: On completion, the page will show a green icon if all cameras were added without errors or warnings.
Export CSV File
After importing the CSV file, if errors or warnings occurred, a CSV file can be exported that shows which cameras have the errors or warnings. The exported file has the same contents as the original file, but with additional columns showing each device's error and warning messages. Corrections can be made on the exported CSV file and re-uploaded using the Import function.
NOTE: Devices with IP and Port combinations that are already in the system will automatically be skipped to avoid duplication.
NOTE: Cameras with warning messages only (no errors) are typically added to the system but may require setting adjustments in the Camera List page.
NOTE: Cameras with error messages are not typically added and will need to be corrected and resubmitted through the CSV file.