ADFS Integration Instructions
Enable ADFS Integration
Add Identity Management Integration
As a web services Administrator,
- From the Channel Partner Portal, go to Management > Integrations.
- Click Add New Integration.
- Select ADFS from the list of options and click Next.
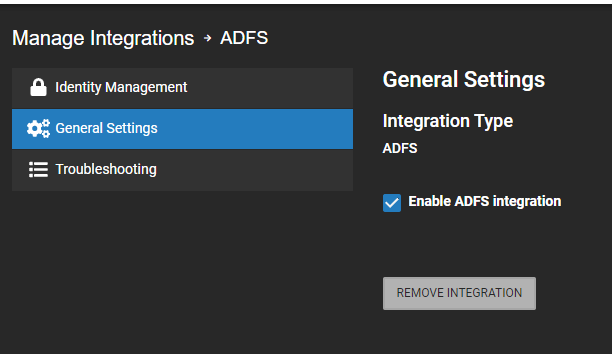
- Ensure Enable ADFS integration is checked.
- Select the Identity Management tab.
- Check Enable Third Party Authentication.

NOTE: Click on  to copy the information in the field.
Enable ADFS
Go to Integrations in the End User Portal.
- Select ADFS and then click Next.

- The ADFS Integration will be added to the Manage Integrations list.

- To make changes to the Integration, click
 from Manage Integration.
NOTE: You’ll be alternating between OWS and ADFS in order to perform this integration.
Configure ADFS for OWS Access (ADFS)
- Download the ADFS 2.0 metadata from the ADFS server at https://<ADFS_HOST>/FederationMetadata/2007-06/FederationMetadata.xml
- Copy the text from that XML file into the Identity Provider Metadata field and click Save.
- Copy the Audience URI (SP Entity ID). You’ll need this later on the ADFS server.
NOTE: The following steps are shown in Windows Server 2016.
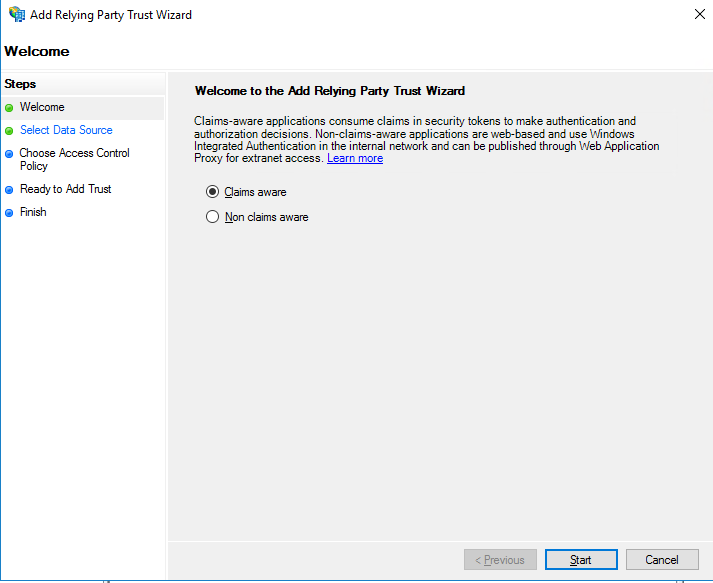
- In the ADFS Management console on the ADFS server, go to Relying Party Trusts and click on Add Relying Party Trust.
- Choose Claims aware and click Start.
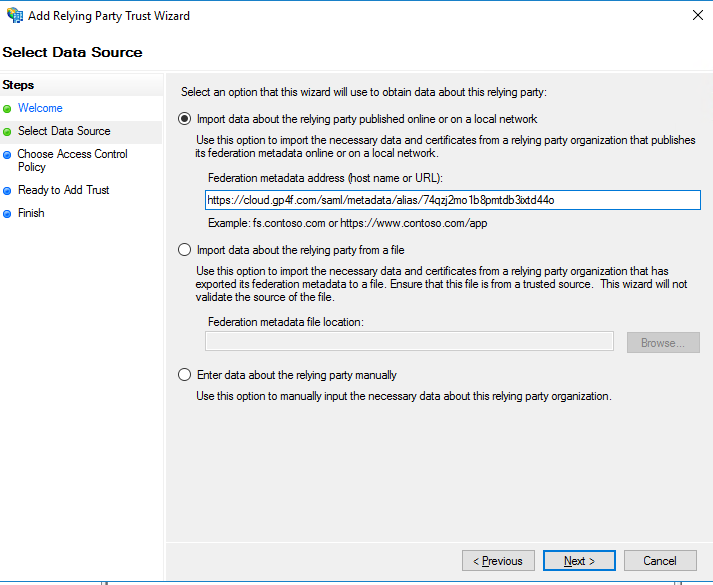
- Check Import data about the relying part published online or on a local network.
- Paste in the Audience URI (SP Entity ID) acquired earlier in OWS into the Federation metadata address (host name or URL): field and click Next.
- Choose a display name in the Display name field. This identifies the relying party when someone logs in.
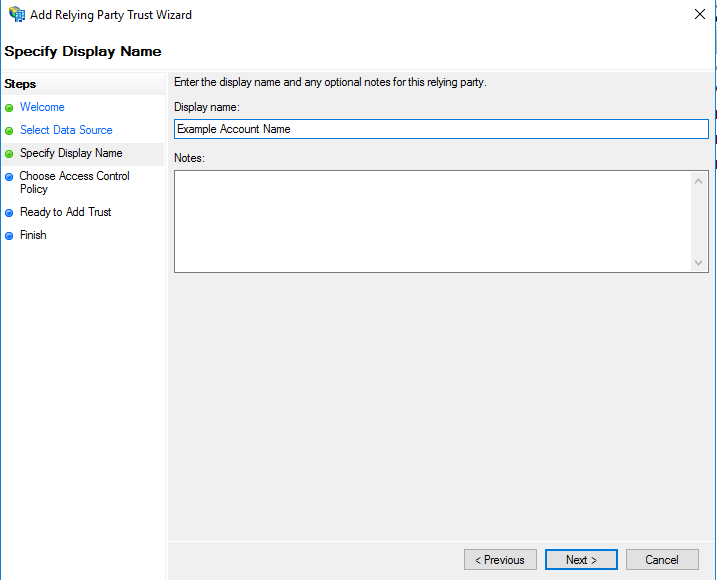
- Click Next.
- Choose an Access Control Policy (e.g. "Permit everyone") and click Next.
- On the Review Settings page, click Next.
- Leave Configure claims issuance policy for this application checked and click Close.
- In the Edit Claim Issuance Policy UI that pops up click Add Rule.
- Select Send LDAP Attributes as Claims and click Next.
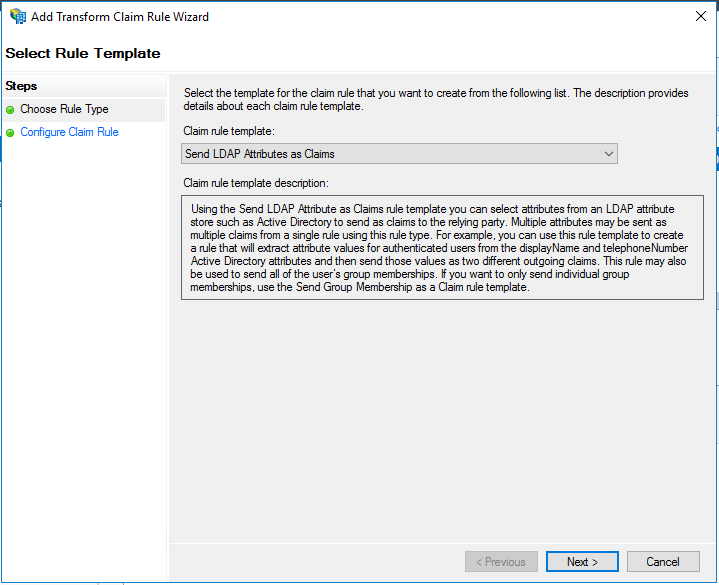
- Choose a Claim rule name: to put in that field. (e.g. “NameID Rule”)
- Choose Activity Directory for the Attribute store: drop down list.
- Choose E-Mail-Addresses for the LDAP Attribute in the list.
- Choose Name ID for the Outgoing Claim Type in the list. Users’ email addresses will be mapped to OWS email addresses for the purposes of login for this account.
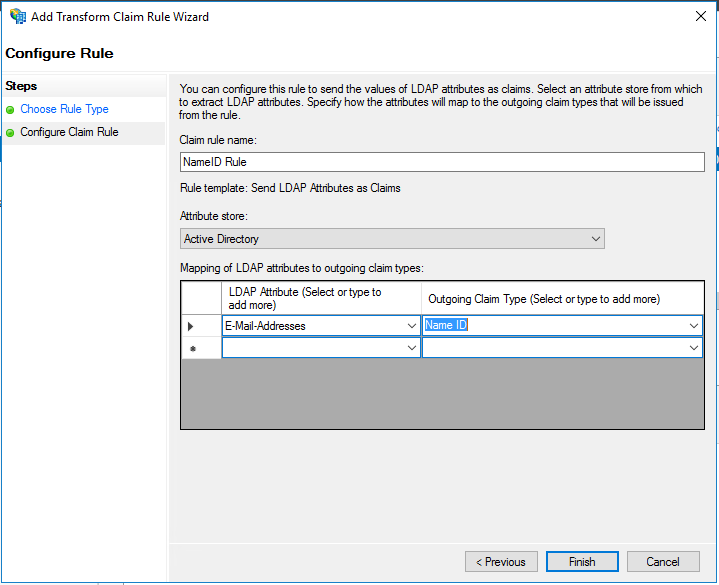
- Now click Finish.
- Click Ok.
You should be able to login with any provisioned or existing user whose OWS username (as an email address) matches the email address for the user in AD when logging into that account.
Example for login from the ADFS server: https://adfs.example.com/adfs/ls/idpinitiatedsignon
Add Users Manually
Users may now be configured to access your OWS application via ADFS in one of two ways:
- Manual invite via OWS.
- Just-In-Time Provisioning (JITP).
Manual Invite Via OWS
Users may be manually added to WS via the standard WS user invite function, including manually adding them to User Groups. The primary advantage of this approach is that users invited in this fashion may choose to login either via WS credentials or the IDP credentials. This approach is ideal for Administrators who need a non-IDP method to login just in case there is an IDP issue. The downside of this approach is that user management is not simplified into a single place, and that users may login both ways if configured to do so.
Automatic Provisioning Via Just-in-Time Provisioning (JITP)
Provisioning may also be performed via JITP through claims made in the SAML that is presented to OWS.
Enable ADFS Integration
Follow these instructions to Enable an Identity Management Integration.
Using Just-in-Time Provisioning (JITP)
Follow these instructions to Enable Just-in-Time Provisioning (JITP).