Cloud Camera Configuration Settings
Analytics
Configure analytics for the device.
Note: Cloud Camera analytics are dependent on license tier. See OWS Licensing for more information.
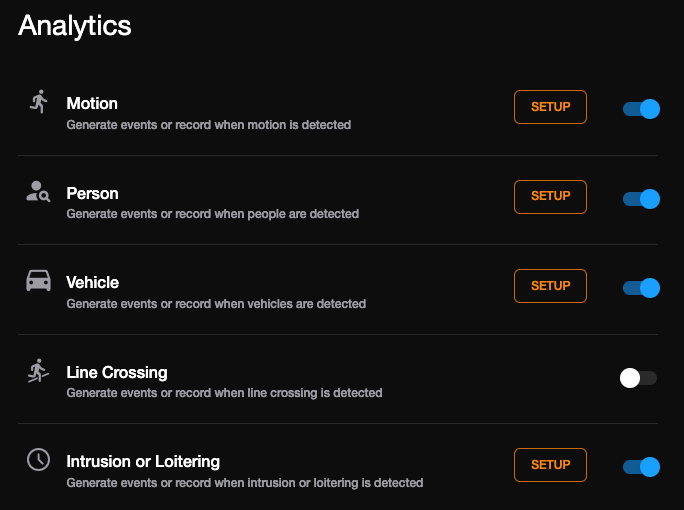
- Click to enable an analytic type.
- Click SETUP.
Motion Region

Configure a Standard Motion Area
- Enable Standard Motion.
- Click Area Selection > Add Area, then click and drag the capture square to create the area.
NOTE: Left click, release, and move to draw a custom polygonal shape one line at a time. Draw and click the last line to the starting point to complete the Area.
NOTE: Motion Areas can be subtracted with Area Selection > Subtract Area to disable motion detection for specific areas of the video stream and motion grids can be drawn over each other.
NOTE: Resize the area of interest by dragging the bottom right-hand corner of the camera confirmation pane.
- Continue modifying Motion Areas as desired using the tools below the camera frame.
Motion and Motion Region Controls
Undo - Cancel the last motion area configuration made.
Redo - Recall the last motion area configuration that was cancelled.
Area Selection - Add Area or Subtract Area.
Select All - Select the entire pane as a motion area.
Edit Area - Click and drag to move an area or click and drag a corner to resize an area.
Delete Area - Click an area to delete it.
Delete All - Delete all motion areas.
Maximize - View the Motion Region pane in full screen.
Motion Sensitivity – Reduce or increase the sensitivity of motion detection.
Noise Sensitivity – Reduce or increase noise sensitivity detected on a camera.
Image Offset – Offset when an image is captured from a motion event.
Record on event detection – Remove the check to disable events from being recorded on the event stream.
- Click Save.

Configure a Smart Motion Area
- Enable Smart Motion.
- Click Area Selection > Add Area, then click and drag the capture square to create the area.
NOTE: Left click, release, and move to draw a custom polygonal shape one line at a time. Draw and click the last line to the starting point to complete the Area.
NOTE: Motion Areas can be subtracted with Area Selection > Subtract Area to disable motion detection for specific areas of the video stream and motion grids can be drawn over each other.
NOTE: Resize the area of interest by dragging the bottom right-hand corner of the camera confirmation pane.
- Continue modifying Motion Areas as desired using the tools below the camera frame.
Motion and Motion Region Controls
Undo - Cancel the last motion area configuration made.
Redo - Recall the last motion area configuration that was cancelled.
Area Selection - Add Area or Subtract Area.
Select All - Select the entire pane as a motion area.
Edit Area - Click and drag to move an area or click and drag a corner to resize an area.
Delete Area - Click an area to delete it.
Delete All - Delete all motion areas.
Maximize - View the Motion Region pane in full screen.
Relevance Threshold – Used to determine when an object meets an acceptable definition of a person or vehicle. All objects are classified with a percentage likelihood that the object is legitimate from 0% - 100%. To help set the Relevance Threshold, a visual red outline will appear in the motion region when Smart Motion is detected. See Smart Motion Best Practices for more details.
Image Offset – Offset when an image is captured from a motion event.
Record on event detection – Remove the check to disable events from being recorded on the event stream.
- Click Save.
Person Region

Configure a Person Detected Area
- Click Area Selection > Add Area, then click and drag the capture square to create the area.
NOTE: Left click, release, and move to draw a custom polygonal shape one line at a time. Draw and click the last line to the starting point to complete the Area.
NOTE: Motion Areas can be subtracted with Area Selection > Subtract Area to disable motion detection for specific areas of the video stream and motion grids can be drawn over each other.
NOTE: Resize the area of interest by dragging the bottom right-hand corner of the camera confirmation pane.
- Continue modifying Motion Areas as desired using the tools below the camera frame.
Motion and Motion Region Controls
Undo - Cancel the last motion area configuration made.
Redo - Recall the last motion area configuration that was cancelled.
Area Selection - Add Area or Subtract Area.
Select All - Select the entire pane as a motion area.
Edit Area - Click and drag to move an area or click and drag a corner to resize an area.
Delete Area - Click an area to delete it.
Delete All - Delete all motion areas.
Maximize - View the Motion Region pane in full screen.
Relevance Threshold – Used to determine when an object meets an acceptable definition of a vehicle. All objects are classified with a percentage likelihood that the object is legitimate from 0% - 100%. See Best Practices for more details. To help set the Relevance Threshold, a visual red outline will appear in the motion region when a vehicle is detected. See Smart Motion Best Practices for more details.
Record on event detection – Remove the check to disable events from being recorded on the event stream.
Advanced object detection capabilities – This option will enable advanced object detection capabilities and increase resource usage on this device.
NOTE: Advanced object detection capabilities is currently in Beta for Attribute Filters and Similarity Search.
- Click Save.
Vehicle Region

Configure a Vehicle Detected Area
- Click Area Selection > Add Area, then click and drag the capture square to create the area.
NOTE: Left click, release, and move to draw a custom polygonal shape one line at a time. Draw and click the last line to the starting point to complete the Area.
NOTE: Motion Areas can be subtracted with Area Selection > Subtract Area to disable motion detection for specific areas of the video stream and motion grids can be drawn over each other.
NOTE: Resize the area of interest by dragging the bottom right-hand corner of the camera confirmation pane.
- Continue modifying Motion Areas as desired using the tools below the camera frame.
Motion and Motion Region Controls
Undo - Cancel the last motion area configuration made.
Redo - Recall the last motion area configuration that was cancelled.
Area Selection - Add Area or Subtract Area.
Select All - Select the entire pane as a motion area.
Edit Area - Click and drag to move an area or click and drag a corner to resize an area.
Delete Area - Click an area to delete it.
Delete All - Delete all motion areas.
Maximize - View the Motion Region pane in full screen.
Relevance Threshold – Used to determine when an object meets an acceptable definition of a vehicle. All objects are classified with a percentage likelihood that the object is legitimate from 0% - 100%. See Best Practices for more details. To help set the Relevance Threshold, a visual red outline will appear in the motion region when a vehicle is detected. See Smart Motion Best Practices for more details.
Record on event detection – Remove the check to disable events from being recorded on the event stream.
Advanced object detection capabilities – This option will enable advanced object detection capabilities and increase resource usage on this device.
NOTE: Advanced object detection capabilities is currently in Beta for Attribute Filters and Similarity Search.
- Click Save.
Line Crossing

Configure a Line Crossing Detected Area
- Click Add Line, then click to place the starting point for the line, and click again to place the endpoint.
- Check either Person or Vehicle (or both) for Detection type.
- Check Record on event detection to automatically begin recording when a line in a region is crossed.
NOTE: Disabling this option will cause the events to still be collected, but video for those events will not be recorded using the event stream.
- Click Save.
Line Crossing Controls
Undo - Cancel the last line crossing configuration made.
Redo - Recall the last line crossing configuration that was cancelled.
+ - Add a new Line Crossing Detected Event for the same camera.
Edit Line - Click and drag to move a line or click in the circle to change the direction for line crossing detection.
- Delete Line - Remove an added line.
Delete All - Click, then click a line to remove it from the pane.
Maximize - View the Motion Region pane in full screen.
NOTE: Resize the area of interest by dragging the bottom right-hand corner of the camera confirmation pane.
Loitering or Intrusion

Configure a Loitering/Intrusion Region
- Click Area Selection, then click and drag the capture square to create or delete the area.
NOTE: Left click, release, and move to draw a custom polygonal shape one line at a time. Draw and click the last line to the starting point to complete the Area.
NOTE: Loitering Detected areas can be subtracted to disable detection for specific areas of the video stream and motion grids can be drawn over each other.
- Check Loitering, then enter a number in the field and choose either Seconds or Minutes from the dropdown to set a threshold.
- Check Intrusion and either Enter or Exit (or both) for intrusion detected events.
- Check either Person or Vehicle (or both) for Detection type.
- Check Record on event detection to automatically begin recording when a loitering area threshold has been exceeded.
Loitering/Intrusion Controls
Undo - Cancel the last line crossing configuration made.
Redo - Recall the last line crossing configuration that was cancelled.
Area Selection – Draw individual detection grids.
Select All – Draws a full detection grid over the image.
Edit Area – Click and drag to move an area or click and drag a corner to resize an area.
Delete Area - Click an area to delete it.
Delete All - Delete all motion areas.
Maximize - View the Motion Region pane in full screen.
NOTE: Resize the area of interest by dragging the bottom right-hand corner of the camera confirmation pane.
- Click Save.
Recording

Recording Mode
Continuous Only – Records video stream continuously.
Continuous + Event – Records one Continuous stream, and then records an Event stream in addition when motion is detected.
Note: Smart Motion requires the Continuous + Event recording type.
After selecting a recording option, configure the stream and resolution options.
Continuous Video Settings
Continuous Recording Stream – Continuous Recording Stream records at a lower resolution and/or frame rate when motion is not detected and the Continuous + Event recording option is selected.
Enable Minimum Retention Limit – This setting determines the minimum retention period for continuous stream video recordings. Setting a higher number of days increases the likelihood that older event recordings will be removed on a FIFO basis in an effort to maintain the specified retention period.
NOTE: The number of days for the minimum retention period is limited up to 30 days.
Event Video Settings
Event Recording Stream – Higher resolution and/or frame rate camera video stream used to record when a motion or a sensor event is triggered.
Stream Configuration
This is where the settings for high and low-quality streams are configured. The high-quality stream is the recording stream, and the system automatically chooses the lower-quality stream for motion detection. These streams are also used as high and low-quality streams in the live view.
Enable Smart Codec – Click to Enable Smart Codec for Stream 1.
NOTE: 8MP cloud camera models only support 16:9 resolutions.
Max Retention Limit
This option sets the maximum number of days that recorded video will be kept. The maximum retention days must be between 0 and 9999 days.
Storage
View SD Card Storage details: SD Card Status, Model, Serial Number, Firmware Version, and Capacity; and view Retention Data details: Oldest Recorded Video, Total Retention (Days), Event Retention (Days), Event Storage (GB), Continuous Retention (Days), Continuous Storage (GB).
NOTE: Retention Data is only updated every 24 hours.

Image Settings

Brightness – Depth of light and shadow in the image. This option can drastically affect the quality of recorded video. The default value is recommended.
Contrast – Adjust the difference between bright and dark areas of the image. This option can drastically affect the quality of recorded video. The default value is recommended.
Saturation – Depth of color in the image. This option can drastically affect the quality of recorded video. The default value is recommended.
Sharpness – Manage image texture, particularly visible in dark scenes. This option can drastically affect the quality of recorded video. The default value is recommended.
White Balance – White balance offsets unnatural color cast in images under different color temperatures and outputs images adjusted for light temperature.
Auto – The camera will automatically read the light and adjust white balance on its own.
Manual – Manually adjust Red Tint and Blue Tint until the image is corrected.
Restore Defaults – Click to restore default image settings.
Image Mirror – Display the image flipped on the vertical axis.
Image Flip – Display the image flipped on the horizontal axis.
Image Rotate – Rotate the camera image 0, 90, or 270 degrees.
Day / Night (IR Function) – Activate the camera IR (infrared) lights if available, for use with night-time recording.
Sensitivity – Adjust for external light conditions. This option affects the camera's ability to capture images in either low light or brightly-lit areas.
Exposure Settings
Measurement Window – Select Full Frame or Center to determine where the camera measures exposure.
Metering Mode – Choose between Auto, BLC (Backlight Compensation), or HLC (Highlight Compensation). Auto allows the camera to automatically adjust the exposure. BLC will over-expose the brighter areas of the image to expose the darker parts. HLC will dim exposure of brighter areas to provide a clearer image.
High Dynamic Range – Enhance details both in the foreground and background. Using this option results in improved video quality but increases recorded video file size.
3D Noise Reduction – Select Off, Low, Medium, or High to reduce the amount of image haze in low-light conditions.
Network
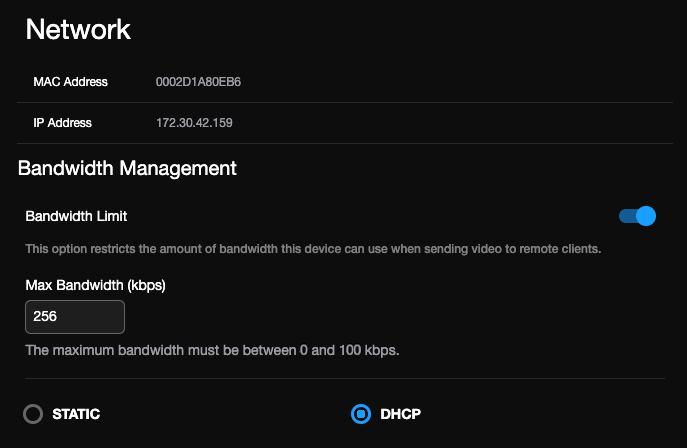
The Network tab lists the MAC Address and IP Address.
Bandwidth Management
Bandwidth Limit - This option restricts the amount of bandwidth this device can use when sending video to remote clients. The bandwidth displayed on the Network tab defaults between 0 and 100 kbps and can change depending on the value set for the device.
Static and DHCP
Set the cloud camera to either Static IP or Dynamic Host Configuration Protocol (DHCP).