System Design Tool
Create and save multiple designs to your account to revisit at a later time or export your design for a complete equipment list to use for onsite configuration. The ability to share your design directly with OpenEye makes quoting and new customer onboarding easier.
Channel Partners can create and save unlimited number of designs to access anytime and can configure cameras and recorders to meet their customers need by following the basic steps below. These designs stay with the company account (rather than the user) so they can be revisited and updated as needed.
Best Practices
- To quickly determine the estimated recorded days based on selected storage capacity or the amount of storage needed based on the number of desired recording days, we recommend choosing Third Party Hardware to design a system and determine storage requirements based on the number of cameras.
- Save a design titled “*Quick Calculator” to revisit the calculator quickly whenever needed.
- Select the Grant OpenEye access to this design option for the ability to send an automatic email to OpenEye Sales for a quote.
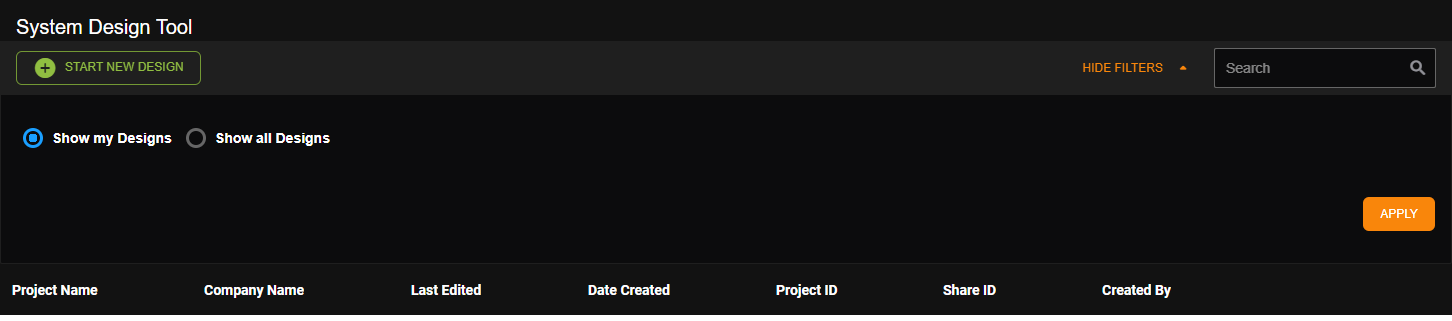
- Utilize the Show Filters button on the Project List page to select Show My Designs or Show All Designs saved to the Channel Partner Management Portal when searching for a saved design.
Start New Design
NOTE: To access the System Design Tool, Channel Partners must have the permissions enabled within Channel Partner Permissions. View the System Design Tool Permissions section for more details.
- Click Utilities in the top navigation bar.
- Choose System Design Tool from the dropdown menu.

NOTE: You can click Utilities on the navigation bar to go directly to System Design Tool.
- Click the Start a New Design button.
- Enter a Project Name and Description, and then choose an OWS License Type from the dropdown menu.

- Click the Create button.
- In the Overview tab enter/add Project Information, Customer Information and Project Requirements.
NOTE: The Grant OpenEye access to this design checkbox located under the Overview tab must be checked to request a quote. A Share ID is listed when enabled and this ID may be needed for OpenEye to locate your quote request later or provide the Share ID if assistance is needed with your design.

NOTE: The System Design Tool allows a user to select a recording device or choose a camera first; the sequence does not matter. However, if a recording device was chosen first and then deleted, another recording device would need to be selected before you are able to add a camera.
Add Cloud Camera
- Click on the Devices Tab.
- Click on Add Cloud Camera.

- Click on the desired camera from the device list.
NOTE: Check the box for Show discontinued devices to add previous models.

- Click the Next button.
- In the Add/Edit Device pop up box choose the Storage Capacity (GB) from the dropdown menu and set the Desired Recording Days.
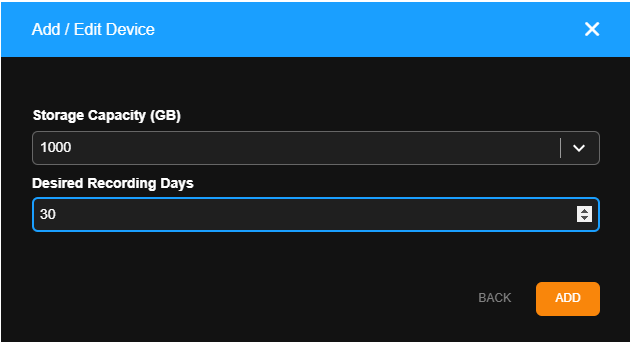
- Click the Add button.
It now shows up under the device list for easy access.
- Click the three dots and select Clone to add a duplicate model of a device to the project.

NOTE: You can customize the tables. See Table Functionality for more information.
Configure Cloud Camera

The System Design Tool allows you to further configure your cloud camera. The right sidebar displays the Camera Details which includes:
- Camera Name allows you to customize the cloud camera name.
- Quantity can be increased or decreased.
- Storage options include Storage Capacity (GB) and Desired Recording Days.
- Recording Options include Recording Mode, Audio Recording, Motion Level, and Hours of Motion.
- Stream details include Resolution, Bitrate and FPS.
Add Recording Device
NOTE: Devices can be added before a recorder by clicking Add Device. Recorder options will be filtered based on the device quantity and total throughput when devices are added to a design first. If starting with a recorder, follow the instructions below; if starting with devices, go to Add Device.
NOTE: Cloud Cameras do not require a recorder.

- Click on the Devices Tab.
- Click on Select Recording Device.
- Click on the desired recorder from the device list.
NOTE: Check the box for Show discontinued devices to add previous models.

- Click the Next button.
- In the Add/Edit Device pop up box choose the Storage Capacity (TB) from the dropdown menu and set the Desired Recording Days.

- Click the Add button.
It now shows up under the device list for easy access.
- Click the three dots and select Clone to add a duplicate model of a device to the project.

NOTE: Click on Add Cloud Camera to add different recorder models to the project.
NOTE: You can customize the tables. See Table Functionality for more information.
Configure Device

The System Design Tool allows you to further configure your device. The right sidebar displays the Device Details which includes:
- Change Model to select a different from the Add/Edit Device menu.
- OWS License Type dropdown allows you to select a different License Type.
- Device Name allows you to customize the recorder name.
- Storage options include Storage Capacity (TB) and Desired Recording Days.
- General options include Operating System and Upgrades.
- Analytics allows you to factor in analytics usage and estimate how many analytics each device can support in the system design.
NOTE: Analytics must be enabled on added IP cameras before analytic data usage is displayed on a device.
NOTE: Analytics will display total analytic data usage for the recording device as well as all added camera devices with analytics enabled.
NOTE: Click Clear All to remove all previous enabled analytic types associated with the device.
NOTE: Some features are dependent on license type.
Best Practice: To quickly determine the estimated recorded days based on selected storage capacity, or the amount of storage needed based on the number of desired recording days we recommend choosing “Third Party Hardware” to design a system and determine storage requirements based on the number of devices.
Add Device
- Under the desired recorder, click the Add Device button.

- Click on the desired device from the list.
- Click the Add button.

- Click the Clone button to add a duplicate model of a device to the project.

Configure Camera

The System Design Tool allows you to further configure your camera. The right sidebar displays the Camera Details which includes:
- Camera Name allows you to customize the camera name.
- Quantity can be increased or decreased.
- Recording Options include Recording Mode, Audio Recording, Motion Level, and Hours of Motion.
- Stream details include Resolution, Bitrate and FPS.
- Camera Settings include Number of Sensors, Codec and Compression.
- Analytics allows you to add analytics usage data to the System Design Tool.
For third party IP cameras and multi-sensor cameras, this includes:
- Stream details include Resolution, Bitrate and FPS.
- Select number of sensors.
- Enable smart compression, if applicable.
NOTE: Default frame rates for third party IP cameras are 15 FPS for Stream 1 and 10 FPS for Stream 2.
Add Accessories
After adding a camera to the System Design Tool, compatible accessories can be added to the camera by clicking Accessories above the Camera Details.

- Select the camera in the Devices list.
- Click Add Accessories.

- Set the quantity for the accessories to be added and then click Add.

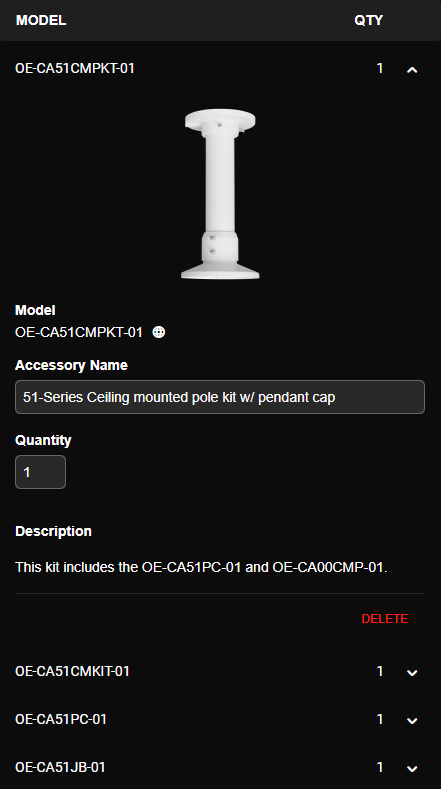
Added accessories will be displayed in a list:

NOTE: Click the minus icon  to remove an accessory.
Select an accessory to view details:
Configure Third Party IP Speaker

The System Design Tool allows you to further configure your Third Party IP Speaker. The right sidebar displays the Device Details which includes:
- Device Name allows you to customize the device name.
- Quantity can be increased or decreased.
- Recording Options include Recording Mode and Audio Recording.
Product Resources
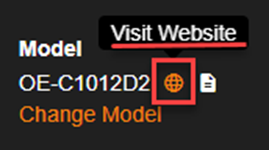
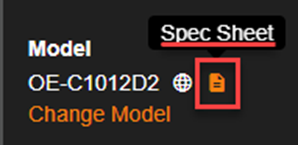
The System Design Tool includes helpful links that allows Channel Partners to have as much information at their fingertips as possible by including links to OpenEye’s website and Spec Sheets for specified equipment. Once selected, each product will display links to:
- Product Page on OpenEye.net.
- Product Spec Sheet.
- OWS Features Comparison Document (OWS Licensing).

Information and Error Icons
Information and error icons are provided to help Channel Partners know if any additional action items are needed before sending a request to OpenEye for a quote.
![]() When a required upgrade is added a blue information icon will appear and users can hover over the icon image to gather the needed information. Required upgrades include Channel Performance upgrades to support upgrading from Linux to Windows, or a specific channel count.
When a required upgrade is added a blue information icon will appear and users can hover over the icon image to gather the needed information. Required upgrades include Channel Performance upgrades to support upgrading from Linux to Windows, or a specific channel count.
![]() When an error has occurred a red error icon will appear, and users can hover over the icon image to gather the needed information.
When an error has occurred a red error icon will appear, and users can hover over the icon image to gather the needed information.
Quick Calculator
Channel Partners can leverage the System Design Tool to make estimations and quotes by being able to save, export and share their system designs. Use the quick calculator, request a quote, and even export an Excel document by following the easy steps below.
- Enter number of Desired Recording Days and/or
- Enter Storage Capacity (TB).
Change the number of desired recording days to see the required storage. Update the storage capacity to see the estimated recording days. It takes the last field entered and calculates the other field.
NOTE: Calculation is based on all cameras associated with the selected recorder.

Best Practice: Save a design titled “*Quick Calculator” to revisit quickly whenever needed.
Send to OpenEye
- Click on the Send to OpenEye button within the desired design to send an automatic email to OpenEye Sales for a quote. A pop-up box will appear if successful.
NOTE: The Grant OpenEye access to this design checkbox in the Overview tab must be marked to request a quote.
Export to XLSX
Click on the Export to XLSX button within desired Design to create the spreadsheet.

System Design information, including hardware Product Types, will automatically be filled into the relevant spreadsheet cells.

System Design Tool Permissions
The System Design Tool is only available to Channel Partner Users currently. It is not available to End Users (or within the Customer Accounts). Designs are saved to the Channel Partner Account so that they can be accessed by your team even if the Channel Partner user is no longer active. Choose Third Party Hardware to design a system and determine storage requirements based on the number of cameras.
- Click Management > User Management > User Groups.
- Choose the Channel Partner User Group you want to modify.
- Click Channel Partner Permissions.
- Check the System Design Tool.
The View All Designs option enables Users to view designs by all Users within the Channel Partner account.
