Channel Partner User Groups Permissions
Channel Partner accounts have an Administrator User Group created by default. These default groups cannot be edited, and it will be necessary to create a new User Group to customize permissions.
To view and make changes to a User Group (other than a default one), click Edit next to the desired User Group under the Management tab: Management > User Groups.
This section will review the different menus and settings for the new or selected Channel Partner User Group.
NOTE: Available permissions are dependent on licensing tier. See OWS Licensing FAQs for more information.
Table of Contents
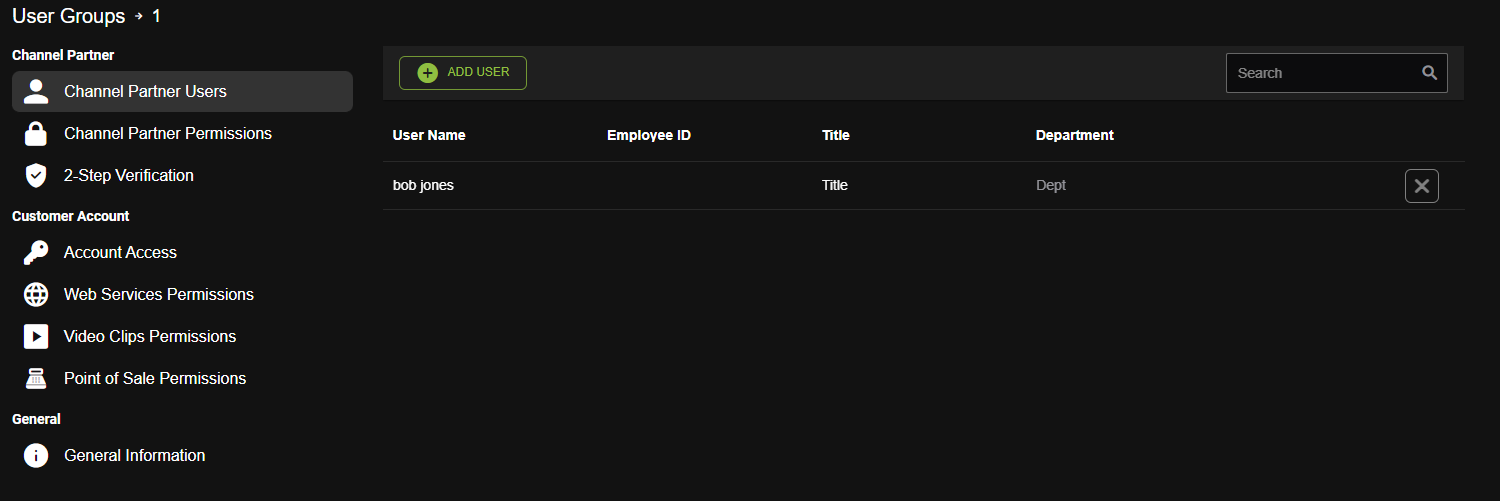
Channel Partner Users
Within this section, you can view Users in the User Group or add Users to the group by clicking Add User and checking the box next to each name to be included. Remove Users by clicking the X next to their names. Alternatively, select Enable Auto Include to include everyone; adding Users to a group in this manner automatically includes future users. See Add Users to a User Group for more information.
Channel Partner Permissions
Use the Channel Partner Permissions section to enable or disable channel partner user permissions for alerts, reports, licenses, and billing. Check the permissions you want to assign. Click Save after checking permissions.
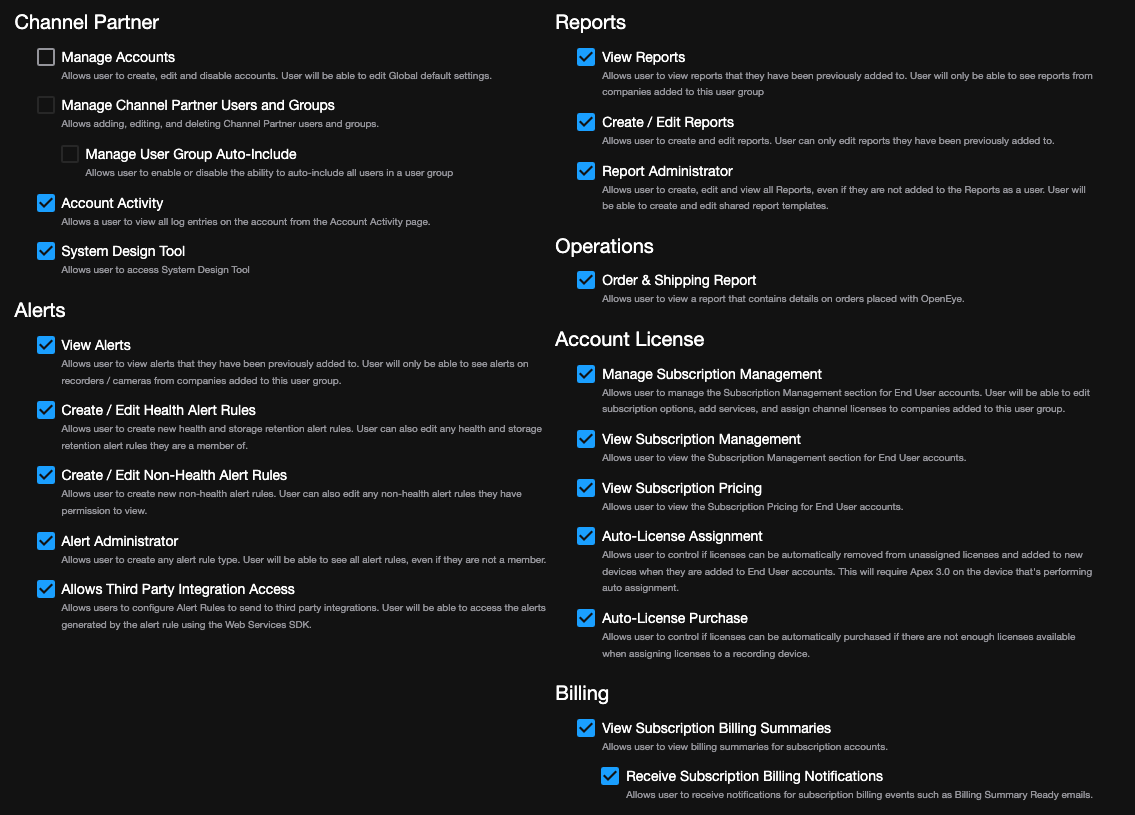
Channel Partner
Manage Accounts: Allows user to create, edit and disable accounts. User will be able to edit Global default settings.
Manage Channel Partner Users and Groups: Allows adding, editing, and deleting Channel Partner users and groups.
Manage User Group Auto Include: Allows user to enable or disable the ability to auto include all users in a user group.
Account Activity: Allows a user to view all activity entries on the account from the Account Activity page.
System Design Tool: Allows user to access System Design Tool.
View All Designs: View designs by all users.
Alerts
View Alerts: Allows user to view alerts that they have been previously added to. User will only be able to see alerts on recorders / cameras from companies added to this user group.
Create / Edit Health Alert Rules: Allows user to create new health and storage retention alert rules. User can also edit any health and storage retention alert rules they are a member of.
Create / Edit Non-Health Alert Rules: Allows user to create new non-health alert rules. User can also edit any non-health alert rules they have permission to view.
Alert Administrator: Allows user to create any alert rule type. User will be able to see all alert rules, even if they are not a member.
Allow Third Party Integration Access: Allows user to configure Alert Rules to send to third party integrations. User will be able to access to the alerts generated by the alert rule using the Web Services SDK.
Reports
View Reports: Allows user to view reports that they have been previously added to. User will only be able to see reports from companies added to this user group.
Create / Edit Reports: Allows user to create and edit reports. User can only edit reports they have been previously added to.
Report Administrator: Allows user to create, edit and view all Reports, even if they are not added to the Reports as a user. User will be able to create and edit shared report templates.
Operations
Order & Shipping Report: Allows user to view a report that contains details on orders placed with OpenEye.
Account License
Manage Subscription Management: Allows user to manage the Subscription Management section for End User accounts. User will be able to edit subscription options, add services, and assign channel licenses to companies added to this user group.
View Subscription Management: Allows user to view the Subscription Management section for End User account.
View Subscription Pricing: Allows user to view the Subscription Pricing for End User accounts.
Auto-License Assignment: Allows user to control if licenses can be automatically removed from unassigned licenses and added to new devices when they are added to End User accounts. This will require Apex 3.0 on the device that's performing auto assignment.
Auto-License Purchase: Allows user to control if licenses can be automatically purchased if there are not enough licenses available when assigning licenses to a recording devices.
Billing
View Subscription Billing Invoices: Allows user to view billing invoices for subscription accounts.
Receive Subscription Billing Notifications: Allows user to receive notifications for subscription billing events such as Invoice Ready emails.
Channel Partner 2-Step Verification

Enable 2-Step Verification
Using 2-step verification will help prevent unauthorized users from accessing an account with just a stolen password. When users sign in using a new device, 2-step verification will require them to enter both their password and a unique code that they receive on their phone.
2-step verification is highly recommended.
Select to Enable 2-Step Verification.
Once enabled, the User will be prompted to enter a phone number the next time they log in. This phone number will be used to send verification codes whenever the user logs in on a new device.
Force Disable 2-Step Verification Requirement
In some cases you may have users who are unable to use 2-Step Verification (users who don't have acces to a phone, etc.). When this happens, these users may need to be exempted from 2-Step Verification.
To exempt users from 2-step verification, follow these steps:
- Create a new user group (optionally called "2-Step opt out") and add the users who should be exempted.
- Enable the "Disable 2-Step Verification Requirement" option on this page.
It is not necessary to add additional permissions to this group if the users exist in other groups with these permissions already configured.
Account Access

Use this section to add or remove Customer Accounts to the User Group. All members of this User Group will have the ability to view and access all Customer Accounts added to this list. Customer Accounts not on this list will be invisible to members of this User Group.
- Click Add Account.
- Check the boxes next to each account to be included in the User Group. To include all existing and future accounts in the User Group, check the box Include all accounts in this User Group.
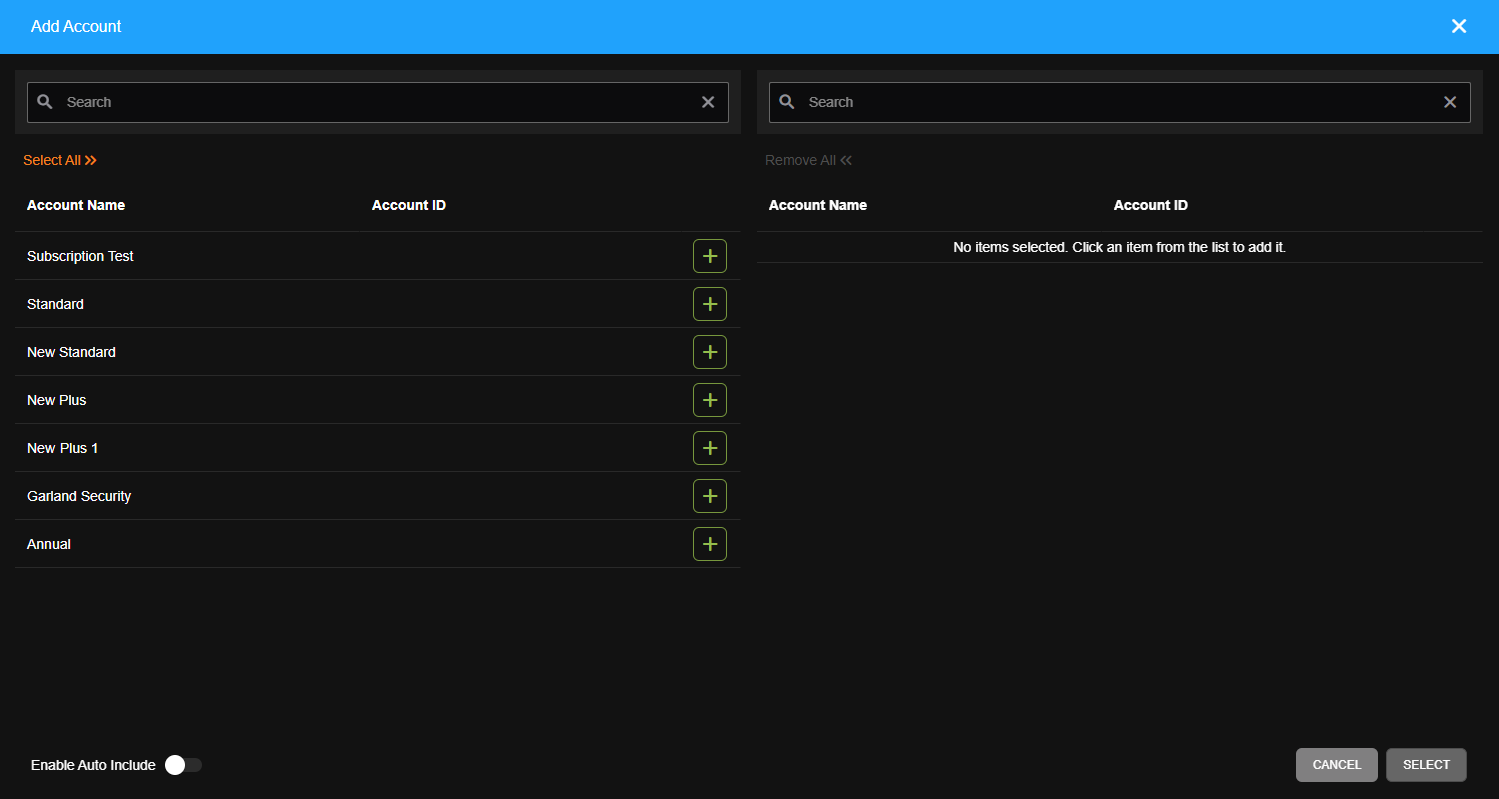
- Click Select when finished.

Web Services Permissions
Use the Web Services Permissions tab to enable or disable User Group permissions pertaining to managing Web Services settings for a location, managing other Users and User Group permissions, and alerts and reports. Under Management > User Groups > Web Services Permissions, check the permissions you want to assign to the User Group. Click Save after checking permissions.

Administrative Access
Allow complete access to all Web Services features and Locations registered to the account.

Web Services Portal
Allows users to log in to the Web Services Portal.

User and User Group Management
User and User Group Administrator: Allows user to add, edit, and delete User and User Groups.

Manage Users and User Groups: Allows users to add, modify, and delete Users and User Groups.
Manage Built-In User Groups: Allows user to view, add, and remove other users from the Built-In User Groups.
Manage Auto Include: Allows user to enable or disable the option to automatically include Locations, Location Groups, and Cameras in User Groups.
Manage Access by External IP Address: Allows users to modify the External IP Address settings.
Manage Non-Email User Accounts: Allows users to add, modify and delete non-email users.
Manage Locations and Location Groups
Location and Location Group Administrator: Grants full access to manage Locations and Location Groups.

Manage Locations and Location Groups: Allows users to add, modify, and delete devices, Locations, and Location Groups associated to this user group.
Location Arming: Enable Arming and Disarming of Locations.
Manage Devices
Device Administrator: Grants full access to all Manage Devices permissions.

Manage System Settings: Allows users to access and modify System Settings, Support Tools, Intrusion, Licensing, Macros, Network Configuration, Spot Monitor, Storage, and System Logs.
Access Power Options: Allows users to access all device power options.
Access Device Reset Options: Allows users to access device reset options.
Manage Camera Settings: Allows users to add and remove recorder-managed cameras, and configure settings for all cameras.
Set PTZ Presets: Allows users to access and manage PTZ presets.
Manage Software Updates: Allows users to perform manual software updates.
Manage Sensor / Relay Settings: Allows users to manage sensor and relay settings.
Alerts
Alert Administrator: Grants full access to View Alerts, Health Alert Rules, Non-Health Alert Rules, Configure Third Party Integration Access, and Configure Alert Rules to Activate Relays.

Configure Third Party Integration Access: Allows users to configure alerts to be sent to third party integrations and view the alerts generated by the alert rule using the Web Services SDK.
Reports
Report Administrator: Grants full access to manage View Reports and Manage Reports permissions.

View Reports: Allows users to view all reports for accounts added under Account Access tab. Users with this permission do not need to be added to the reports in these accounts.
Policies
Policies Administrator: Grants full access to manage all policy types.

Manage Settings Policies: Allows users to add, edit, and delete settings policies.
Client Access
Full Client Access: Grants full access to all Client Access permissions.
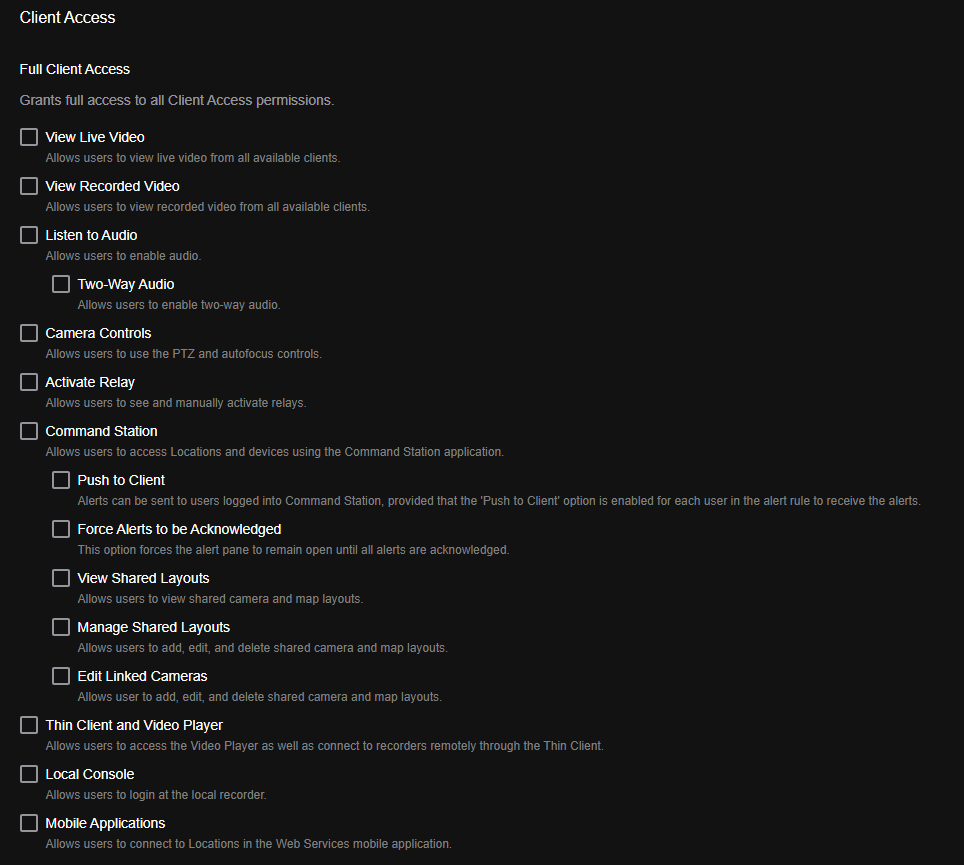
View Live Video: Allows users to view live video from all available clients.
View Recorded Video: Allows users to view recorded video from all available clients.
Listen to Audio: Allows users to enable audio.
Two-Way Audio: Allows users to enable two-way audio.
Camera Controls: Allows users to use the PTZ and autofocus controls.
Activate Relay: Allows users to see and manually activate relays.
Command Station: Allows users to access Locations and devices using the Command Station application.
Push to Client: Alerts can be sent to users logged into Command Station, provided that the 'Push the Client' option is enabled for each user in the alert rule to receive the alerts.
Force Alerts to be Acknowledged: This option forces the alert pane to remain open until all alerts are acknowledged.
View Shared Layouts: Allows users to view shared camera and map layouts.
Manage Shared Layouts: Allows users to add, edit, and delete shared camera and map layouts.
Edit Linked Cameras: Allows users to add, edit, and delete shared camera and map layouts.
Thin Client and Video Player: Allows users to access the Video Player as well as connect to recorders remotely through the Thin Client.
Local Console: Allows users to login at the local recorder.
Mobile Applications: Allows users to connect to Locations in the Web Services mobile application.
Video Player Maps
Video Player Maps Administrator: Grants full access to Video Player Maps.

View Maps: Allows a user to view Maps in the video player.
Restrict Access by External IP Address
Restrict Access by External IP Address: When enabled, Users in this user group will only be able to connect from the external IP Addresses added here.

Video Clip Permissions
Allows access to view and manage video clips uploaded by other Users, as well as Edit, Delete, Share or View Video Clips.

Export
Export Video Locally: Allows exporting or recorded video to a local storage location (USB, Disc, etc).
Export Video to Web Services: Allows exporting of recorded video to Web Services.
Management
View Any Video Clip: Allows access to view any video clip.
Edit Any Video Clip: Allows editing any video clip titles and notes.
Delete Any Video Clip: Allows permanently deleting any video clip.
View Video Clips Added by User: Allows access to view video clips added to the account by the user.
Edit Your Video Clips: Allows editing your video clip titles and notes.
Delete Your Video Clips: Allows permanently deleting your video clips.
View Clips Shared with User: Allows access to view video clips shared directly with the user.
Download Video Clips: Allows access to download video clips the user permission to view. Allows sharing to other users with Download option.
NOTE: Any new user groups that are created will have to enable the permissions to View Clips Shared with User and Download Video Clips. User groups created previous to July 17, 2024 will have these Permissions enabled by default.
NOTE: If a user doesn't have permission to download video clips, guest users they share video clips with will also be unable to download video clips.
Sharing
Share Video Clips: Allows email sharing of video clips.
Share With New Guest Accounts: Video clips can be shared with users who do not have Web Services accounts. Users without accounts will be given guest accounts.
Point of Sale Permissions
Allows users to configure options and search data for Point of Sale.

Configure Point of Sale Options: Allows user to manage Point of Sale options.
Search Point of Sale Data: Allows user to search Point of Sale data.
General Information
Use this section to edit the Name or Descriptions of the User Group, or to delete the group entirely. Deleting a group cannot be undone and will remove all users from the group.

Clone User Group
- Click Clone
 .
.

- Enter Name and Description.
NOTE: The cloned User Group must be given a unique name.
- Check which options from the original User Group you want to copy to the clone.
- Click Create.