Live View Menus
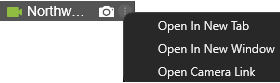
Camera Tile Right-Click Menu
Use the Camera Tile Right-Click Menu to manage individual camera tiles.
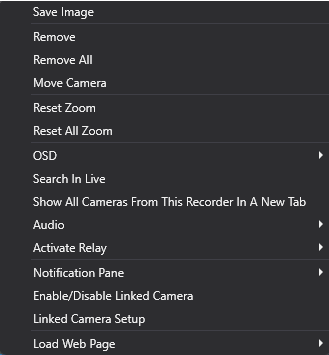
Save Image – Save the current image displayed on the selected Viewing Pane.
Move Camera – Move a camera when PTZ is enabled using point and click.
Remove – Remove a camera from the Viewing Pane.
Remove All – Remove all cameras from the Viewing Pane.
Reset Zoom – Reset the zoom to 0 in the camera tile.
Reset All Zoom – Reset the zoom in all camera tiles.
OSD (On-Screen-Display) – Display the On-Screen-Display options.
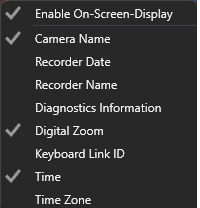
- Enable On-Screen-Display – Enable or disable On-Screen-Display.
- Camera Name – Display the camera name.
- Recorder Date – Display the recorder date.
- Recorder Name – Display the recorder name.
- Diagnostics Information – Display framerate, bitrate, resolutions, and video format.
- Digital Zoom – Display the digital zoom rate.
- Keyboard Link ID – Display the ID number for a keyboard linked to the camera.
- Time – Display the current time.
- Time Zone – Display the time zone of the recorder.
Search in Live – Display camera in Playback in Search in Live.
Enable PTZ Mode – Enable PTZ mode to control PTZ cameras.
Show all cameras from this Recorder in a new tab – Open a new tab with all cameras from a single recorder.
Audio – Mute audio.
Activate Relay – Activate Relay on selected camera.
360 View Mode – See 360° View in Command Station Desktop Client.
Notification Pane – Set Notification Pane, Clear Notification Pane or Clear All Notification Panes from the selected viewing pane.
Enable / Disable Linked Cameras – Enable or disable cameras linked to the selected camera.
Linked Camera Setup – Open a Linked Camera Setup tab for the selected camera.
Recorder Right-Click Menu
Use the Recorder Right-Click menu to manage recorders in the device list.
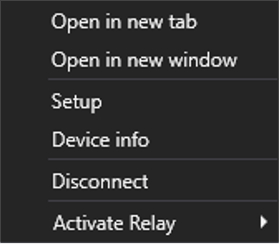
Open in new tab – Open the recorder in a new Command Station tab.
Open in new window – Open the recorder in a new Command Station window.
Setup – Open the recorder setup menu.
Device info – Display the device ID, connection type and version.
Connect / Disconnect – Connect or Disconnect from the recorder depending on the current state.
Activate Relay – Activate Relay between recorder and selected camera.
NOTE: The recorder right-click menu can also be accessed by clicking the three dots in the device list or on the lower right-hand corner of a video viewing pane.
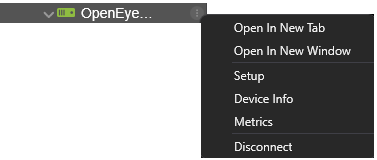
Camera Right-Click Menu
Use the Camera Right-Click menu to manage cameras in the device or Layouts list.
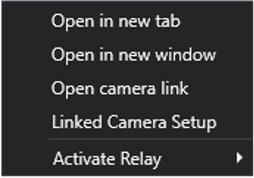
Open in new tab – Open camera tile in a new video view tab.
Open in new window – Open camera tile in a new window.
Open camera link – Open camera IP in a new window.
Linked Camera Setup – Open a Linked Camera Setup tab for the selected camera.
Activate Relay – Activate Relay for the selected camera.
NOTE: The camera right-click menu can also be accessed by clicking the three dots in the device list or on the lower right-hand corner of a video viewing pane.
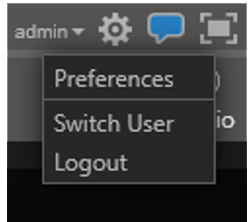
User Dropdown Menu
The User Dropdown Menu can be found alongside the settings button on the Live Screen. This menu displays Preferences, Switch User, and Logout.
-
In the Live Screen, click the expansion arrow next to the current User Login.
-
Select from the dropdown menu.