Export Functions
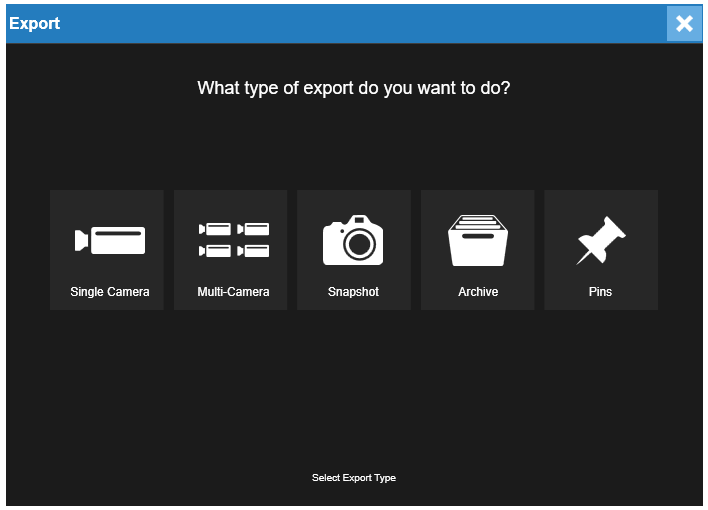
Export a Video Clip Locally
- In the Search screen, perform the desired Timeline search, and then click the Export button.
- Select the Single Camera export icon.
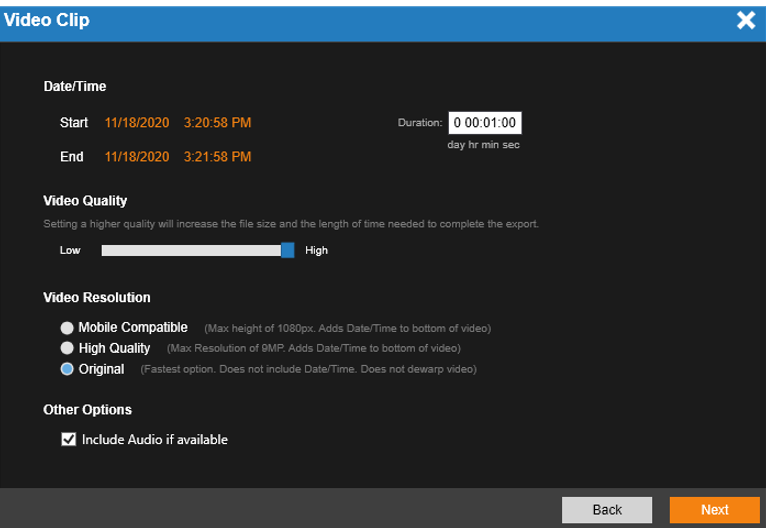
- Specify the length of clip with Start / End time or Duration.
- Specify the Video Quality and Video Resolution and then click Next.
NOTE: Larger Length of clip and higher Quality and Resolution will result in larger video files sizes.
- Select the Export Locally option and browse to the desired location, and then click Export.
NOTE: Locally exported video clips are saved in the My Videos folder by default as MP4 files.
NOTE: A maximum of four hours can be exported at one time.
Export Video Clips from Multiple Cameras
- In the Search screen, click Export.
- Click Multi-Camera, and then check the boxes for the desired cameras you wish to export.
- Click Next.
- Select the Start and End Date and Time or Duration, and then select the Video Quality and Video Resolution.
- Click Next.
- Choose Export to Web Services or Export Locally.
NOTE: If you choose to Export to Web Services, give the export file a Title and Description. If you choose Export Locally, designate the location for the export file to save.
- Click Export.
NOTE: All active cameras will display in the Multi-Camera export list. You are able to export multiple cameras from multiple DVRs at once.
Export an Image Locally
- In the Search screen, perform the desired Timeline Search or narrow Thumbnail Search.
- Click Export.
- Click Snapshot in the Export window.
- Click the folder button and then specify a local file save location.
- Click Export.
NOTE: Locally exported images are saved in the My Pictures folder as JPEG files.
Create an Archive
The Archives function exports up to 24 hours of data in the native format.
- Add cameras to the search Grid.
- Click the Export button and select the Archive option.
- Check the cameras listed and click Next.
- Set the Start & End Date/Time or Duration and click Next.
- Chose the local or network location by clicking the folder icon and click Export.
View an Archive
The Archive function displays video in the native format one recorder at a time.
- In timeline search or the standalone viewer click the LOAD option.
- Navigate to the archive var file, select the file and click Open.
NOTE: The stand-alone archive viewer will automatically load the latest var file if located in the same directory.
Export from an Archive
Video Clip
The Archive Viewer supports exporting single camera MP4s locally.
- In the Search screen, perform the desired Timeline search, and then click the Export button.
- Select the Single Camera export icon.
- Specify the Start / End time and Video Quality, and then click Next.
- Select the Export Locally option and browse to the desired lcoation, and then clikc Export.
Snapshot
The Archive Viewer supports exporting snapshots locally.
- In the Search screen, perform the desired Timeline search or narrow a Thumbnail search.
- Click Export.
- Click Snapshot in the Export window.
- Click the folder button and then specify a local file save location.
- Click Export.
Create and Export Pins
- In the Search screen, perform the desired Timeline search.
- Click in the Export Bar at the desired start time, and then drag to the desired end time.
- Right click in the Export Bar to Create Export Pin.
- Assign the Pin Group and name the New Export Pin and click Create Export Pin.
- Repeat Steps 1-4 until all desired export pins have been created.
- Click the Export Button.
- Select Pins.
- In Pins Manager check the Group or Videos to export.
- Click Export.
- Adjust Video Quality, Video Resolution and audio under Other Options, then click Next.
- Choose either Export To Web Services or Export to Local / Network Location and click Export.
NOTE: Click on the last pin created and select Clear All Export Pins to delete all. Select the X to clear the last pin from the timeline.
Export Video Without OSD
Video can be exported without the On-Screen Display information.
- In the Search screen, perform the desired Timeline search, and then click the Export button.
- Select the Single Camera or Multi-Camera export icon.
- Specify the Start / End time and Video Quality.
- Check Original under Video Resolution.
- Click Next.
- Choose Export to Web Services or Export Locally.
- Click Export.
Optional Release Export
NOTE: Some Export options in Command Station are only available as an Optional Release. For more information, see Account Options.

- In the Search screen, perform the desired Timeline search, and then click the Export button.
- Select the Single Camera export icon.
- Specify the length of clip with Start / End or Duration.
- Specify the Video Quality.
- Specify the Video Resolution:
- Original: Fast option. Does not include date/time and does not dewarp video.
- High Quality: Takes longer. Max Resolution of 9MP and adds date/time to bottom of video.
- Medium Quality: Takes longer. Max resolution of 2MP and adds date/time to bottom of video.
- Export to Web Services or Locally:
- To export to the OWS Cloud Portal, select Export to Web Services and enter a Title and Public Note.
- To export locally, select Export to Local / Network Location, then Select Destination Folder and Filename.

- Add Users by entering email addresses. If an account doesn't exist, the user will be emailed a guest account invitation.
- Select additional options to Set Expiration Date, Allow user to download video clip, or Add text to be included with email (optional).

- Click Export.