OE-C8312P2 Quick Start Guide
OE-C8312P2 Quick Start Guide
Click the link if you need to download the original hardcopy of the OE-C8312P2 Quick Start Guide included with the boxed contents.
Box Contents
OpenEye C8312P2 cameras come with security screws, threaded pendant mount, threaded mount adapter, security torx tool, 3-pin power terminal block, and 14-pin alarm I/O terminal block. Identify the following components to make sure everything has been properly included with your new recorder. If any of the following items are missing, contact the dealer to arrange a replacement.
|
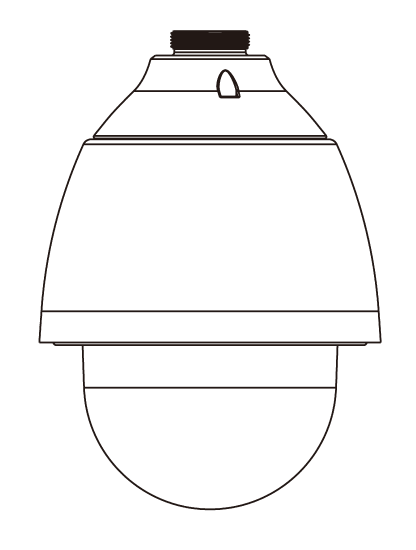
OE-C8312P2 PTZ Camera |
M4 x 8mm Security Screw with Rubber |
|
Threaded Pendant Mount |
Threaded Mount Adapter |
|
Security Torx Tool |
3-Pin Power Terminal Block (AC 24V Use) |
|
14-Pin Alarm I/O Terminal Block |


Connections

| 1 | RJ-45 Port | For network and PoE+ connections | |
| 2 | Power Connector (AC24V) | AC24V power connection | |
| 3 | Alarm I/O & RS-485 Connector | Alarm I/O & RS-485 connection | NOTE: Do NOT connect external power supply to the alarm I/O connector of the camera. |
| 4 | Reset Button | Press the button with a proper tool for at least 20 seconds to restore the system. | |
| 5 | SD Card Slot | Open the dome cover to reveal the SD Card Slot. Insert the SD card into the card slot to store videos and snapshots. Do not remove the SD card when the camera is powered on. | |
Power Connection
To power up the camera, connect the AC24V power adaptor to the power connector of the camera and the power outlet. Refer to the diagram and pin definition below for AC24V power connection.

| 1 | AC24V L |
| 2 | GND |
| 3 | AC24V N |
Alarm I/O Connection
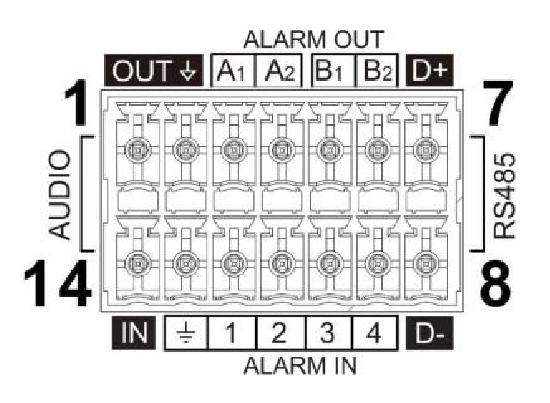
| 1 | Audio Out | 8 | RS-458 D- |
| 2 | GND (Audio I/O) | 9 | Alarm In 4 |
| 3 | Alarm Out A1 | 10 | Alarm In 3 |
| 4 | Alarm Out A2 | 11 | Alarm In 2 |
| 5 | Alarm Out B1 | 12 | Alarm In 1 |
| 6 | Alarm Out B2 | 13 | GND (Alarm I/O & RS-485) |
| 7 | RS-458 D+ | 14 | Audio In |
Product Features
Cameras
| Maximum Resolution | 1920x1080 |
| Frame Rate at Maximum Resolution | 30FPS @ 1920x1080 |
| Configurable Video Profiles | Main Profile, High Profile |
| ONVIF® | Profile S/G/T Compliant |
| Day/Night | True Day/NIght with IR-Cut Filter |
| Image Rotation | 180° |
| Audio In/Out | 1 - Line In / 1 - Line Out | Built-in Mic |
| Two-Way Audio | Yes |
Environmental and Power
| Power Consumption | Max 29.04W (w/ heater) |
| Input Voltage | 24vAC/PoE+ |
| Pan/Tilt/Rotate |
Pan: 0° ~ 360° (Endless) Tilt: -10° ~ -100° |
| Ingress Protection | IP66 |
| Impact Rating | IK10 |