Timeline Search in the Legacy Web Client
NOTE: The following information is for Timeline Search available after connecting to a recorder via Web Connect (or the Apex Web Client). View search details here for the Cloud Video Player under the Video tab in OWS.
Timeline Search
Timeline Search narrows searches to a specific day and time. In Timeline Search, continuous recording without an event is represented by dark blue lines on the timeline bar, and Motion events are represented by light blue lines. Continuous recording while collecting motion event data is represented by a solid gray bar. The video from the selected date and time is playable in the camera tile.
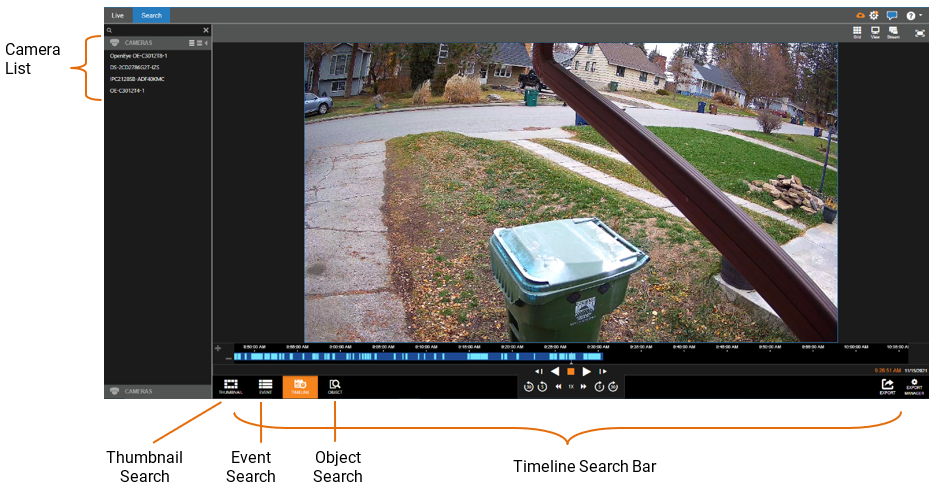
Timeline Search Bar Playback Controls
NOTE: The example Timeline Search Bar shows recorded video that is based on Continuous + Motion recording, meaning the higher resolution motion video is only recorded when a motion event is triggered. This results in video automatically switching between the lower resolution and higher resolution video. Motion video is shown in light blue, and non-motion video is shown in dark blue. See Recording Motion for more details.
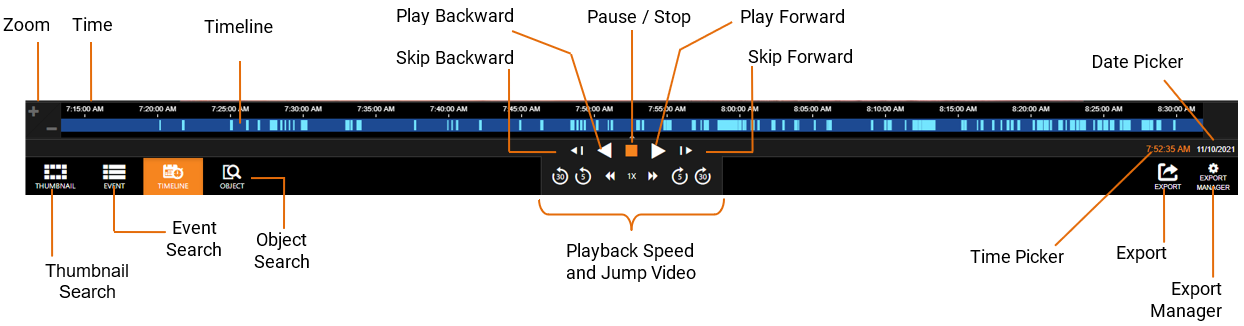
Playback Controls
Zoom – Zoom in and out to adjust the time range and timeline.
Timeline – Continuous recording is represented by dark blue lines on the Timeline Search bar, with light blue lines on the Timeline Search bar representing Motion events.
NOTE: If only motion events are collected on the recorder, they will display on the timeline as light grey.
The colors displayed on the timeline bar include:
- Dark Blue = Continuous recorded video
- In most cases this is a lower resolution and frame rate
- Light Blue = Motion / Event footage
- In most cases higher resolution and frame rate
- Light Grey = Motion / Event footage only
- In most cases higher resolution and frame rate
Skip Backward – Move to the previous frame of recorded video.
Play Backward – Play recorded video backward. Pause / Stop – Pause / Stop video playback.
Pause / Stop - Pause / Stop video playback.
Play Forward – Play recorded video forward.
Skip Forward – Move to the next frame of recorded video.
Playback Speed – Control the speed of video playback.
Jump Video – Jump video backward and forward in 30 second and 5 second intervals.
Timeline Previewer – Hovering over the timeline will show a preview of the recorded video.
Export – Export recorded video as seen in the current search playback.
Export Manager – Manage and search exported videos.
Date and Time Picker – Use to designate a date and time to search recorded video.
Perform a Timeline Search
1. Customize the camera tile grid in the Search Screen Viewing Pane if desired. See details below.
2. Select a Date (and time) from the Timeline Search Date (and Time) Picker by clicking on the date (and time) on the right side of the timeline bar:
On the Thumbnail Search Bar, click the Timeline Search Date (or Time) Picker.
Select the desired Date (and specific time), and then the timeline will update automatically.
3. Use the Play/Pause, Stop, Play Forward/Backward, and Skip Forward/Backward playback controls to control video playback during the search.
Perform a Date/Time Search
1. Customize the camera tile grid in the Search Screen Viewing Pane if desired. See details below.
2. In the Search Screen, click the Date / Time Picker.
3. Select a date from the calendar, and then designate a time if desired.
4. Click Select.
5. Click Play.
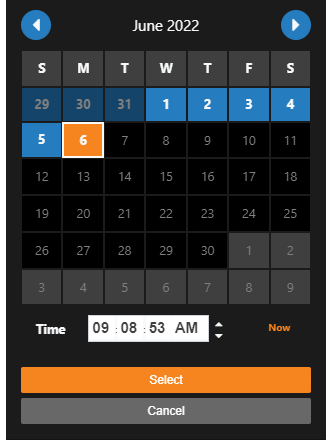
NOTE: To automatically update the Time, click Now. To automatically exit the Date/Time Search, click Cancel.
NOTE: Days with recorded video available to search will be highlighted in blue.