Event Search in the Video Player
Access Search through the Video Player
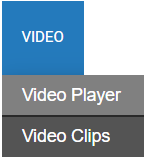
To access the Cloud Web Client, click the Video tab > Video Player within the OWS Cloud Portal.
NOTE: Connecting to the OWS Video Player via the CONNECT button will display a dynamic camera grid based on the number of cameras associated with the location. The selected location will also display in the search filter. Clear the filter to view all locations:
- 10+ cameras = 4x4 grid
- 5-9 cameras = 3x3 grid
- 3-4 cameras = 2x2 grid
- 1-2 cameras = 1x2 grid
- 1 camera = 1x1 grid
In the OpenEye Web Services (OWS) Video Player, click Search 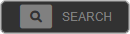
NOTE: Any recorders or cameras currently in view in the Video Player will be automatically included in the Event Search Filters.
Types of Event Search
Click the the search type you want to perform on the displayed video panes:
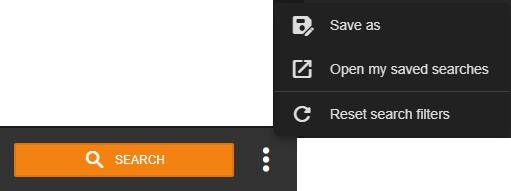
NOTE: Click the three dots to see more Event Search types.
![]()
- Person
- Vehicle
- License Plate (LPR - License Plate Recognition)
- Analytics
- Point of Sale (POS)
- Motion
- Sensor
- Access Control
- Intrusion
Person
Click on Person  to search person detection events.
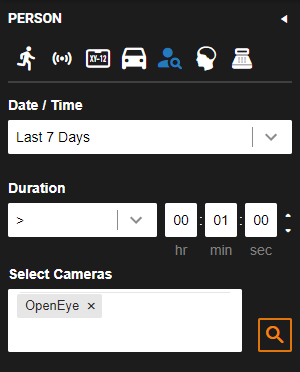
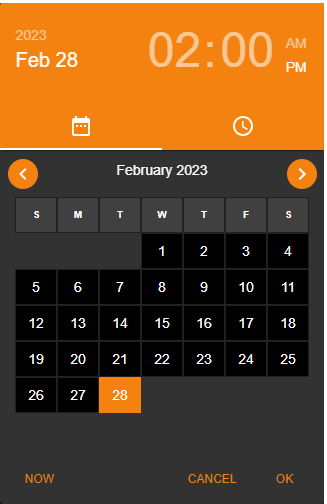
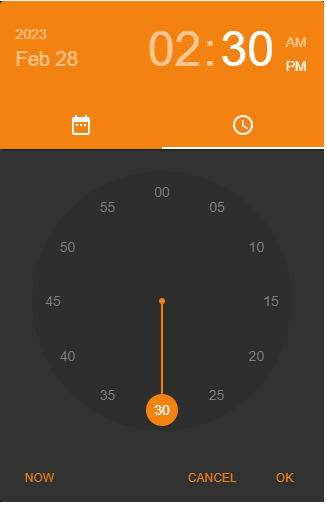
- Select a Date / Time from the dropdown. If you select Custom Range, enter a Start Date / Time and End Date / Time in the fields, or click the calendar
 and set Start and End Date / Time.
 - From the Duration dropdown, select greater than > or less than <
- Enter numerical values for hr : min : sec or click the up and down arrows to increase or decrease the Duration.

- Select Cameras from the dropdown or click Search Cameras
 to select from a list of cameras.
NOTE: If you don't see your camera on the list, enable Show All Cameras. 
- Click Search to to display the list of Events that match the search criteria. Click Reset search filters to start over with a new search.

Vehicle
Click on Vehicle  to search vehicle detection events.
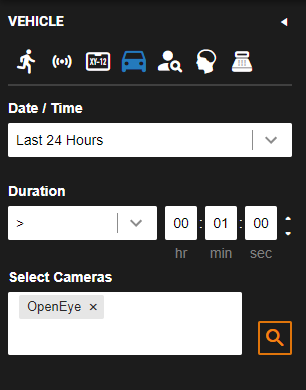
- Select a Date / Time from the dropdown. If you select Custom Range, enter a Start Date / Time and End Date / Time in the fields, or click the calendar and set Start and End Date / Time.
- From the Duration dropdown, select greater than > or less than <
- Enter numerical values for hr : min : sec or click the up and down arrows to increase or decrease the Duration.
- Select Cameras from the dropdown or click Search Cameras to select from a list of cameras.
NOTE: If you don't see your camera on the list, enable Show All Cameras.
- Click Search to to display the list of Events that match the search criteria. Click Reset search filters to start over with a new search.
License Plate (LPR - License Plate Recognition)
Click on License Plate  to search video for LPR events.
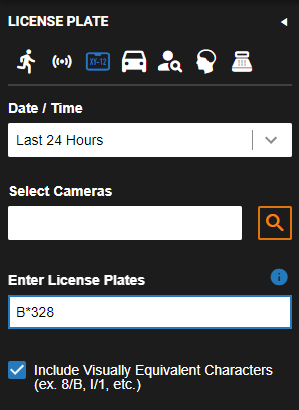
- Select a Date / Time from the dropdown. If you select Custom Range, enter a Start Date / Time and End Date / Time in the fields, or click the calendar and set Start and End Date / Time.
- Select Cameras from the dropdown or click Search Cameras to select from a list of cameras.
NOTE: By default, only cameras that support LPR events will be displayed. If you don't see your camera on the list, enable Show All Cameras.
- Enter License Plates numbers to search license plates that match the letters and numbers entered into the field.
- Check Include Visually Equivalent Characters to include results with plate numbers and letters that are close in appearance.
NOTE: More than one license plate number can be entered. Separate each entry with a comma. Up to 100 plate numbers can be entered.
NOTE: Add a Wildcard asterisk (*) to a license plate to return specific results.
Examples:
WH89K* will return all license plates that start with WH89K
WH*KR will return all license plates that start with WH and end with KR
W*MK* will return all license plates that start with W and contain MK
- Click Search to to display the list of Events that match the search criteria. Click Reset search filters to start over with a new search.
Analytics
Click on Analytics  to search person Line Crossed, Fog / Smoke, Camera Tampering, Mask Detected, Queue, and Scenario events.
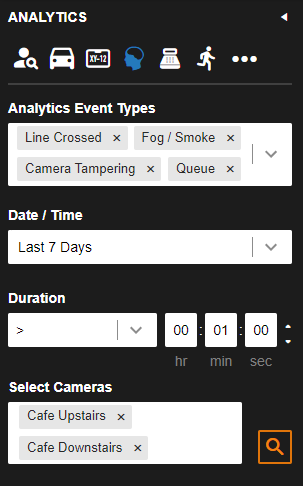
- Select one or more of the Analytics Event Types: Line Crossed, Fog / Smoke, Camera Tampering, Mask Detected, Queue, and Scenario.
- Select a Date / Time from the dropdown. If you select Custom Range, enter a Start Date / Time and End Date / Time in the fields, or click the calendar and set Start and End Date / Time.
- From the Duration dropdown, select greater than > or less than <
- Enter numerical values for hr : min : sec or click the up and down arrows to increase or decrease the Duration.
- Select Cameras from the dropdown or click Search Cameras to select from a list of cameras.
NOTE: If you don't see your camera on the list, enable Show All Cameras.
- Click Search to to display the list of Events that match the search criteria. Click Reset search filters to start over with a new search.
Point of Sale (POS)
Click on POS  to search video for Point of Sale events.
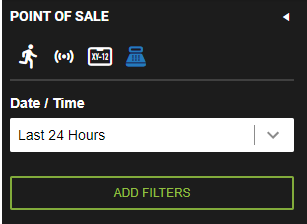
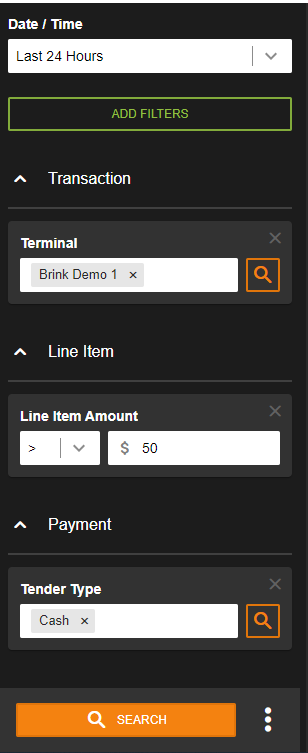
- Select a Date / Time from the dropdown. If you select Custom Range, enter a Start Date / Time and End Date / Time in the fields, or click the calendar and set Start and End Date / Time.
- Click Add Filters to add POS search criteria.
- Select which filters to apply to the search. More than one filter can be chosen.
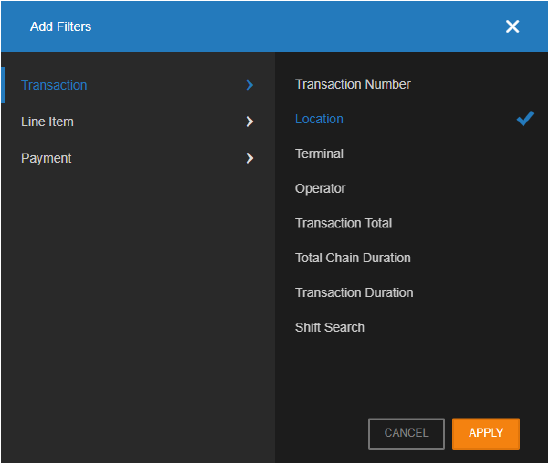

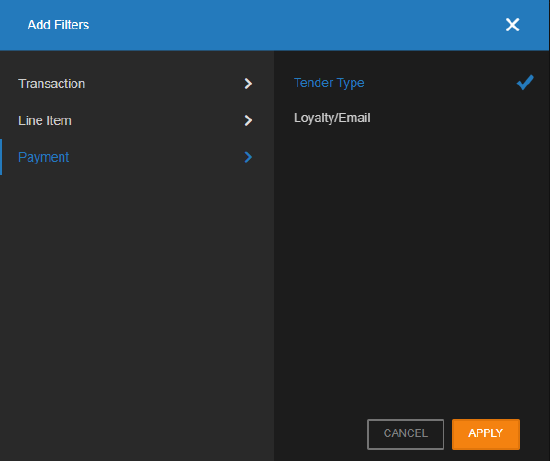
- Click Apply.
- Use the fields and dropdowns in the selected fields to set search criteria.
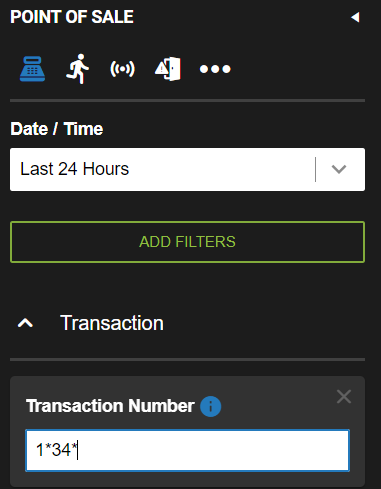
NOTE: Add a Wildcard asterisk (*) to a transaction number to return specific results.
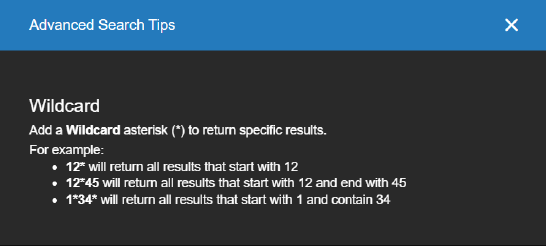
Examples:
12* will return all results that start with 12
12*45 will return all results that start with 12 and end with 45
1*34* will return all results that start with 1 and contain 34
- Click Search to to display the list of Events that match the search criteria. Click Reset search filters to start over with a new search.
NOTE: Filters are not limited to being selected once per search. For example, two different Line Item Amount filters could be applied to the same search. The exception is Location, which can only be selected once per search.
Point of Sale (POS) Saved Search
Save as
Users can save search criteria to quickly audit for the sales and operations metrics that matter most to their business. Saved searches are not sharable at this time; they are only available to the user that created them.
- After creating a POS event search, click on the three dots
 next to the Search button.
- Click Save as.
- Name your search and Choose a folder to save the search in.
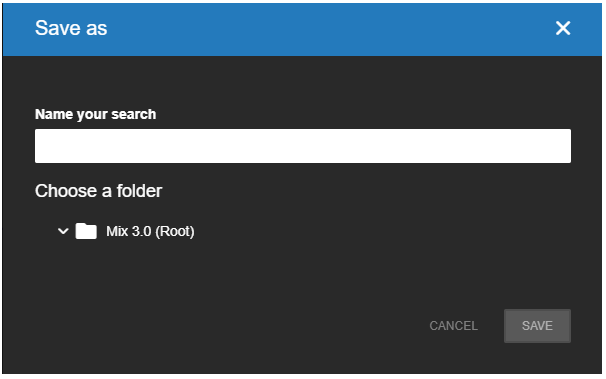
- Click Save.
Open my saved searches
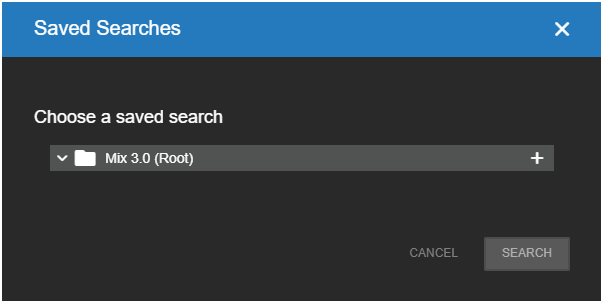
- After creating and saving an event search, click on the three dots next to the Search button.
- Click Open my saved searches.
- Choose a saved search from your folder directory.

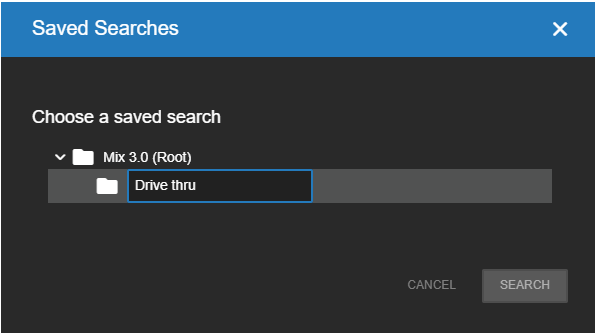
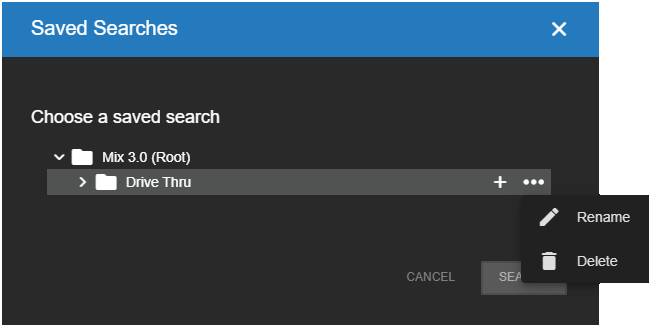
Create a saved search folder
- Select your root folder and click +.
- Enter a name for the new folder.
- After creating a new folder, you can click on the three dots to Rename or Delete it.
Export embedded POS Data
After performing a POS Event Search, you can embed ticket data to display with the exported video playback.
- Click Export
 from the Search or Details screen.
 - Choose export type.
- Check the POS export types:
- Include Point of Sale data (if available): Only applies if exporting to Web Services. When viewing the exported video clip in Video > Video Clips, the point of sale data will display on the right-hand side pane under the player.
- Embed Point of Sale data onto video (if available): Not available when exporting using 'Original' resolution. Playback of the video clip in an external video player will display the POS data within the video.
- Include the receipt in a separate txt file: Only applies if exporting to our local computer. POS data is downloaded in a separate text file.
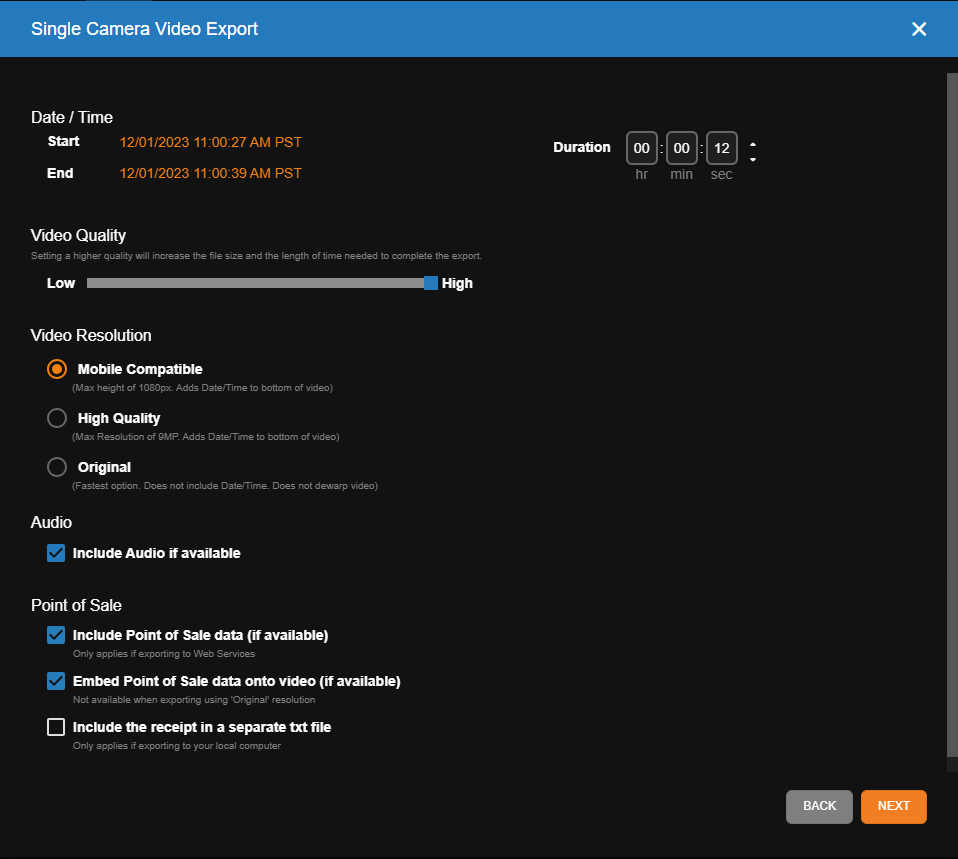
- Choose export destination, name the video, and share with users.
- Select Export. See Export and Clip Sharing from the Video Player for more information.
Motion
Click on Motion  to search video for motion events.
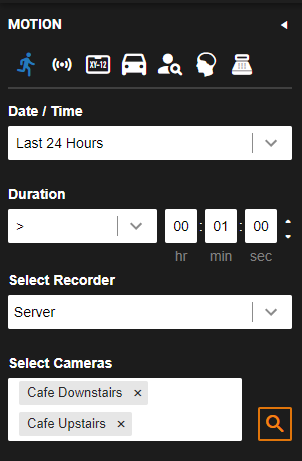
- Select a Date / Time from the dropdown. If you select Custom Range, enter a Start Date / Time and End Date / Time in the fields, or click the calendar and set Start and End Date / Time.
- From the Duration dropdown, select greater than > or less than <
- Enter numerical values for hr : min : sec or click the up and down arrows to increase or decrease the Duration.
- Select Recorder from the dropdown.
- Select Cameras from the dropdown or click Search Cameras to select from a list of cameras.
- Click Search to to display the list of Events that match the search criteria. Click Reset search filters to start over with a new search.
Sensor
Click on Sensor  to search video for sensor events.
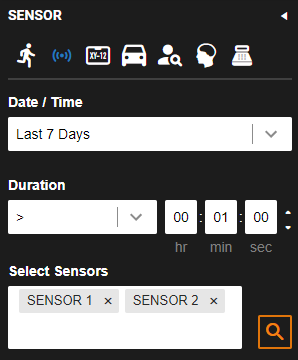
- Select a Date / Time from the dropdown. If you select Custom Range, enter a Start Date / Time and End Date / Time in the fields, or click the calendar and set Start and End Date / Time.
- From the Duration dropdown, select greater than > or less than <
- Enter numerical values for hr : min : sec or click the up and down arrows to increase or decrease the Duration.
- Select Sensors from the dropdown or click Search Sensors to select from a list of sensors.
NOTE: Enable Include Out of Service Sensors to display all sensors in the list. 
- Click Search to to display the list of Events that match the search criteria. Click Reset search filters to start over with a new search.
Access Control
Click on Access Control ![]() to search for Access Denied to Area not Exited, Access Denied to Area Outside Schedule, Door Held Open, Door Opened, Access Denied to Unauthorized Area, Access Denied to Armed Area, Access Denied to Door, or Door Forced Open.
to search for Access Denied to Area not Exited, Access Denied to Area Outside Schedule, Door Held Open, Door Opened, Access Denied to Unauthorized Area, Access Denied to Armed Area, Access Denied to Door, or Door Forced Open.
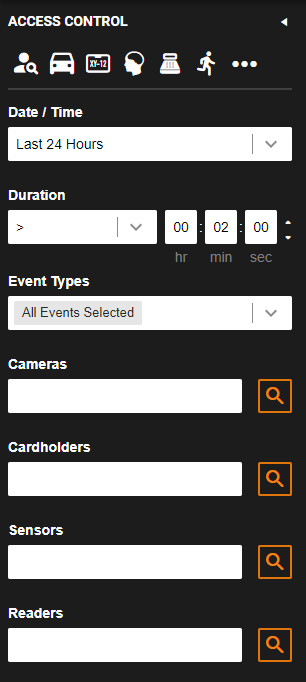
- Select a Date / Time from the dropdown. If you select Custom Range, enter a Start Date / Time and End Date / Time in the fields, or click the calendar and set Start and End Date / Time.
- From the Duration dropdown, select greater than > or less than <
- Enter numerical values for hr : min : sec or click the up and down arrows to increase or decrease the Duration.
- Select one or more of the Event Types: All Events Selected, Access Denied to Area not Exited, Access Denied to Area Outside Schedule, Door Held Open, Door Opened, Access Denied to Unauthorized Area, Access Denied to Armed Area, Access Denied to Door, or Door Forced Open.
- Select Cameras from the dropdown or click Search Cameras to select from a list of cameras.
NOTE: By default, only cameras that support Analytics events will be displayed. If you don't see your camera on the list, enable Show All Cameras.
- Select Cardholders from the dropdown or click Search Cardholders to select from a list of cardholders.
Select Sensors from the dropdown or click Search Sensors
to select from a list of sensors.- Select Readers from the dropdown or click Search Readers to select from a list of readers.
- Click Search to to display the list of Events that match the search criteria. Click Reset search filters to start over with a new search.
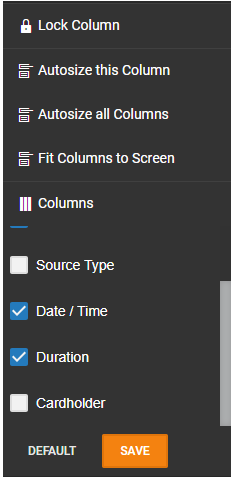
NOTE: Search Results for Access Control event types can display additional Cardholder and Source columns by clicking on the three dots  next to a column header and clicking Columns, and then checking Source Type and Cardholder. See Table Functionality for more information on customizing tables.
Intrusion
Click on Intrusion ![]() to search video for Intrusion Sensor and Sensor Activated events.
to search video for Intrusion Sensor and Sensor Activated events.
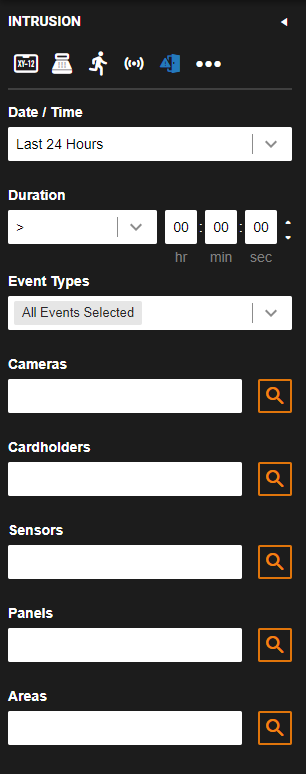
- Select a Date / Time from the dropdown. If you select Custom Range, enter a Start Date / Time and End Date / Time in the fields, or click the calendar and set Start and End Date / Time.
- From the Duration dropdown, select greater than > or less than <
- Enter numerical values for hr : min : sec or click the up and down arrows to increase or decrease the Duration.
- Select one or more of the Event Types: All Events Selected, Intrusion Sensor, and Sensor Activated.
- Select Cameras from the dropdown or click Search Cameras to select from a list of cameras.
NOTE: By default, only cameras that support Analytics events will be displayed. If you don't see your camera on the list, enable Show All Cameras.
- Select Cardholders from the dropdown or click Search Cardholders to select from a list of cardholders.
- to select from a list of sensors.
- Select Panels from the dropdown or click Search Panels to select from a list of panels.
- Select Areas from the dropdown or click Search Areas to select from a list of areas.
- Click Search to to display the list of Events that match the search criteria. Click Reset search filters to start over with a new search.
NOTE: Search Results for Intrusion event types can display additional Cardholder and Source columns by clicking on the three dots next to a column header and clicking Columns, and then checking Source Type and Cardholder. See Table Functionality for more information on customizing tables.
Search Results
A list of results that match the search criteria will be displayed. Video with playback is displayed in Details to the right of the list.
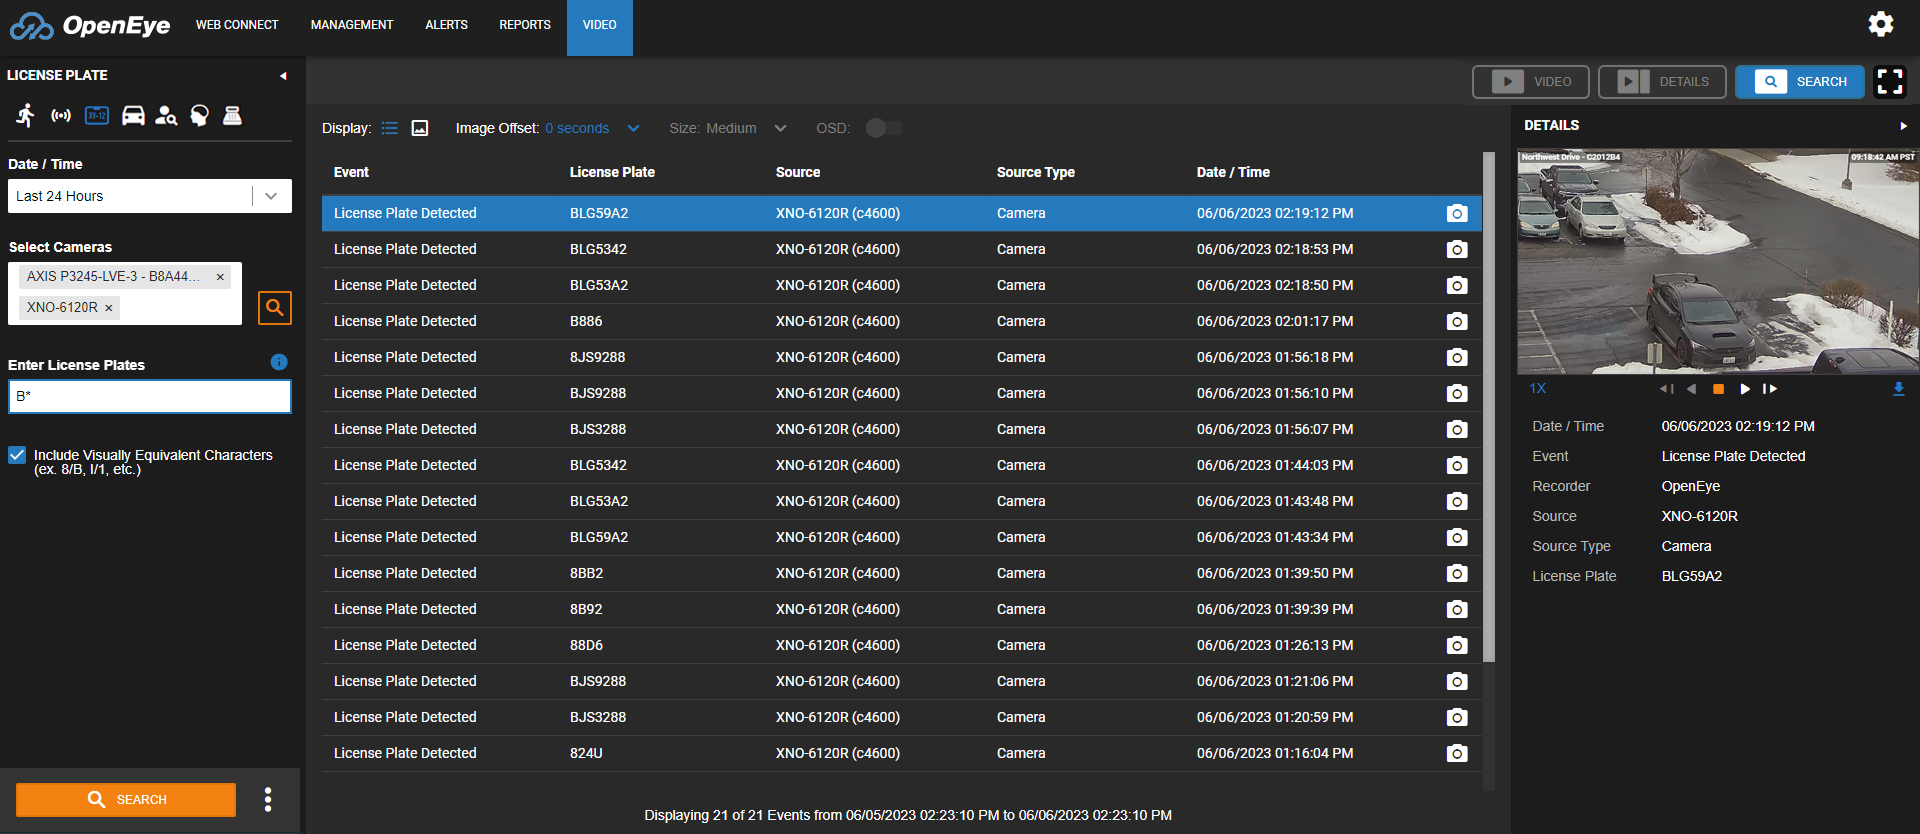
Hover over the camera icon ![]() to view a thumbnail of the clip.
to view a thumbnail of the clip.
Click on the thumbnail Display to view the search results list as thumbnails. 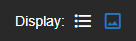
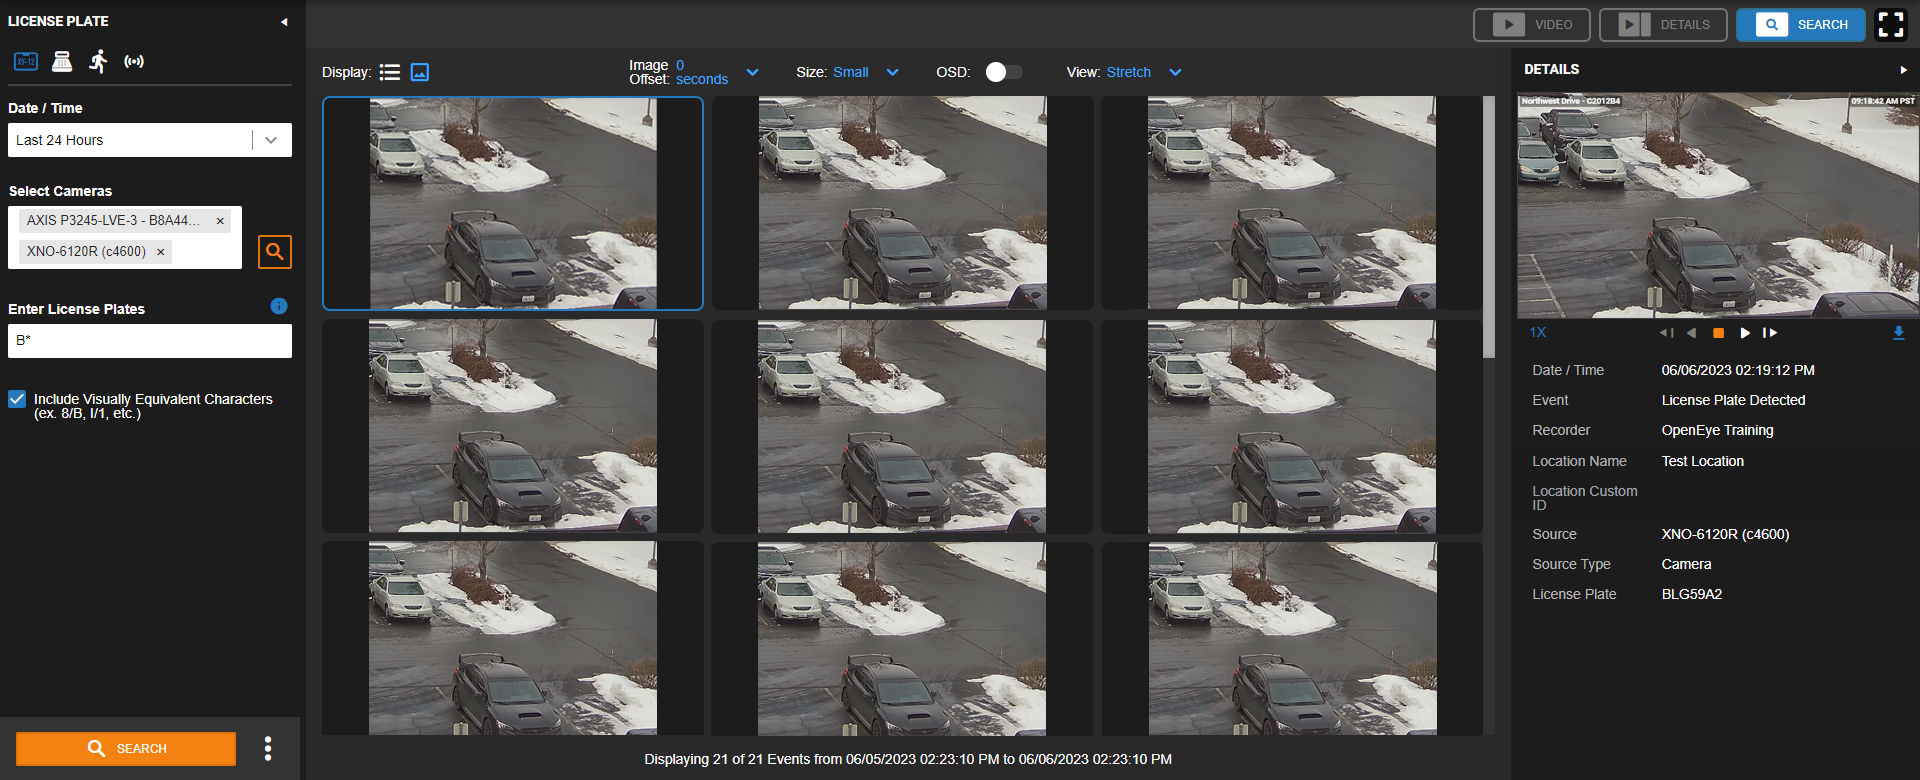
Thumbnail Search Options

- Image Offset: Changes the image offset of the thumbnail images in a range between -4 seconds to 4 seconds.
- Size: Use the Size dropdown to adjust the size of the thumbnail images to Small, Medium, or Large.
- OSD: Select OSD to display the On-Screen Display on the thumbnail images.
NOTE: To view recorded video or listen to recorded audio on a search result, select the clip and click the Video tab.